
Creating a Shopify store is the first step on the path to online success for many entrepreneurs. Shopify’s intuitive website building environment makes it quick and easy to start generating sales online. Not only can you create a stunning brand image with templates, but you also get access to countless valuable add-ons and plugins from the Shopify store too.
Of course, before you can start experimenting with things like search engine optimization and email marketing, you need to master the basics. That means knowing how to popular each product page on your website so that you can generate sales.
Product pages for your online store allow you to showcase each product, complete with an SKU, so you and any other Shopify admin can track your inventory. Today, we’ll be showing you how to add products to Shopify, the right way.
Step 1: Log Into Your Shopify Account
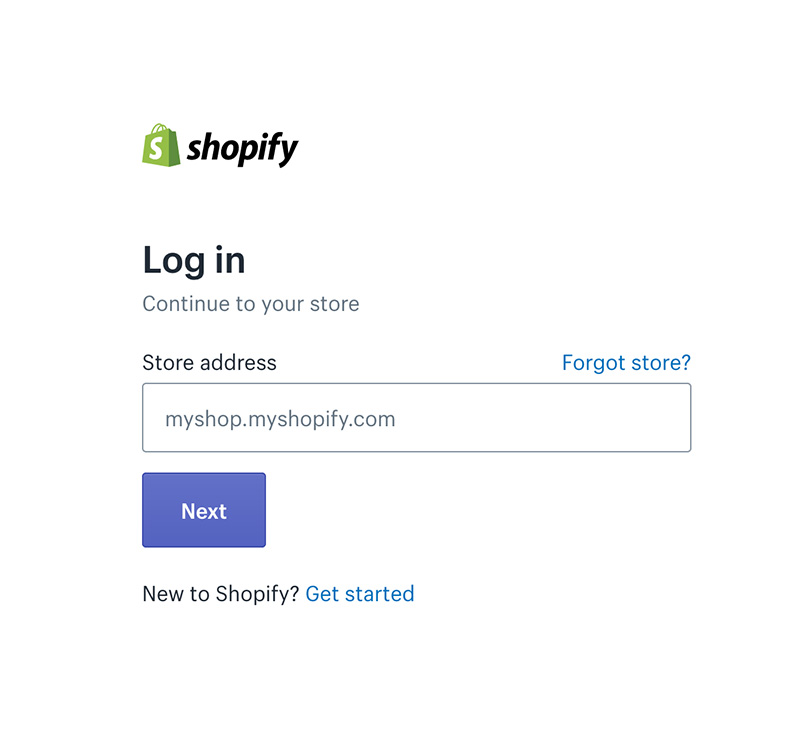
To create a product page on Shopify, you’ll first need to log into your account backend. You should have all of your login information available to do this. Click the “Log in” option on the Shopify website, and enter your store address, email address, and password. You can click the “remember me” option to access your account faster in the future. Don’t do this if you’re using a shared device.
Look for the Products tab underneath the Search option on your Shopify account. Click on this tab, and you’ll get options like “Add a product” or “Import products.” Click add a product to visit the product page.
Step 2: Adding Product Details
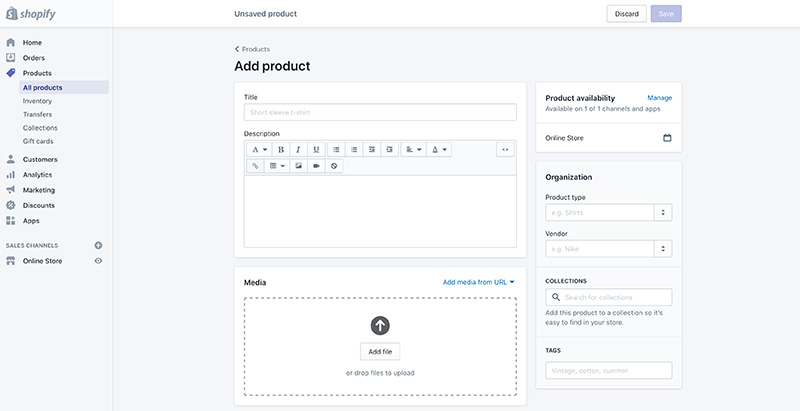
Next, you’re ready to start adding information to your product page. Your product details will include things like:
- Product title
- Description
- Product Type
- Vendor
The title
The product title is the name that you’re giving to your product. For instance, if you’re selling a pair of women’s shoes, they might be called “Purple ankle boots with kitten heel.” Ideally, your titles should be short, sweet, and straight to the point. Give your customers all of the information they need without overwhelming them.
Your titles also need to have a consistent feel to them on every page. If you start with the color of the product on one title, you should do so on every other product page too.
Description
Your product description is one of the most important things you have on your product page. It’s a chance for you to capture your audience’s attention and convince them that you need whatever you’re selling. To write a solid product description, remember to focus on the benefits to the customer first.
For instance, if you were selling an armchair, you might start with something like: “This luxurious and comfortable armchair is big enough for cuddling with your partner.” Don’t just copy and paste product information from other websites, as this will harm your SEO opportunities with Google.
Every time you add a new product to your website, follow the same format for the description. This make include using a bullet list of features or even suggesting additional products to go alongside the main purchase.
Product type
This section doesn’t require as much creativity as the two above. Just enter a word or term that would classify the product into a specific category. For instance, if you’re a clothing company, and you’re creating a product page for a pair of jeans, you might add it to the “Jeans and pants” section, or just the “Women’s clothing” segment.
Vendor
If you’ve created this item, you can put your own brand name here. Alternatively, if you’re selling another brand’s product, use the Vendor section to credit the manufacturer or supplier.
Step 3: Inventory, Price, and Extra Information
Once you’ve completed the central part of your product description, the next step involves filling out the remaining details. In the Inventory and Variants section on Shopify, you’ll be able to enter details like your product SKU, price, shipping options, and weight.
Price:
All customers will want to know what they can expect to pay for each item on your eCommerce store. That’s why it’s so important to specify the price for each of your pages. You don’t need to add a currency symbol to this field, as your Shopify General settings will inform the tool of what currency your eCommerce business uses.
Remember, choose your pricing carefully. You don’t want to scare your customers off with a cost that’s too high. However, selling products at too low of a price could also damage your profits.
SKU:
The SKU part of the products section on Shopify is where you enter your Stock Keeping Unit. This is essentially a unique identifying number for every product in your store. You can find the number on the manufacturer website or take it directly from the supplier. If you’re struggling, search Google to see if you can find extra information from other tore owners.
Shipping Options:
Next, let your customers know how you’re going to deliver their products to them. For shipping options, you can uncheck or check the Charge Taxes box or the Requires Shipping box. For instance, you may not need either of those things if you’re selling downloadable products or services that don’t require delivery.
Weight:
The weight of your product might not seem like a big deal – but it does make a massive difference to the freight cost and shipping expenses of your order fulfillment strategy. If you’re not sure about the exact weight, you can use an estimation, but it’s better to go over than under here.
Once the weight section is complete, you can use your variants and inventory section to compare prices for your products, enter information like the barcode provided by a manufacturer, and unlock fulfillment options if you’ve activated support from a fulfillment service. You’ll also be able to set up an inventory policy for tracking your stock and add multiple options for things like colors and sizes.
Step 4: Adding Product Images
Once you’ve successfully entered all of the essential details for your product, you can begin entering the images that will give your customers some much-needed insights into what they’re buying. It’s helpful for customers if store owners can provide as many relevant images as possible here.
Name your images with consistent formatting, and make sure that you separate each word with a dash. This will help with finding pictures and improving your SEO ranking.
If possible, try to add multiple images of your product to each page, using different angles, or even showcasing different color options if they’re available. Make sure that every image is high-quality and clear, and don’t forget to check that you have permission to use any of the images you’re accessing.
Step 4: Add Tags and Collection Details
Once your pictures are ready, the next step is adding your products to specific collections or areas on your website. On Shopify, a Collection is like a category. Using the Add to Collections button, you can place your product page in any category it belongs to. This could mean adding some boots to the “footwear” collection, for instance.
You can also add tags to your product, which make it easier for customers to find and search for items. From your Shopify admin panel click on the name of the product you want to edit and click the Organization sections. You can add tags for your products here and use a comma to separate different words. Click Save when you’re done.
Shopify store owners can also use tags to create automated collections. From your admin page, go to the Collections tab, and add a description or title for your collection. In the Type section, click on Automated, and choose which conditions your products need to meet to fall into that collection.
For instance, for a product to automatically go into a “footwear” collection, it might need to include tags like “shoes” or “boots.”
Step 5: Edit your Search Engine Listing
Shopify automatically generates meta descriptions and page titles for you to assist with your presence in the search engines. However, these automatically generated pieces of information come from the details that you added on your Product Details screen.
Often, you’ll need to change the Meta Description and Page Title information separately to get the most out of your SEO. Your page title and meta description both need to contain valuable keywords related to your products. To edit your information, click on the Product Details page, then go to the Search engine listing preview.
Click Edit website SEO and in the page title field, add a descriptive title that includes your keywords. This will show up in the search engine results on Google. Add up to 55 characters in your title. You can also enter a description for your search engine listing. Ensure you add relevant keywords to help customers find you here too. Meta descriptions can feature up to 320 characters.
In the URL and handle section, edit your website address. It may be worth switching any random numbers on your URL with keywords that are relevant to the product page. Remember that your URL can’t contain any spaces. Handles work with Shopify theme design.
When you’re done, click Save.
Step 6: Publishing Your Product Page
Once everything is ready, check the details of your product pages, and make a quick review before you click the Save product button in the bottom right of the screen. You can scroll to the top of the page after you’ve Saved to see what your product page looks like.
Click the link saying, “View on your website,” to ensure everything looks good.
If you notice any issues, you can edit your product pages by clicking back into your individual product page. Remember, though you can change your product details at any time, this could have an impact on the way that products group in your reports, so be careful with things like tags and collections.
To edit a page, go into your Shopify admin page and click on Products. Click the name of the product you want to change and modify the details accordingly, then click Save.
Duplicate a Product
Whether you’re selling through multiple sales channels or adding similar products from a dropshipping provider, you can save some serious time by duplicating items already on your list. When you duplicate a product, you can add options and copy one or more of the details available, like images, SKUs, inventory quantity and barcodes.
If you just want to add options to one of the products you offer, then try adding a variant instead. By default, the duplicate product hides away on all of your channels and apps. This product won’t be published until you change the availability on it. You can make the duplicate available on the same channels too. To create a duplicate:
- Go to Products > All Products from your Shopify admin
- Click on the name of the product you want to duplicate in the Shopify app
- Click the Duplicate checkbox
- Enter a name different to the existing product
- Click Duplicate again
- Modify the product details
You can also update the product availability so it’s accessible on the same channels as the original. Remember that duplicate products aren’t the same as a product variant.
Add New Products with Shopify POS
You can add new products from the Products screen in the Shopify POS. products that you create here won’t appear on other sales channels unless you update their settings in Shopify. You will need an internet connection to create Shopify POS products. To create a new product here, click the + button, and tap on Add product.
In the add product window, you can enter details about the item, including its price, title, and inventory status. Remember, if you want to add a product image, you’ll need to tap the image button, and select an image from your files. You can also take a product picture at that moment using the front-facing camera on your POS device.
When you’re ready to make this single product available for checkout, tap on Save product. This will cause the product to appear on the checkout screen on the POS and your products page for the Shopify website. To edit or delete a product, you can open into it from the Products page as an admin with Shopify. You cannot delete or edit products directly in Shopify.
Make Products Available on Sales Channels
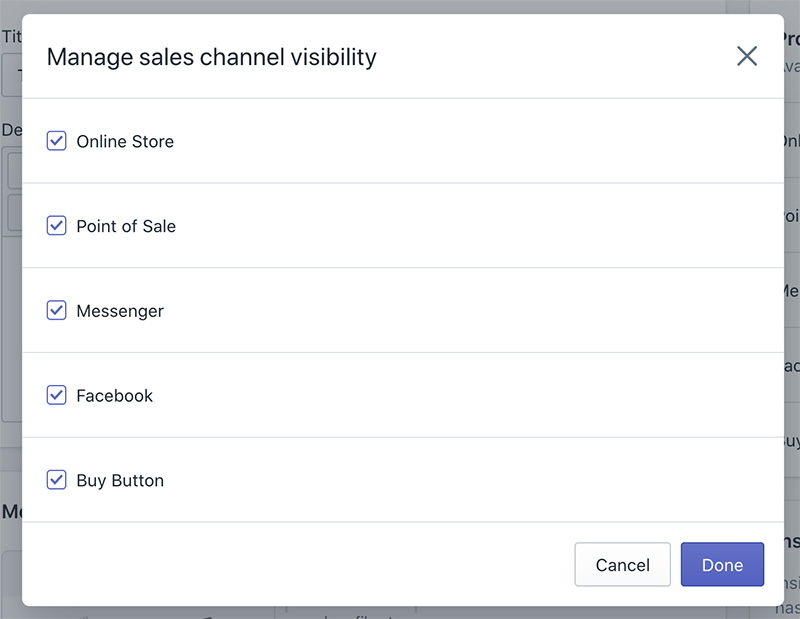
The chances are that you’re selling products in different environments. If you’re dropshipping a product from AliExpress, for instance, you might be selling on Amazon and eBay as well as with your Shopify Shopping cart. It’s up to you to decide which of your products are going to be available on which active sales channels. If you decide that a product shouldn’t be available on a certain sales channel, the system will hide that item from your catalogue.
Many business owners hide products because they’re seasonal and only available for some parts of the year. You might also hide a product because it’s out of stock, or you want to make sure that you’re giving an online exclusive to your most valuable customers.
To make products available on different channels, go into your Products > All products environment, and click on the name of the product. The product will be available to the channels that are listed in the availability sections. You can click Manage to change where your products are available and select the channels that are suitable for you. Click Done and Save to begin selling.
You can set product availability as a bulk action too, which might be helpful if you’re selling dropshipping products through something like Oberlo.
Scan Products With a Camera
Another way to add more products to your Shopify environment for potential customers is to scan a barcode with the available device camera. The Shopify app supports this action. All you need to do is go into the Shopify app, then click on Products and All Products. From this screen, you can either create a new product or tap on an existing product.
Tap on the Inventory option, and in the barcode section, click on the barcode icon to open the camera on your device. The camera screen should come with a rectangular box which shows you where you need to position your iPhone so that the barcode appears within the screen. Wait for Shopify to recognize this barcode. The app will return to the inventory screen afterward.
How to Delete Products on Shopify
So far, we’ve covered everything a step by step guide on how you can upload images and product information to your Shopify website. However, both beginners and Shopify experts alike will also reach a time when they need to remove products from their store and fulfillment service.
Shopify allows you to remove items that are no longer available for delivery or manual collection. You can remove items one by one or use a bulk action. Just remember, removing an item from Shopify gets rid of the stock forever. Products are not available to restore. If you no longer want to display a product for any reason, then you can hide the product and use it again later.
To delete a product, go into your Shopify admin page and click on Products > All Products. From there, click the product you want to delete and go to the product details page. Click on Delete product and confirm.
Adding Products to Shopify: Conclusion
Adding products to Shopify isn’t as difficult as it seems. As you can see from the steps above, you can get to work on adding products in no time. Whether you run a Shopify or BigCommerce store, having the right product information available will always be crucial to your sales. Good luck on making the most of your store!
Hello,
Thank you so much for sharing this very informative article. This will help me and many others also. thanks a lot.
You’re welcome!
Hello.
How can I see which app is best for me?
I want to search for products which interest me beföre I choose some app. Where and how can I do it?
I don’t have any shop yet so I only have free 10 days to try Shopify.
Thank you!
Regards,
Zana
Hey Zana,
It’s hard to do this in 10 days, but this article on finding the best dropshipping suppliers might be useful.
Your guide is really awesome. It is helpful for me. Thanks for share for it.
You’re welcome! 👍