
Trying to find relevant info on how to build a WordPress website? You're in the right place!
In this guide, we take you step-by-step through all the stages of getting a WordPress website built.
We cover everything from how the process works at a bird's eye view, to planning your website, the tools required, how to build a WordPress website by using them, and how to put everything together so that you walk out with an optimized site at the end of it.
Overview on how to build a WordPress website
First things first, learning how to build a WordPress website isn't as difficult as it might seem! 😌
The whole idea of WordPress as a website platform is to democratize the whole “owning a website thing” and make it achievable for anyone, no matter your budget or skill level. But we'll talk about WordPress traits and features in the next section.
Here are the steps you'll need to go through on your way from 0 to a fully functional WordPress website:
With all that out of the way, let's get going with the first order of business when learning how to build a WordPress website:
What is WordPress and how does it work?
The first thing that we should perhaps set straight before getting into any how-tos is what WordPress actually is and what makes it a good choice for building a website.
Technically speaking, WordPress is a piece of server software (an open source content management system). The “server” part means that instead of installing it on your laptop or desktop computer, you can only run it on a web server.
Now, so what does this “server software” do? Simply speaking, WordPress is the operating system of your website.
Think of it like so: your laptop might be running on macOS or Windows. These are the most common operating systems for personal computers. They sit underneath everything and let your other apps and tools do their job.
WordPress is just like that but for your website.
This sort of comparison to macOS and Windows isn't an overstatement. WordPress is the most popular website engine of them all. It's estimated that ~40% of all websites run on WordPress. This, by any standard, is a huge market share!
WordPress takes care of all the basic operations that happen on your site – it lets you publish content, change your design, and so on.
Since WordPress is doing all that, it means that you can focus solely on creating content, conveying your business message, or even selling your products directly from the site. In other words, you don't have to worry about any technical aspect of “running a website” since WordPress does all that for you.
🌱 Beginner's Q&A:
How to plan your own website
Starting to work on your site without planning it first will probably lead to trouble…or maybe dissatisfaction is a better word.
The thing is that websites are not all the same, and, depending on the reason you want to learn how to build a WordPress website, the resulting outcome will vary. Actually, it will probably not only vary but look completely different than someone else's website built for a different purpose.
That is why you always need to start with a good plan as to the direction you want to take with the project. In this section, we'll show you how to do that.
Here are the questions you'll need to ask yourself:
Set your website goals
Now that you know who you're building the site for, it's time to think about how all this relates to your goals and the functionality that you'll need on the site.
Setting your goals probably feels intuitive, especially if you're learning how to build a WordPress website for your business. In most cases, you want to use the site as a business asset and either sell your products from the site directly, or use it as a marketing channel to get new clients/customers.
The above sounds all fine and dandy, but it's not defined clearly enough to serve as an actual goal.
Get as detailed as possible when it comes to your goal, and even try to make it measurable. If your goal can't be clearly measured, then it also can't be clearly verified. Read: you'll never be sure if you reached your goal or not.
Let me give you an example, if you set your goal to be, “generate sales for my business,” then did you really achieve the goal if the site brought you one new sale? How many do you need to call it a success? Ten? 100?
This is exactly what goals are for! A much better website goal would be something like, “each month generate ten new sales directly from the website.” A goal like that is something that can be verified and tracked over time!
Make it simple! Make it measurable!
Plan your website functionality
The goals you set for your website will dictate your design and functionality choices further down the road.
For example, if your website goal has anything to do with selling, then you'll need a mechanism that will allow you to sell stuff directly from the website.
On the other hand, if your goal is to promote your expert woodworking skills, then you need tools for good photo presentation on the site – to showcase your work.
Go through your goal statements from the previous section and try to fish out unique website functionalities that would make the goal possible.
If you're having trouble with this, go to your competitors' websites and list the features and functionalities that they have.
We're going to use that list later in the process when putting together your website.
Pick a domain name and hosting
No website can exist without a domain name and web hosting plan.
Here's a quick lesson on what domains and hosting are in case you're not quite sure:
- A domain name is every website's unique address on the internet. The domain name of the site you're reading right now is
staging.ecommerce-platforms.com. - Web hosting is where your website lives and from where visitors can access it. Contrary to popular belief, websites don't simply exist “on the internet.” Where they actually reside is “on special-purpose computers (called servers) that are connected to the internet 24/7.” Web hosting is a service that gives you access to such a server machine and allows you to store your website there.
Where to get your domain name and hosting
The web is chock-full of domain registrars and web hosting firms. But which one to choose? Are they all the same?
First, how does registering a domain name even work, and who's a domain registrar?
- A domain registrar is a company that can register a domain on your behalf and then give you complete control over said domain. This is how registering domains on the web works – no need to get any deeper into that.
In order to get your hands on a domain name, you must pick a registrar and then buy the domain from them.
Ultimately, the specific registrar you choose does not matter. They can all sell you the same domain name (provided it's available and not already taken by anyone). The prices are also rather similar, so you generally won't save a huge amount of money by going with one registrar vs the other.
But wait, there's a lifehack you can apply here!
Instead of buying your domain name from one company, your hosting from another, and then having to connect the two together (so that your website can work), you can get both the domain and hosting from the same place.
This sort of arrangement makes everything much easier by eliminating a couple of setup steps. In the next section, we're going to show you how to do exactly that – using our favorite hosting company for WordPress.
How to set up your domain and hosting
Over the years, we've experimented with a handful of hosting companies here at staging.ecommerce-platforms.com. We've tested their setup procedures, their general ease of use, and how well their platforms are optimized overall. All this testing has landed us on one company to be our favorite – SiteGround.
SiteGround is one of the most well-known and respected managed WordPress hosting providers on the market. They offer affordable pricing (starting at $4.99/mo), good server performance, and an easy-to-grasp setup procedure.
Most importantly of all, you can get both your domain name and your web hosting at the same time from SiteGround.
Here's how to sign up with SiteGround and set up your domain name and hosting service:
Go to the SiteGround website and scroll down to the pricing section.
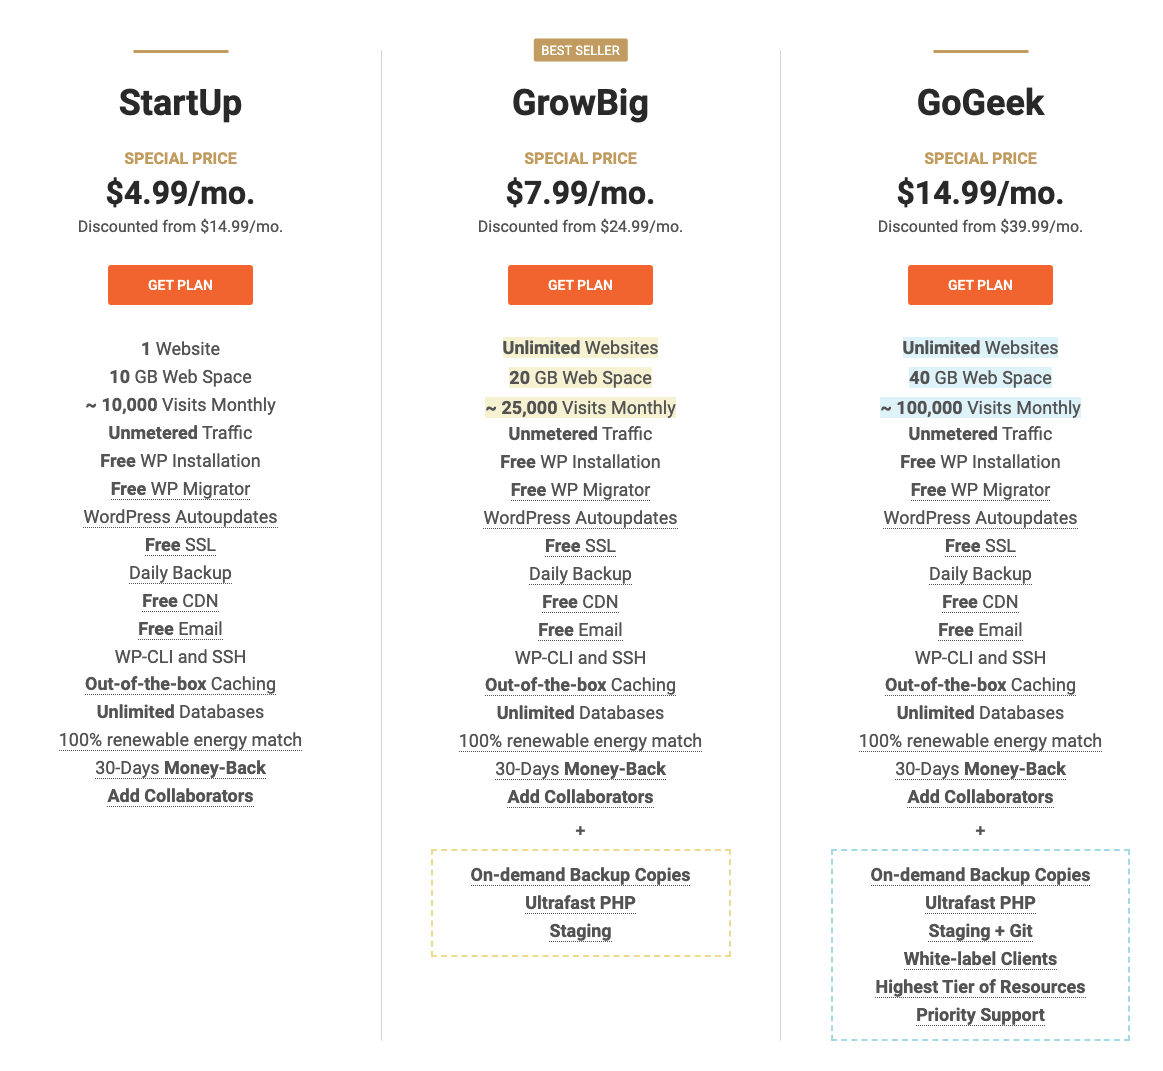
Pick the pricing plan that's best for you and click on the GET PLAN button below it.
“Hold on, which of these plans is going to be the best?” A spot-on question. Luckily, you don't have to overthink this.
- If you're starting with a new website idea from scratch, you can go with the entry-level plan at $4.95/mo. It offers more than enough juice to handle your site at the early stages of its existence.
- If, for some reason, you're going to be launching more than one site, you'll need to pick at least the GrowBig plan. It offers slightly more disk space and capacity for monthly visitors.
In the next step, you'll be able to pick a domain name for your site. Keep in mind that the price of the domain name is a separate thing from the main listing price of web hosting itself. Most domain names will cost you ~$18 annually.
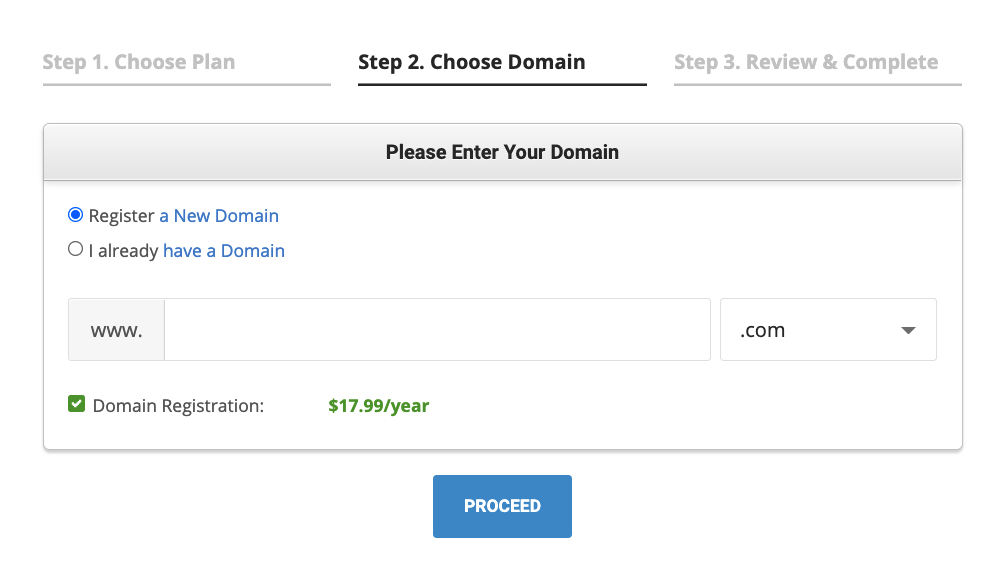
Enter the name that you want to go with and see if it's available.
Note; try going with a .com domain rather than any other domain extension such as .net or .org. Users will expect your site to be a .com anyway, so forcing them to remember any other version of a web address will only confuse them.
In the next step, SiteGround will ask you for a few final details:
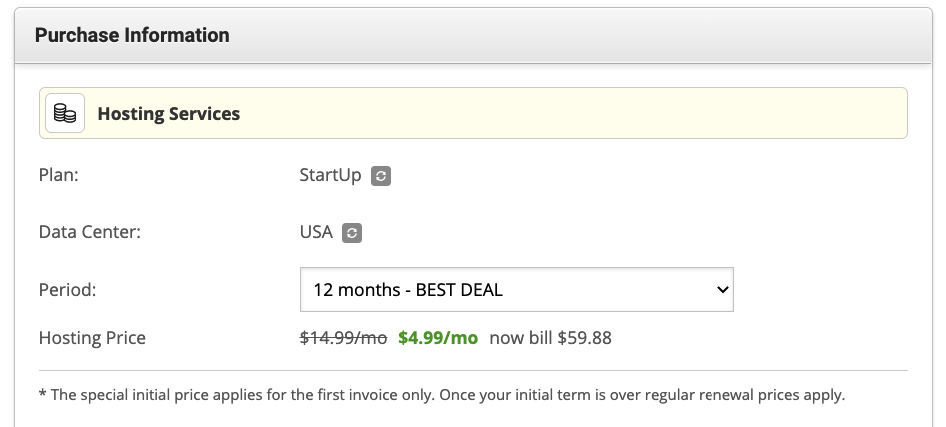 Here's what to pay attention to with this form:
- Plan – check if it matches what you selected in the first step.
- Data Center – pick the data center location that's the closest to your target audience's location. For instance, if you want to target users in the UK, pick London as the data center location, rather than a server in the US.
- Period – this is the initial contract length that you're signing. To get the best deal, you have to sign up for one year upfront.
- Extra Services – generally speaking, none of these are required, but they can improve your experience/security. For example, it's advisable to get the Domain Privacy package. This will hide your personal info from the domain's publicly available record.
When you're done with this form, all that is left is to finalize the payment. After that, you'll get access to your new SiteGround hosting account.
Install WordPress on your hosting
Depending on who you're hosting your WordPress website with (be it SiteGround, Bluehost, or some other WordPress hosting provider), the process of installing WordPress itself can be anything from super-easy to super-frustrating.
SiteGround sits on the “super-easy” end of the spectrum. Otherwise, we wouldn't have recommended it!
First things first, the exact process of installing WordPress on SiteGround changes slightly from time to time. SiteGround continues to work on its user experience, trying to make everything as hassle-free as possible for everyone.
However, what this means for us right now is that the exact steps you'll need to take to get WordPress installed on your hosting setup might vary slightly from what we're describing here.
A couple of things can happen when you first log in to your user panel in SiteGround:
Scenario (a)
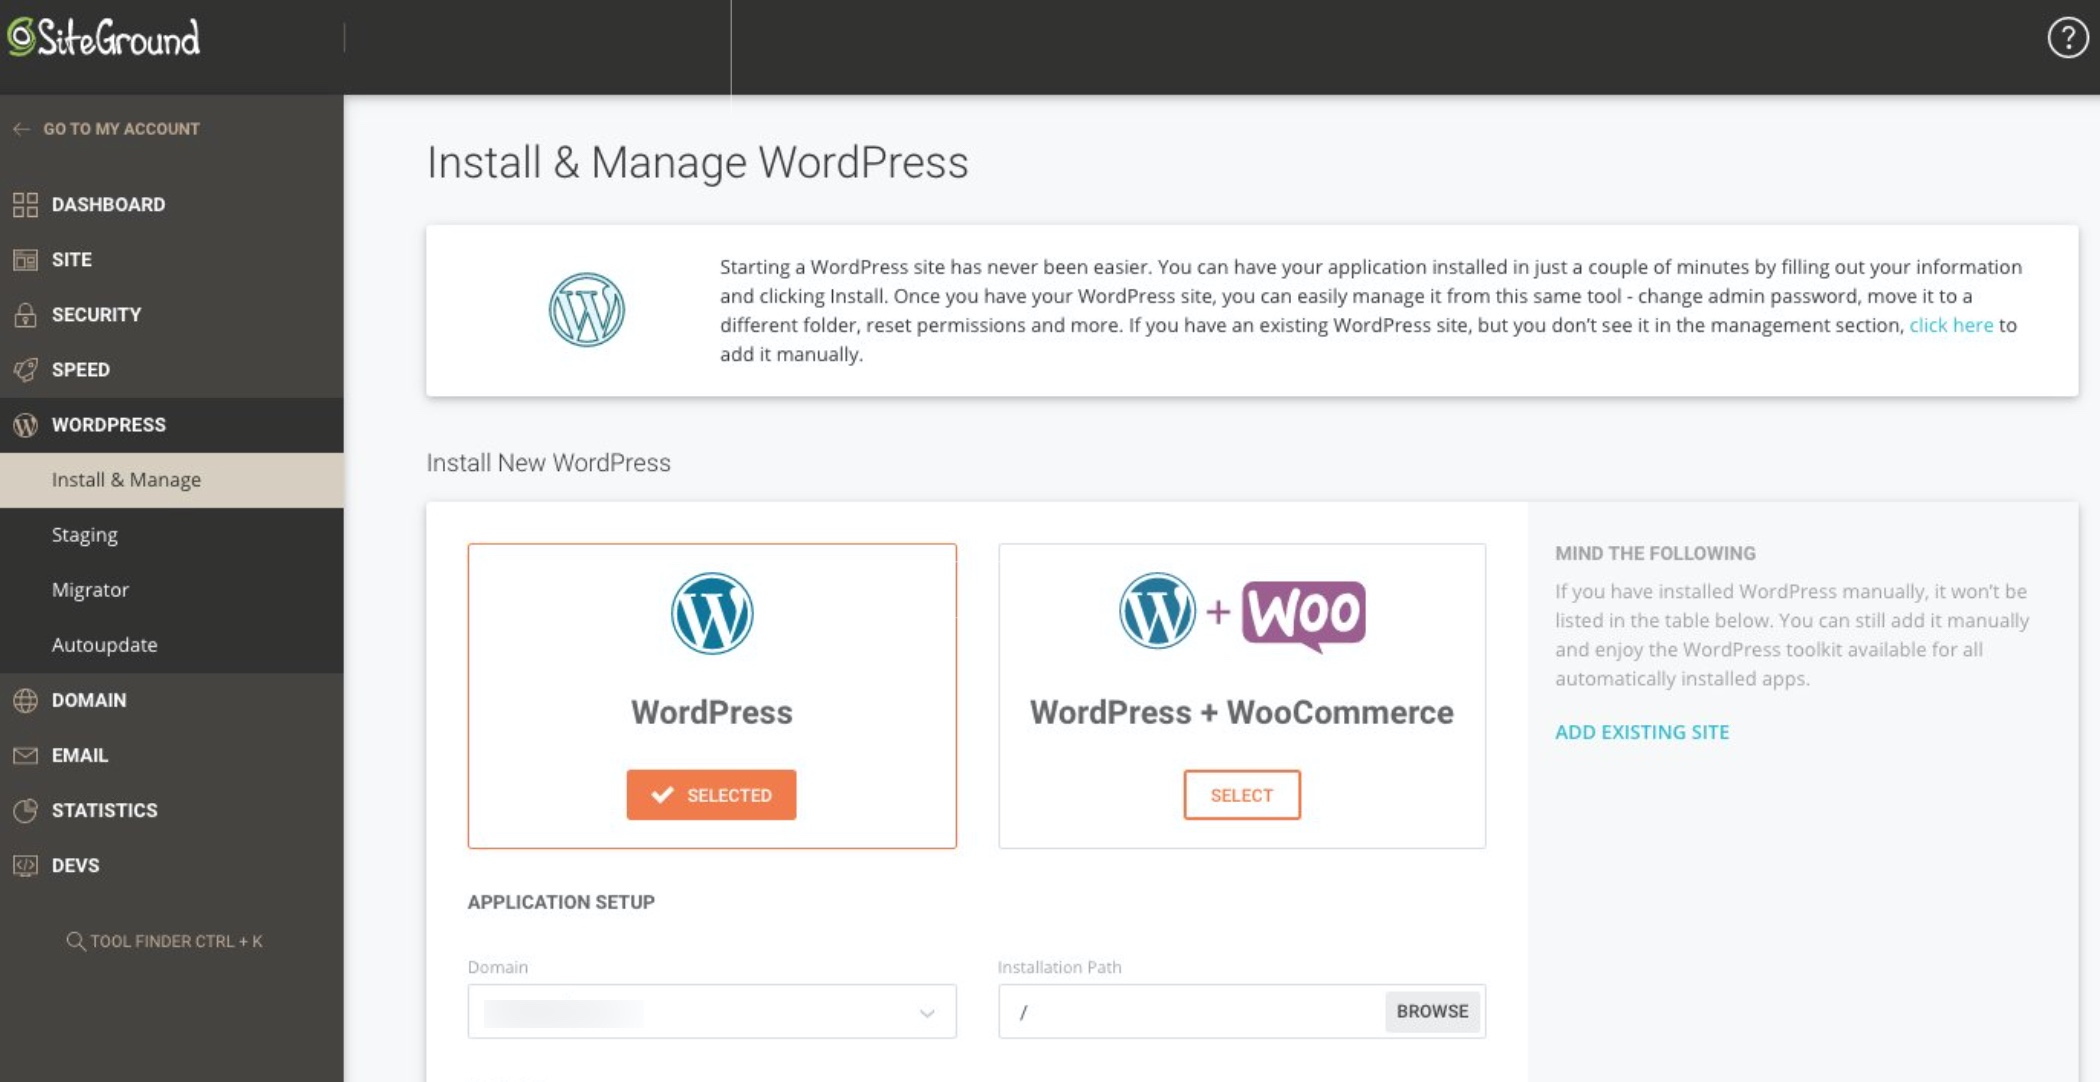
If you don't have a working WordPress instance added to your account yet, SiteGround will show you a step-by-step installation wizard.

You will be taken by the hand through the steps required to set everything up. You'll be able to add your site name and set login details for the admin account.
Scenario (b)
Alternatively, if you don't see such a wizard when you log in to your SiteGround account for the first time, it probably means that you already have WordPress pre-installed on your setup.
To verify that, go to the account section in the SiteGround user dashboard. See if there's a WordPress instance listed on this page. If so, this means that you don't have to do anything else to install WordPress – SiteGround took care of the installation process for you.
If not, you can install WordPress with just a couple of clicks.
Alternatively, if you don't want to get your hands dirty, you can reach out to SiteGround support via the help section in the user panel and ask them to install WordPress for you. 10/10 times they will be happy to do it. SiteGround has been known for the support quality they offer to customers, so you can feel free to test this yourself.
Get familiar with the WordPress interface
Before you can use WordPress to its full potential, you should get at least a tiny bit familiar with its interface and main areas of the admin panel.
Let's take it from the top. What you can see below is a screenshot of the main WordPress dashboard – aka the wp-admin:

The central part of the admin dashboard is where you can find WordPress' welcome message along with the links to other sections that most users will want to check out first.
This central part is also the main canvas where you'll work with your site after selecting a specific module from the sidebar. Speaking of the sidebar:
In the sidebar, you can see the main modules of the admin panel. Most notably, this is where you can get to:
- Posts – aka blog articles.
- Pages – similar to posts, but meant to hold more evergreen pieces of content – think things like some info about your team, your business, your contact info, etc.
- Appearance – this is where you can switch your site's design (aka theme) or customize the current theme.
- Plugins – this is where you can add new functionality to your website via small installable scripts called plugins.
- Users – at this early stage of your site's lifespan nothing much is going on in this section. If you ever invite other people to help you work on the site, this is where you will be able to manage their WordPress user accounts.
- Settings – this is the main settings section for the entire site. We'll cover it more in depth in a minute.
There are also other sections in the sidebar, but they are either not that useful when you're just getting your grasp on how to build a WordPress website or they are pretty self-explanatory once you start experimenting with them.
Key settings for very new WordPress site
Every newly established WordPress site should have a couple of key settings tuned up before being used to its full potential.
To be frank with you, WordPress is basically operational right after installation, and there's no actual need to adjust anything. However, doing so will enhance your experience and make work easier over the long haul.
To get to the main settings, click on Settings in the main sidebar of the WordPress dashboard.
You will land in the General Settings sub-section.
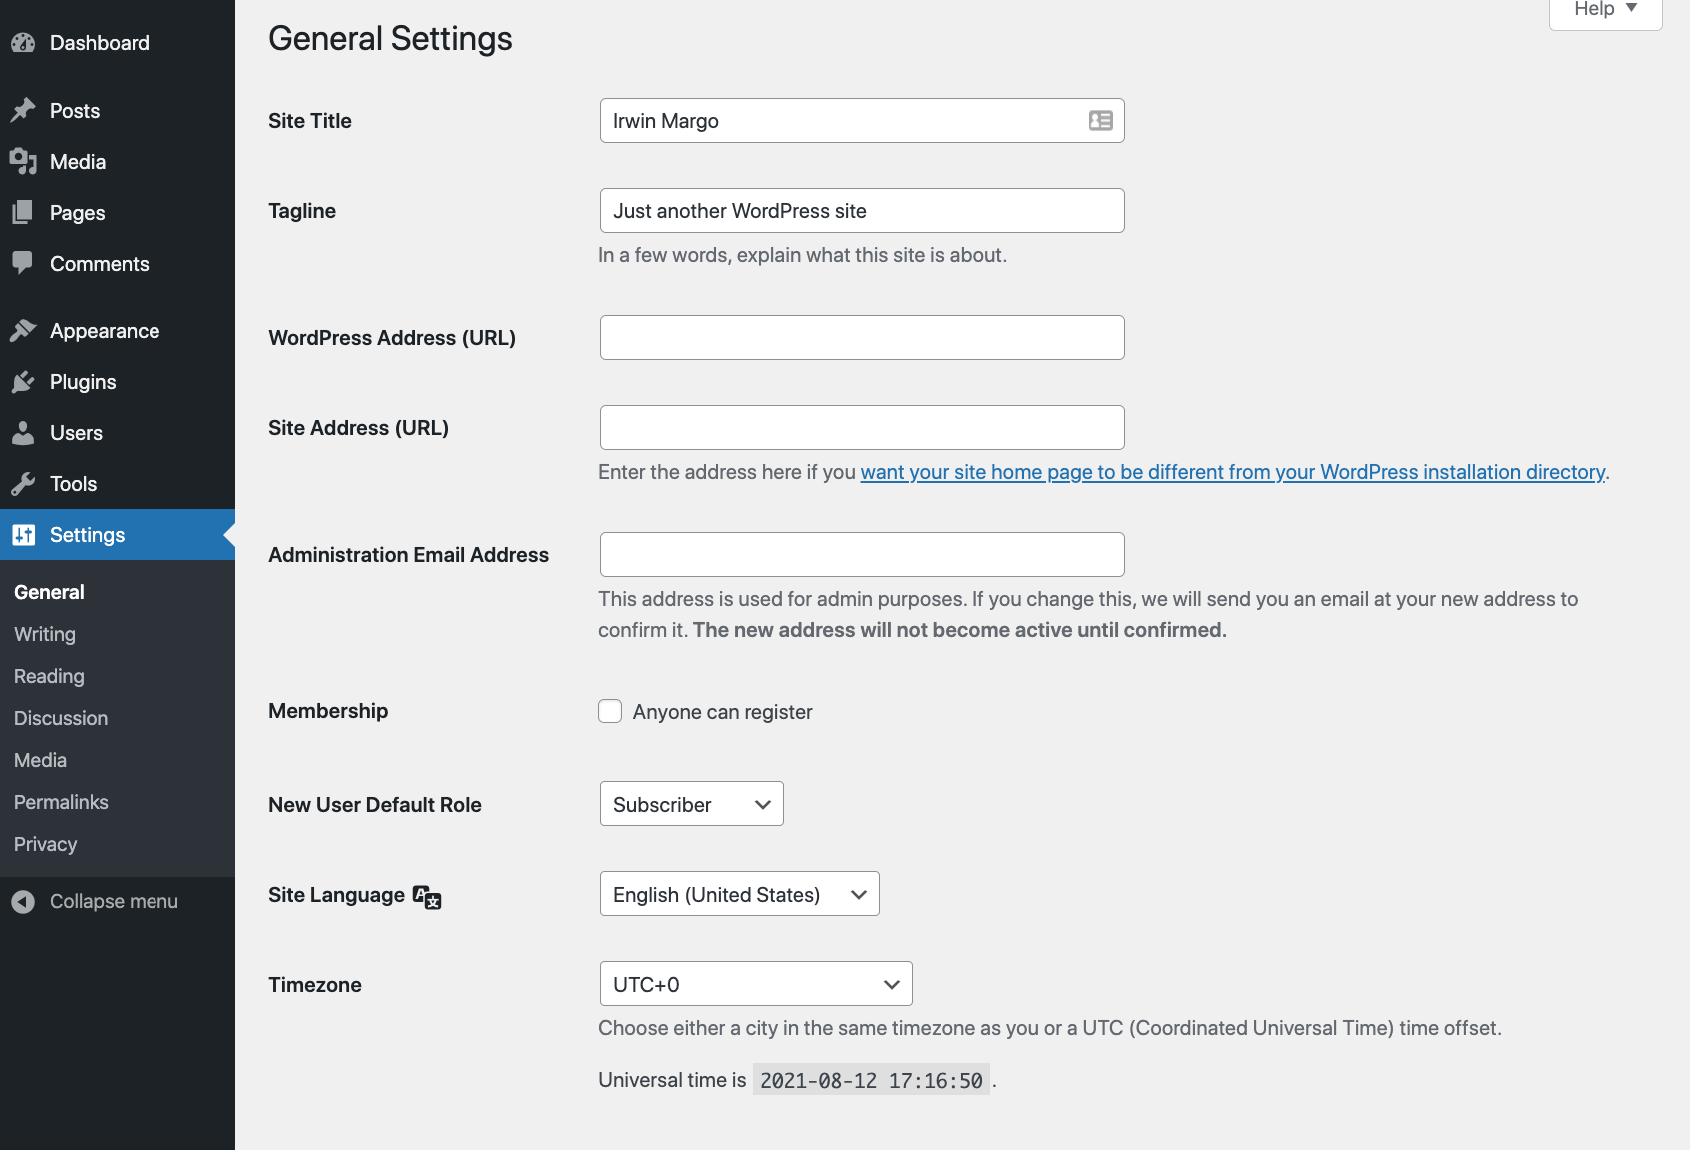
This is where you can make sure that your Site Title matches what you set during WordPress installation. This is also a good occasion to add a site Tagline if you want to use such a thing (optional).
Next, scroll a bit further down the page and see if the Timezone setting is correct. If it's not, it will be hard for you to plan article publication to happen at an exact hour.
With the general part of the settings done, let's now switch to the Reading sub-section.
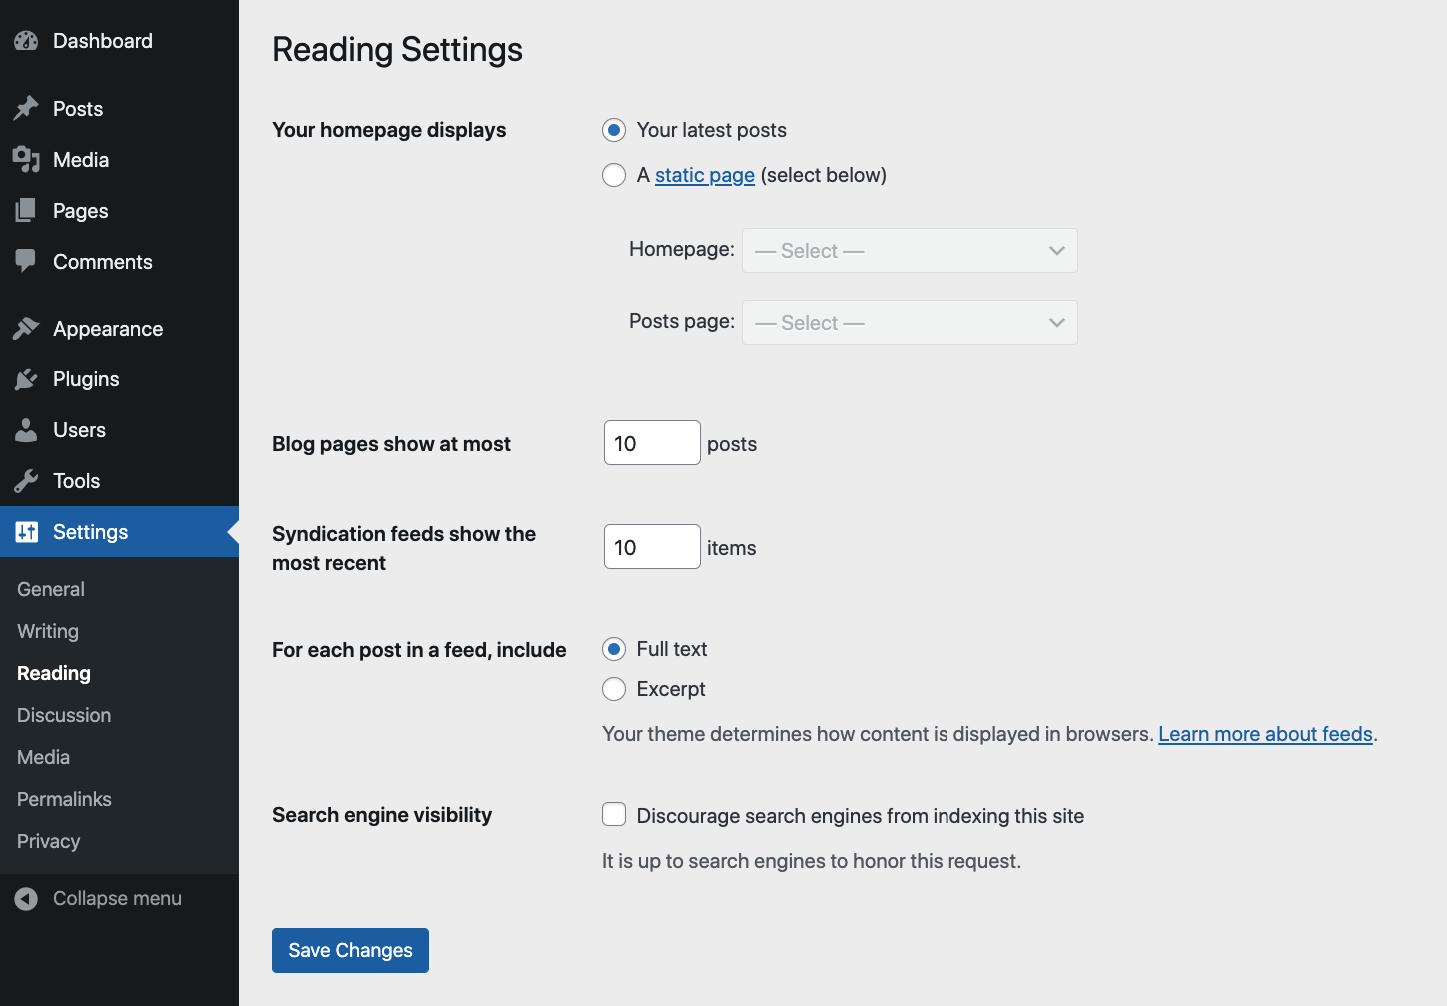
There are a couple of important elements here.
First, there's the section labeled “Your homepage displays.” We'll leave that one untouched for now.
Then, at the bottom, there's the “Search engine visibility” setting.
This is important! Make sure this checkbox remains unchecked.
If you were to leave it checked, this would exclude your site from appearing on Google. In 99% of the cases, this is not what you want!
Let's now switch to the Discussion sub-section of the settings.
What you'll do here depends on whether you want people to be able to leave comments under your blog posts or not.
If you do want reader comments, check “Allow people to submit comments on new posts.” If you choose that, it's also advisable to select the box “Comment author must fill out name and email.”
Now, it's time to take care of the final section of the settings area – and also the most mysteriously sounding one – Permalinks.
Permalinks are what WordPress calls the individual web addresses that lead to your website pages or blog posts. In the Permalinks section of the settings, you can set the structure of those web addresses.
Here are the main options available:
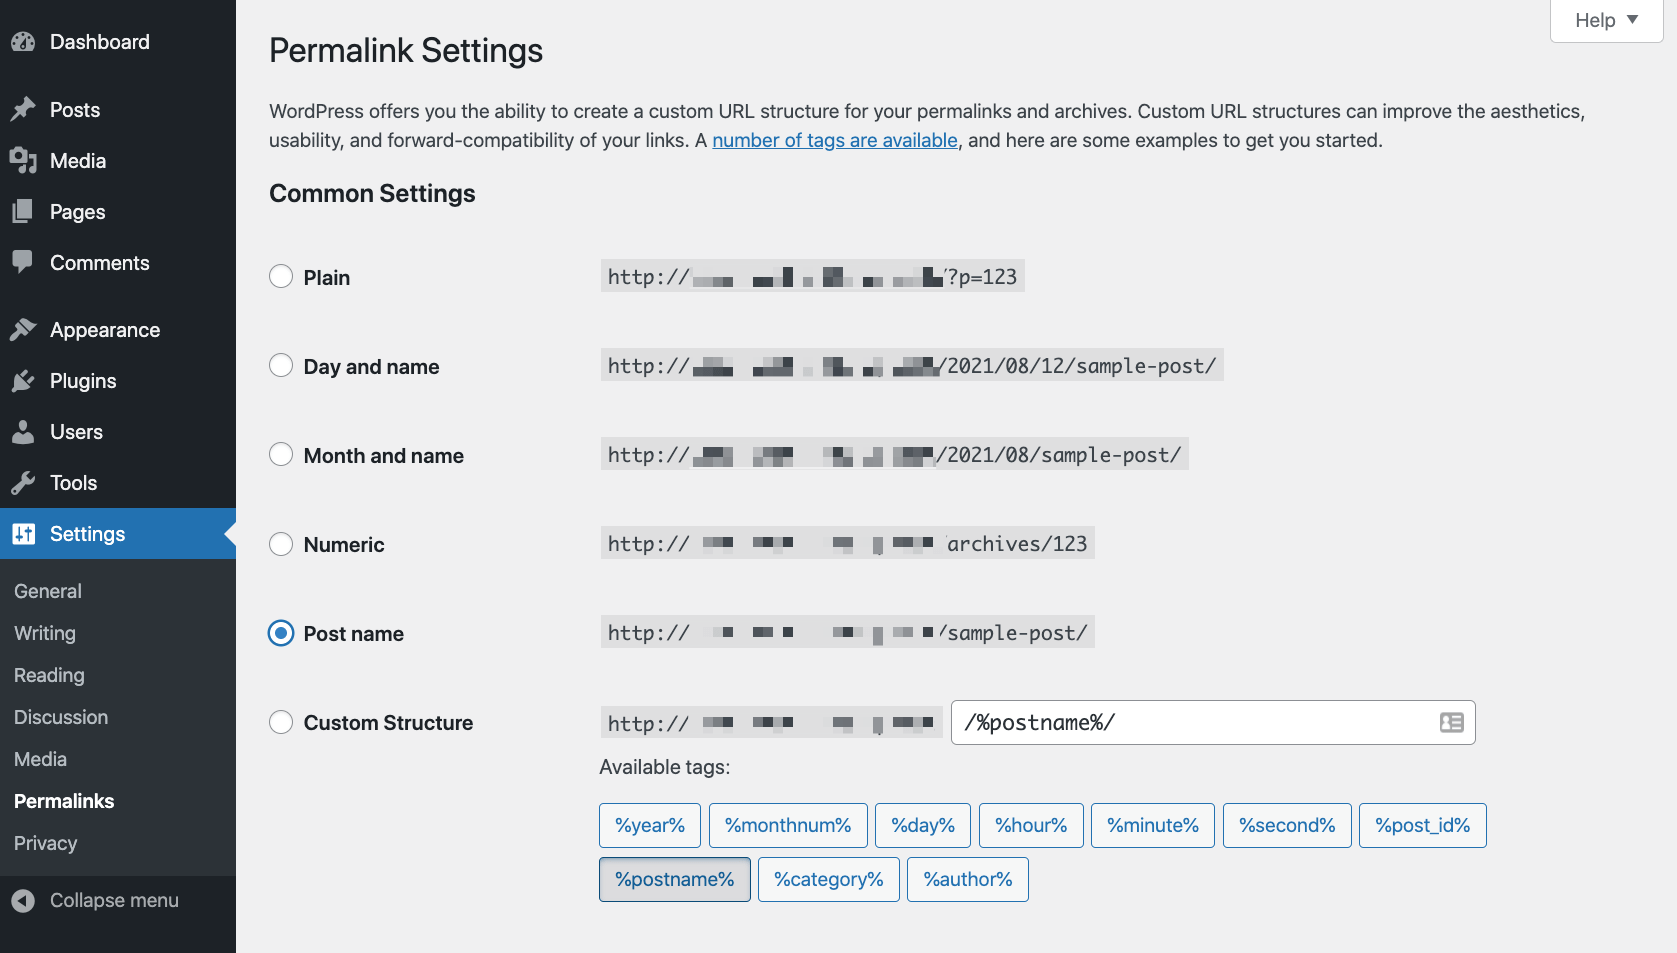
I will make this easy for you – simply select “Post name” as your setting.
This is the most universal and the most SEO-friendly link structure of the available ones.
With this step done, you've just managed to adjust your new WordPress site's key settings. Now let's get to the fun stuff:
Pick your website design (aka theme)
I'd guess that picking your design is the most fun part of the whole process of learning how to build a WordPress website!
The reason why this can be so much fun is because WordPress is incredibly customizable, and it basically made its name for having thousands of themes available. The best part – you can switch between them with just a couple of clicks.
Okay, that's all fine and dandy, but how to actually pick an ideal WordPress theme for your site?
A mere couple of years ago, I'd tell you to start with your business goal and look for themes that have been pre-optimized to serve your business niche. For instance, a restaurant might want to go with a theme optimized for restaurants specifically. Whereas a mom-and-pop coffee shop might want to go with, yep, a theme for cafes.
Nowadays, however, the landscape has changed, and we have a whole range of all-purpose themes that can be optimized and customized easily to fit any business or niche.
Let me give you two examples in particular:
- the Astra theme
- the Divi theme
Astra
The Astra theme started as a classic business theme with a purpose-made design meant to cater to small businesses and startups specifically.
👉 Read our Astra theme review here.

Over time, it has evolved following the modern trends in the WordPress theme ecosystem. It has transformed into a theme based on a solid core structure with a whole range of easily-installable starter designs for all imaginable purposes.
Just looking at the catalog of available designs, you'll find ones for:
- outdoor adventure websites, pizzerias, ecommerce, food bloggers, influencers, online magazines, restaurants, e-learning platforms, coffee shops, lawyers, marketing agencies, yoga studios, fitness, classic blogs, small businesses, and many more.
Basically, no matter what your website might be about, Astra will have a starter site design that'll fit.
Many of those starter designs are free. Some are paid.
Divi
Divi, on the other hand, is a premium theme that starts from $89 annually. There's no free version of the theme available.

Where Divi stands out is that it was created to make website building as easy as possible, even for people who haven't dabbled in websites before. Divi achieves this by delivering its own visual page-building experience.
“Visual page building experience” might sound grand, but what it actually means is that Divi comes with an original design tool that you can use to put your website together. This design tool doesn't require you to have any coding skills or actual web design skills. It's all drag-and-drop based. All you need to use it is a good grasp of what you want your website to look like.
That being said, Divi also comes with its own range of starter designs, which you can use if you don't want to build your pages from scratch.
Lastly, Divi offers really in-depth settings and customization options, which basically allow you to control what each individual sub-section of your pages looks like. In other words, you can customize pretty much anything about the design.
How to pick your theme?
My simple advice is to go with either Astra or Divi and play around with the starter sites and customization options offered by either theme.
For instance, if any of Astra's starter designs matches your needs perfectly then you can stay with that. If you're more of a build-it-yourself person, you can start with Divi and its plethora of settings and options.
Or, you can take it from a different angle. If you want to start with a free theme, go with Astra; if you're willing to invest in a quality product with good customer support, go with Divi.
How to install a WordPress theme
Although both Divi and Astra are WordPress themes, they install a bit differently. That's because Astra – being a free theme – can be installed directly from the WordPress dashboard, while with Divi, you need to go through a couple more steps.
How to install Astra
Let's start with Astra. If you want to install that theme, go to your WordPress dashboard and enter Appearance → Themes. Click on Add New.

In the search box, enter the name of the theme you want to install – “Astra.”
Once you see your theme on the list, click on the Install button next to it.
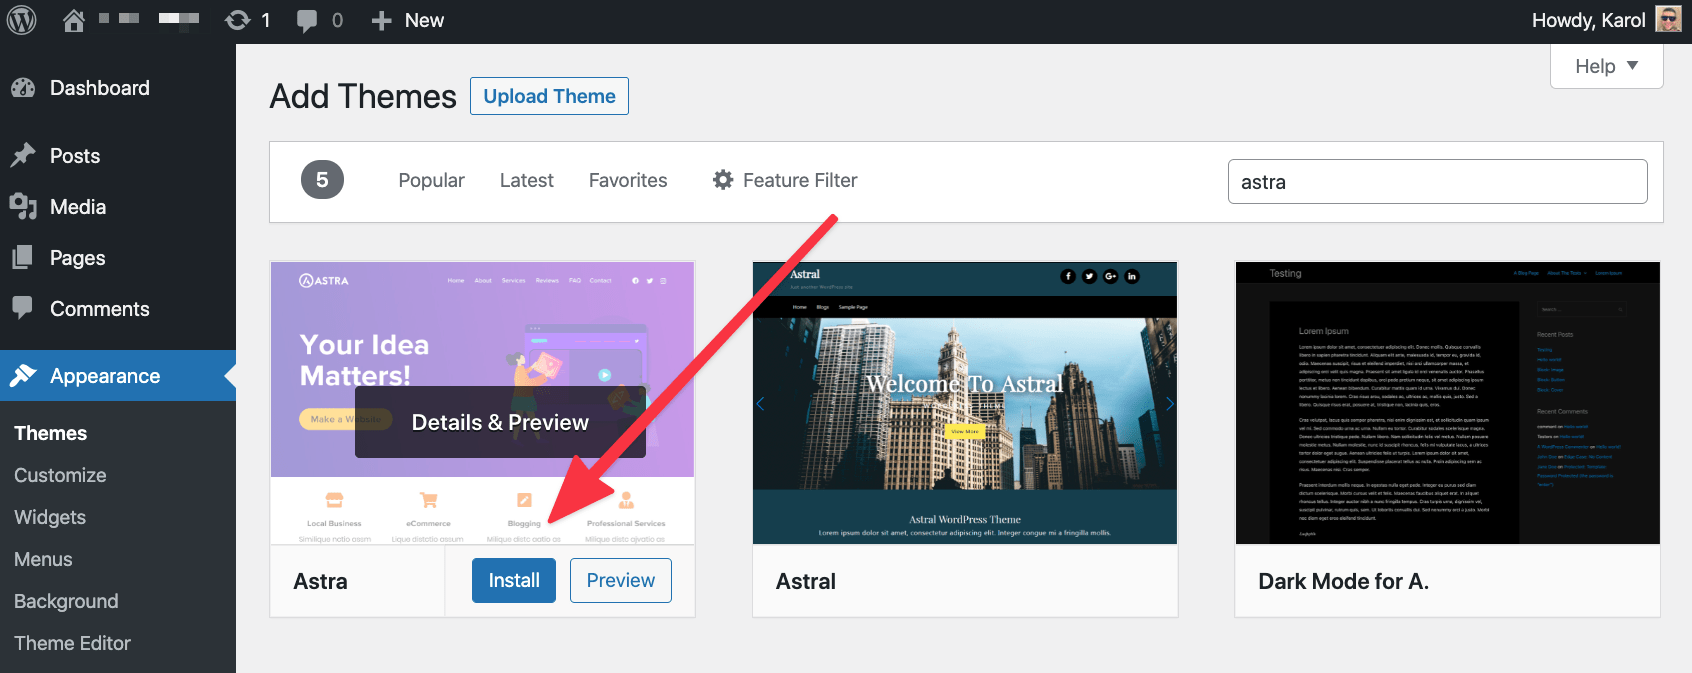
After a couple of seconds, a new Activate button will appear in place of the Install button. Click on it.
With that done, your new theme is now installed and active on your site. You should see a welcome message from the theme.
How to install Divi
If you want to install Divi, you first have to purchase the theme from the official website. Once you finalize the purchase, you'll be able to download a ZIP archive with the theme's files. Save the archive somewhere on your desktop.
Next, go to Appearance → Themes from your WordPress dashboard. Click on the Add New button and then on the Upload Theme button.

Select Divi's archive from your desktop and upload it to the site. When the upload finishes, click on Activate.
Divi will show you a quick welcome message along with some tips on what to do next – how to customize it to match your needs.
Install the must-have WordPress plugins
WordPress by itself is already pretty awesome! However, it is even more impressive when you add a couple of plugins to the mix and extend your site beyond its normal set of features. But let's start from the beginning:
What are WordPress plugins?
Let's skip the technical details and just focus on what plugins can do for you.
To say it simply, WordPress plugins are like apps for your WordPress website. In other words, your iPhone has apps, and your WordPress has plugins. Simple enough!
What can plugins do?
I really want to say “everything” because that would be pretty much spot-on. However, since everything is rather difficult to imagine, let me give you a shortlist instead. Through plugins, you can extend your site with features such as
- contact forms,
- SEO settings,
- Google Analytics integration,
- additional security,
- backups,
- image optimization,
- social media integration,
- email newsletters,
- ecommerce and shopping cart,
- cookie notices, and much more.
Basically, if you need a feature that's not in WordPress by default, there's almost certainly a plugin available that will provide you with that feature. In fact, there are more than 58,000 plugins available in the official directory at WordPress.org. And that official directory is not even the only place where you can get plugins.
Which plugins to get?
Okay, so with all that abundance of plugins, which ones should you get?
Most websites can benefit from the following plugins (all are free):
This is the most well-known contact form plugin out there. It's free, it's easy to use, and it does the job that it's advertised for.
It lets you create contact forms and then add them to your posts and pages. Your visitors can then use those contact forms to reach out to you directly.
This is one of the most popular WordPress plugins of them all. Yes, it's not just a popular search engine optimization plugin, but one of the most popular plugins overall.
It extends your WordPress site with easy-to-use SEO features, new settings for your content, and new optimizations under the hood.
Most websites will benefit from having Google Analytics (GA) looking over their visitors and tracking how popular the site is getting.
This plugin will allow you to integrate your site with GA easily. It's basically a set-it-and-forget-it kind of a solution.
Although WordPress is a pretty secure website engine out of the box, things can always be improved!
Wordfence helps you protect your site against hackers and malicious scripts. Best of all, most of its magic happens automatically, so you don't even have to spend a lot of time in the plugin's settings.
Did you know that image files can take up to 80-90% of your host's allocated bandwidth? In other words, out of all the data that your site is consuming every day, 80-90% are the images you have on the site.
Limiting your data consumption will potentially lower your hosting bill (in extreme cases), but more importantly, it will make your site load faster for visitors.
Optimole optimizes your images on the fly, and for free.
Every website needs a thought-out backup strategy! And don't worry – the execution is pretty simple.
First of all, why even bother with backups? Imagine you wake up one day, and your whole site is gone for whatever reason. Maybe the server failed, maybe someone broke into it and is holding your site for ransom. The reason is not important, but the consequences can be serious!
Backups help you mitigate the risk. If you have a recent backup, you can simply erase the server blank and restore your site from the last working backup.
UpdraftPlus gives you backups on autopilot. You can also set the backups to be stored in Dropbox or some other cloud solution of your choice.
AMP stands for Accelerated Mobile Pages. It's an initiative popularized by Google meant to make websites display lightning fast on mobile devices.
The best part is that most WordPress websites – at least the ones running on modern themes – are compatible with AMP from the get-go. All you need is to enable AMP by installing the AMP plugin.
How to install a WordPress plugin
Just like with themes, plugins can be installed straight from the WordPress dashboard as well.
Go to Plugins and click on the Add New button up top.
Enter your plugin's name in the search box.
Once you see your plugin on the list, click on the Install Now button next to it. After a couple of seconds, the Activate button will appear. Click on it.
With that done, your new plugin has been installed, and it's ready to be used!
Customize your site and make it yours
The best part about learning how to build a WordPress website is that you can then customize it pretty much endlessly.
It all starts with picking your theme – that part we have already behind us. But it doesn't end there. Even once you have your theme installed, you can still customize your site significantly.
Let's use the Astra theme as our example – it's one of the two themes I recommended in the previous section of this tutorial.
The great thing about Astra is that you can make the beginning stages of your work easier by picking a starter site design. It's best to go with a starter site that matches your niche or website purpose.
Installing a starter design
To get started, go to your WordPress dashboard and into Appearance → Astra Options.
Once there, click on the Install Importer Plugin link.

This installation should only take a couple of seconds, and you'll be taken to the starter site import immediately afterward.
This is the screen you'll see:
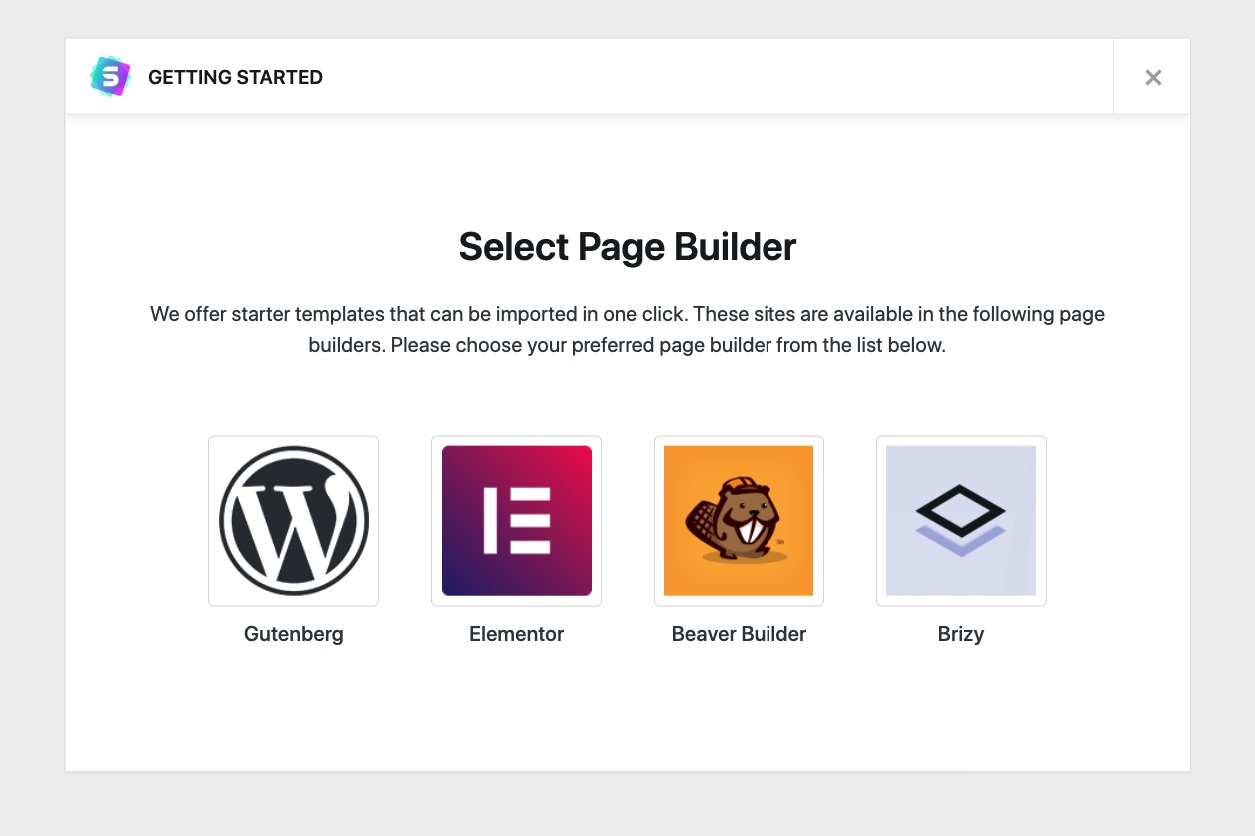
⚠️ Note; for a universal code structure of the starter design, select “Gutenberg” as your design/builder type.
In the next step, pick the starter design that you like.

To narrow down on just the designs that are optimized for your website type, you can use the dropdown menu that's up top.
If something catches your eye, click on the listing to see the import options available.

Most starter sites come as a set of sub-pages. Usually, those are for the homepage, contact page, about page, plus some other pages, depending on the exact starter design you're looking at.
- You can choose to import the whole website – by clicking on the Import Complete Site button.
- Or, you can import just individual pages – by first clicking on the page you want and then on the Import “X” Template button.
In most cases, you will want to import the whole site.
Astra might ask you a couple of additional questions before it imports the template, but those are pretty straightforward and only meant to understand the purpose of your site better.
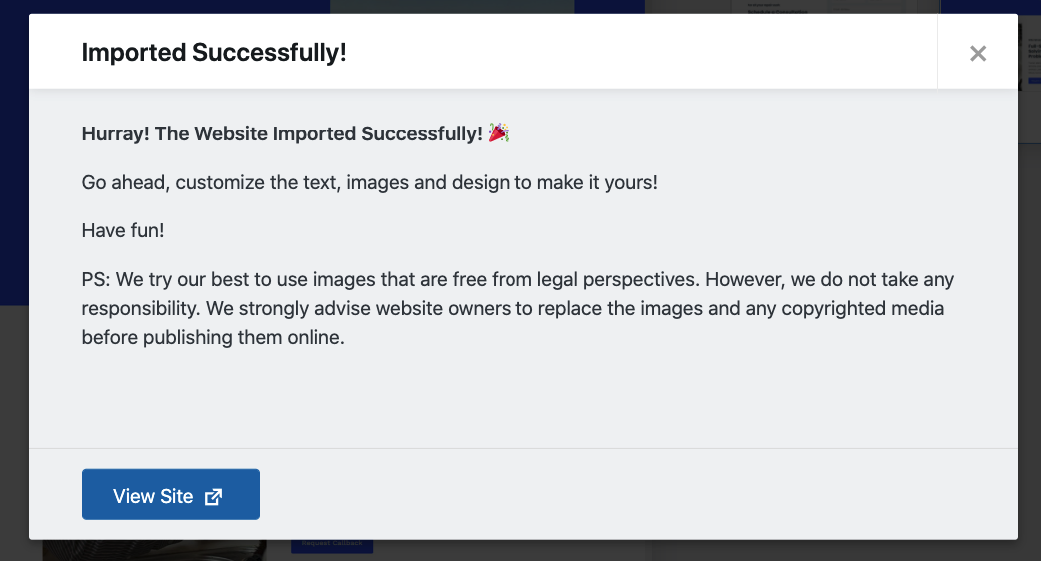
During the importing process, Astra will fetch the design and any plugins that might be needed for the extra functionality that comes with the design. You will also get a load of example content, which will give you a better idea of what the finished site can look like.
After the import finishes, Astra will invite you to check out your new site in all its glory:
Customizing the theme
There are many things that are great about WordPress, but one of them in particular makes it better than any other website engine. I'm talking about the Customizer module.
As the name implies, Customizer allows you to tune up your theme and adjust some of its elements that might not be spot on for what you need.
To access the Customizer, go to your WordPress dashboard, into Appearance → Customize.

What you see here is a sidebar where you can access all the customization options available and the main canvas in the center where you can see the preview of the changes you're working on.
That sidebar looks like a lot, but luckily, all the options are pretty easy to understand once you start clicking around and adjusting this or that. The fact that you can see the preview in real-time makes it easier to get a grasp of what your site will look like after you're done.
If you're wondering what the best place to start with these customizations is, consider the following:
Global
A convenient section where you can change the main color and typography settings of your design. This is a good place to add the colors and fonts that identify your online presence and brand.

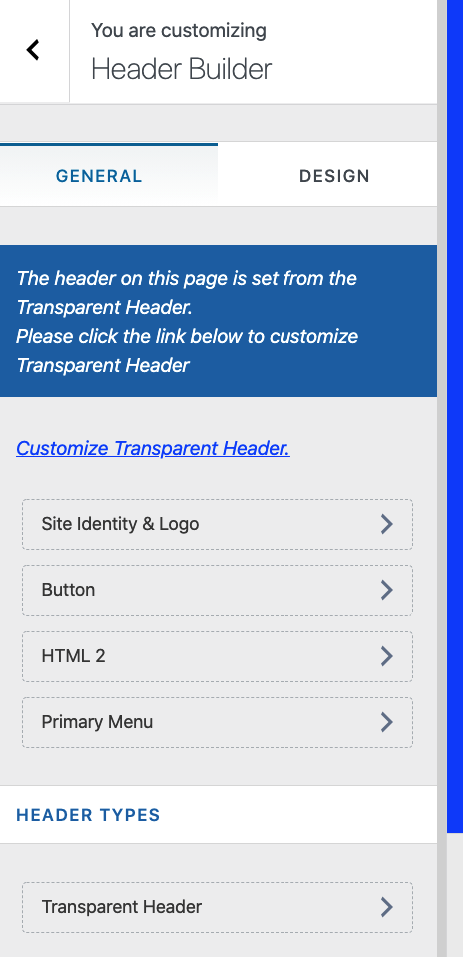
Header Builder
This is where you can change the main header area of your design. Most websites will want to add a custom logo there and perhaps adjust the main layout of the header.
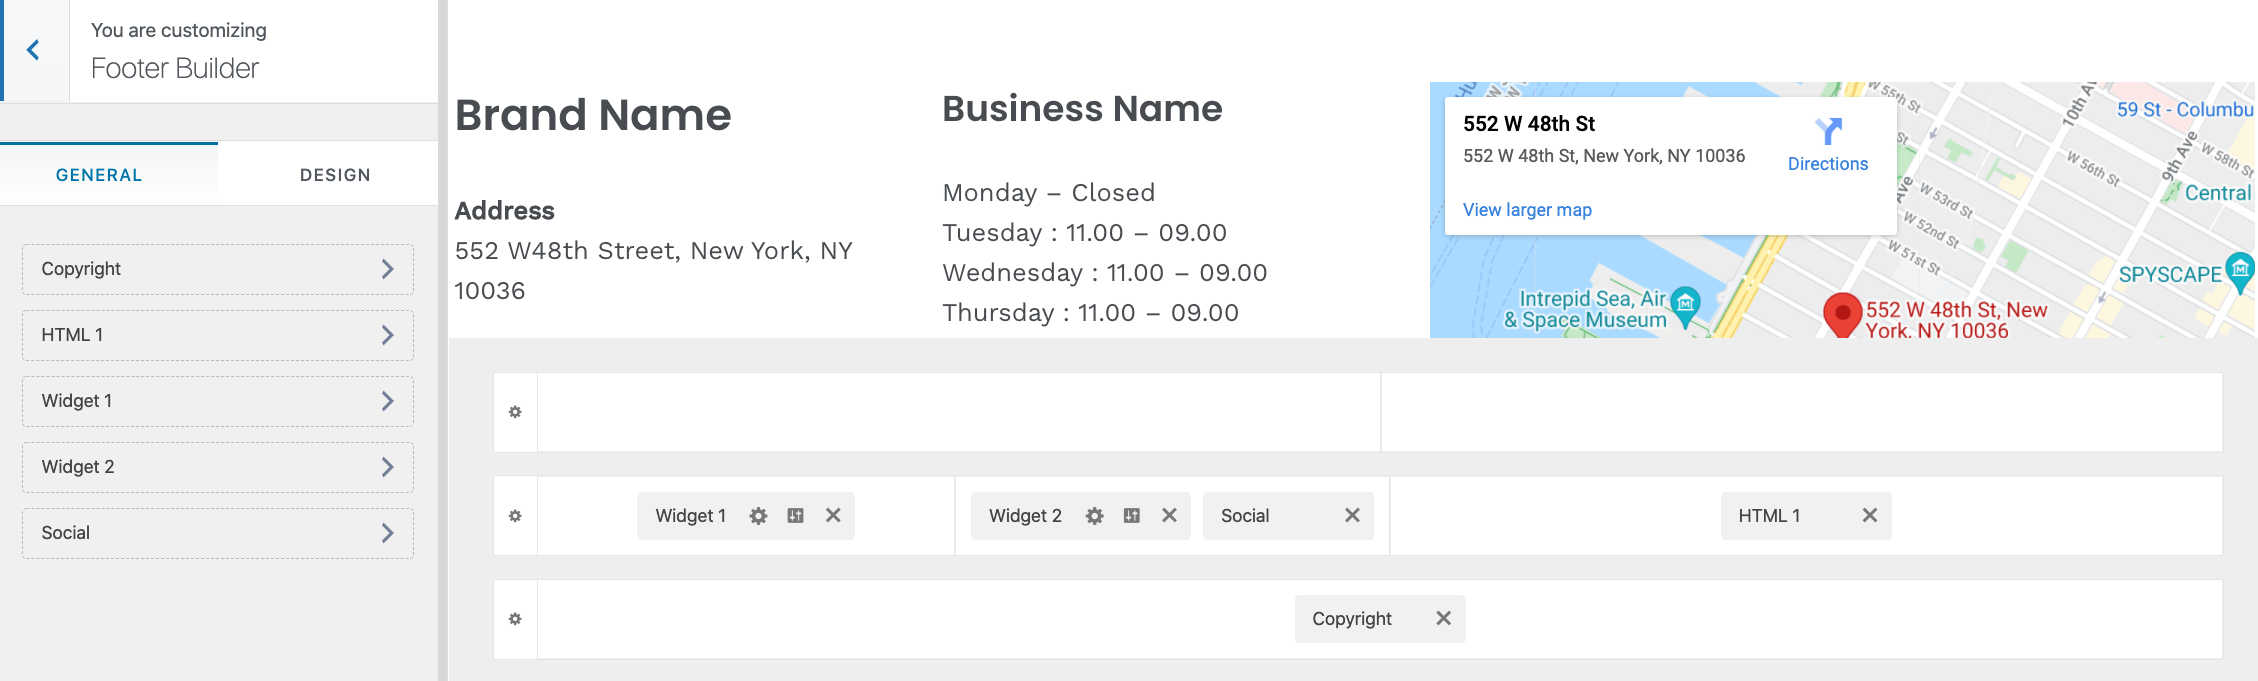
Footer Builder
The idea is similar to the Header Builder, but this time, what you're building is the site's footer. You can pick the elements that you want to place there and also move them around with drag-and-drop.
There's a lot more sections in the Customizer sidebar, but you don't have to trouble yourself with them right now. With time, as you master the basics, you can come back and experiment with adding custom CSS, widgets (if you need them), etc.
Customize your homepage
The homepage that you got from your theme's starter design isn't a set-in-stone thing. You can customize it as well.
You can actually go quite deep with these customizations. You can do anything from simply moving stuff around to adding new elements or removing existing ones.
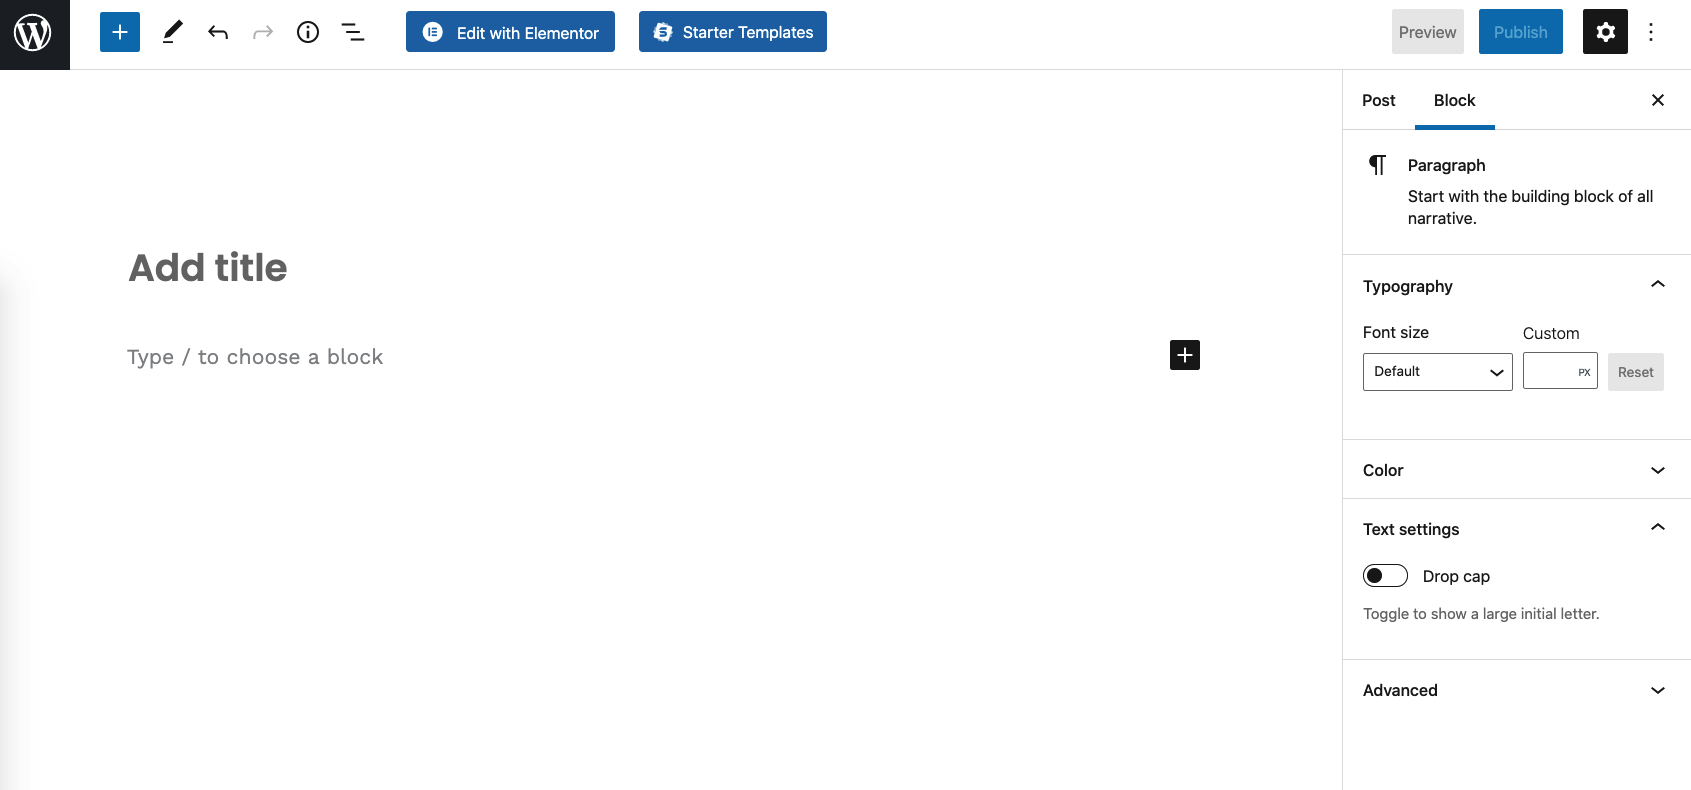
To begin, go to your homepage and click on Edit Page up top.

You'll see the main block interface of WordPress.
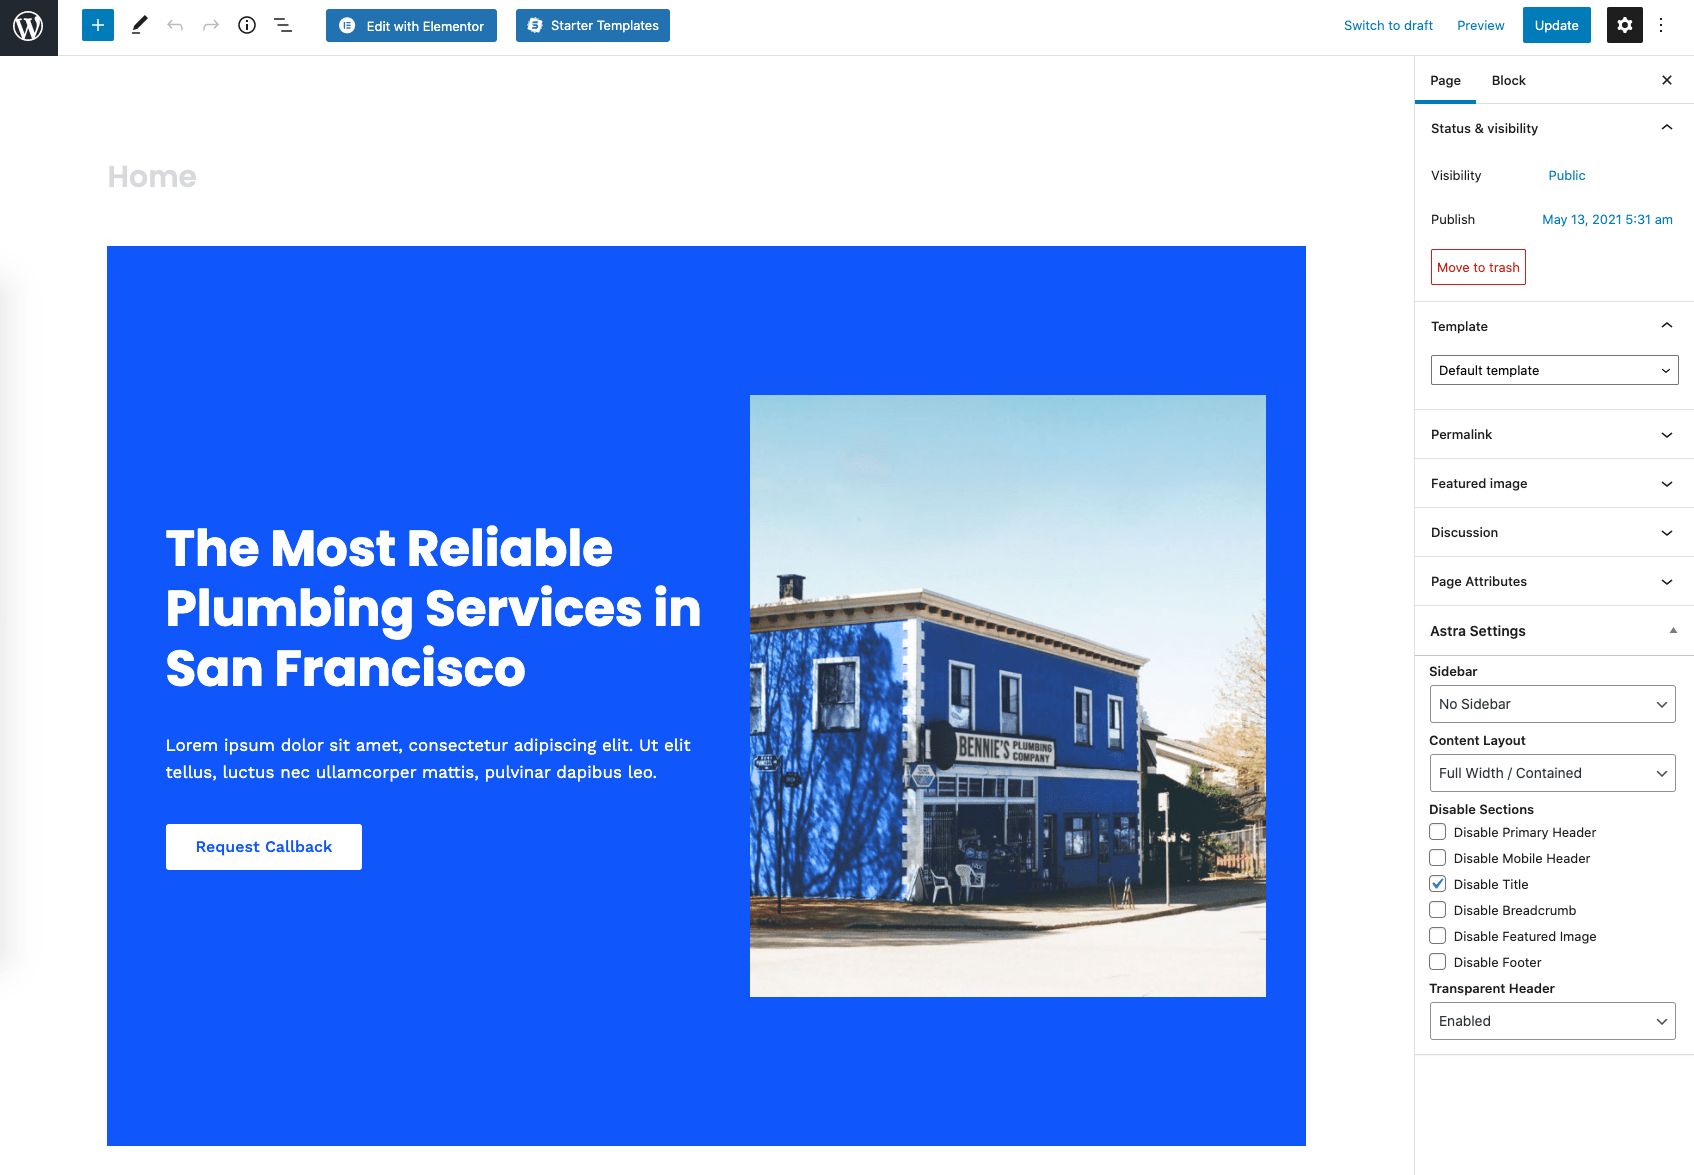
There's quite a lot of stuff on that page, but it's all very user-friendly once you start interacting with what you see there.
Some of the things you can do:
- Grab any element that's on the page and drag and drop it somewhere else.
- Delete elements you don't want by hovering over them, clicking on the three dots icon, and then on Remove block.
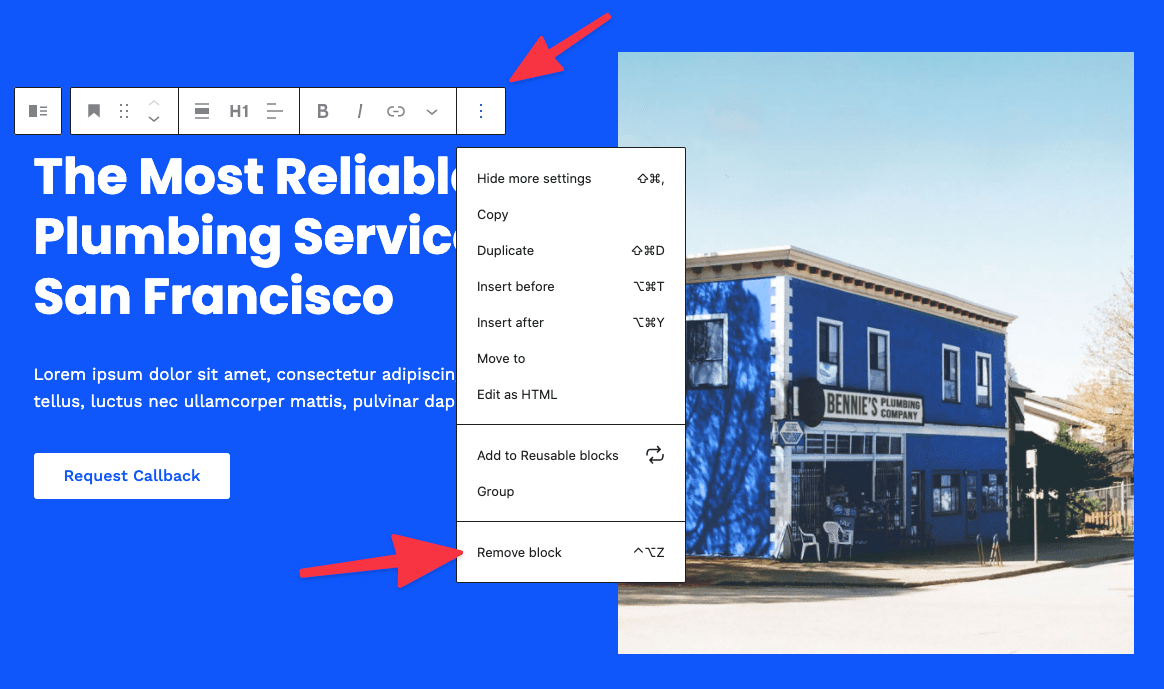
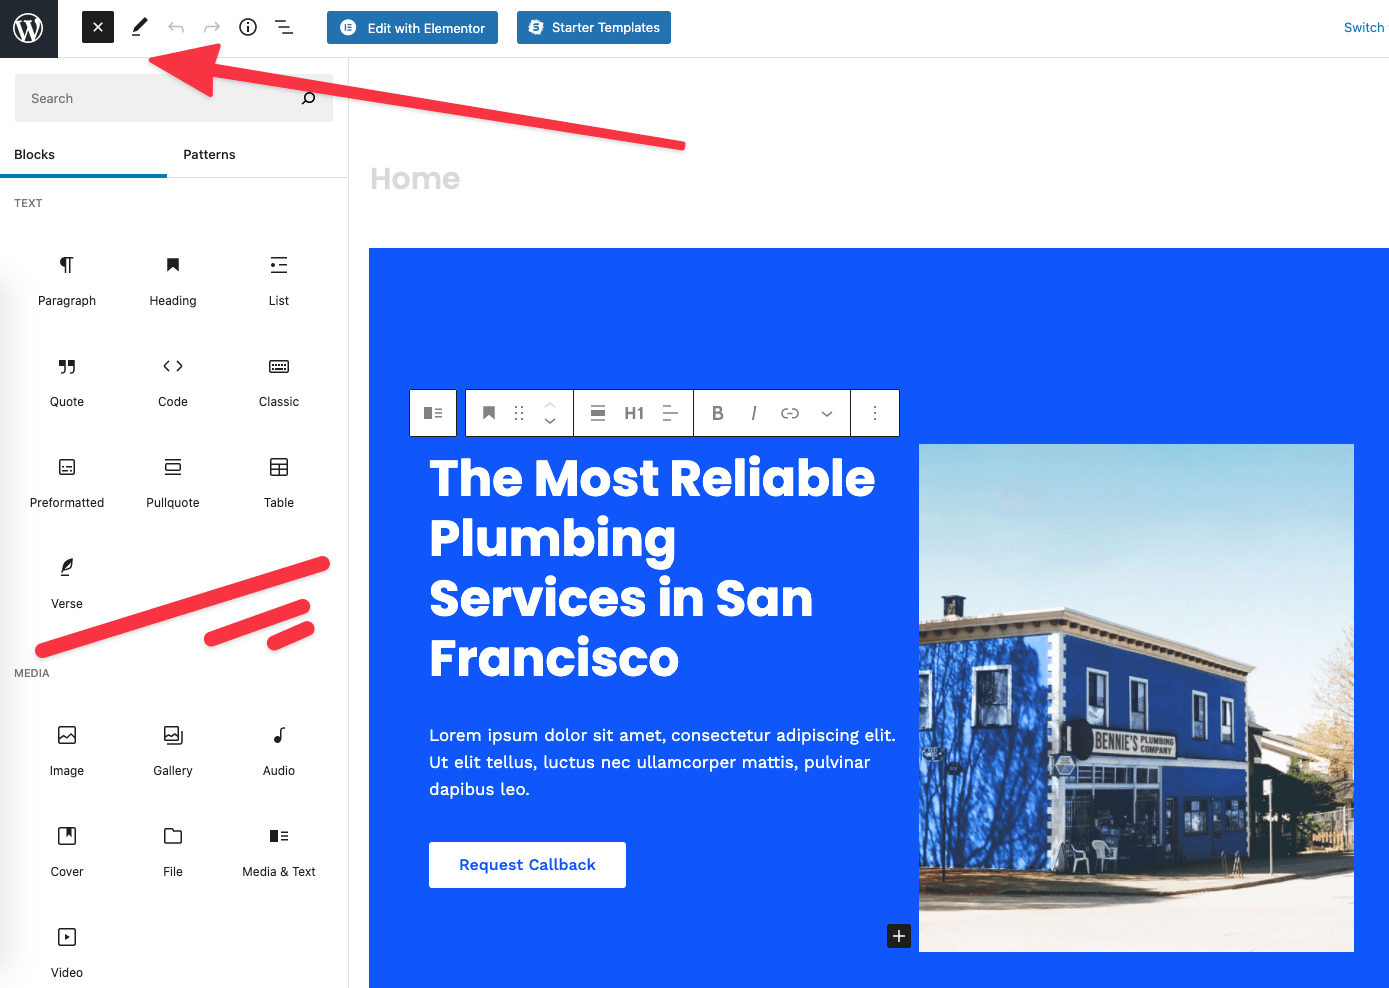
- Add new elements by clicking on the “+” button in the top left and then dragging a new block onto the canvas.
- Click on any of the elements on the canvas and change the texts.
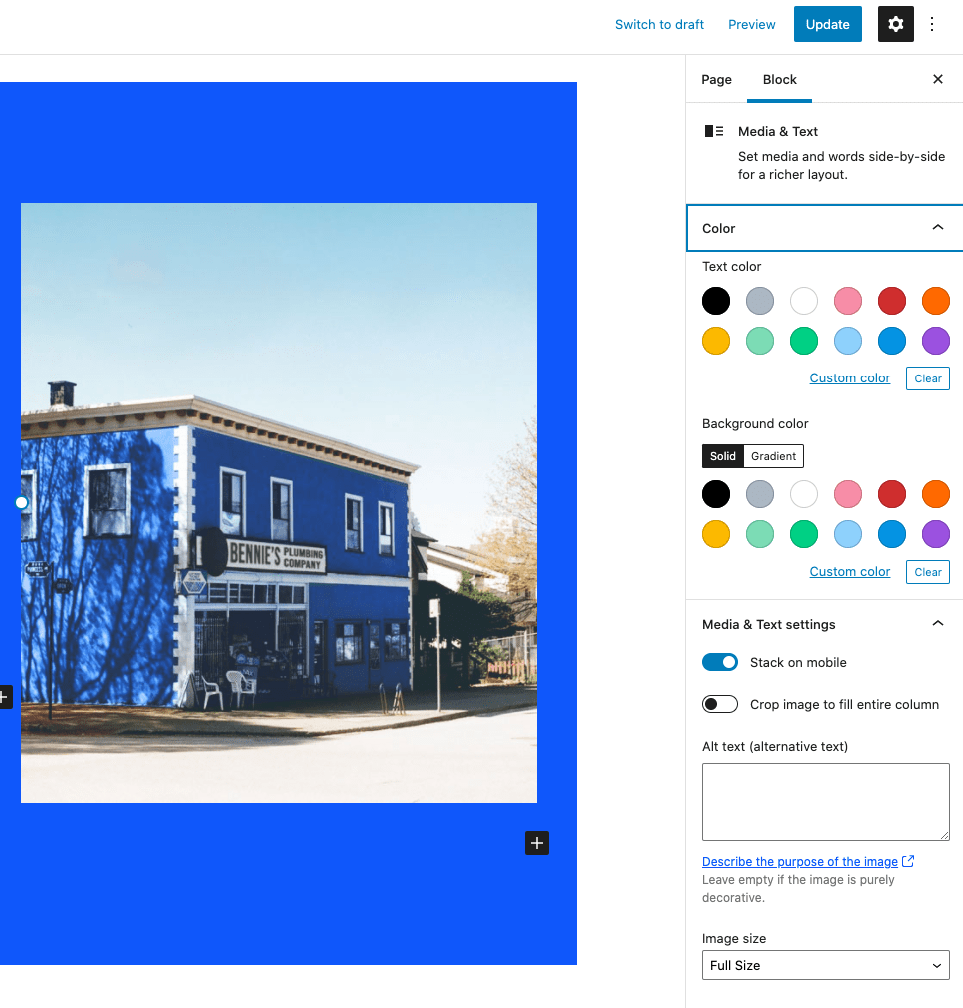
- Click on any of the elements again, but this time look at the sidebar on the right. Change some of the parameters there. Depending on what type of block you're interacting with, you will be able to adjust the font, size, colors, styling, and more.
When you're done, click on the main Update button in the top right corner to save all your changes.
Create the must-have pages
Depending on the starter design you've chosen, you will already have some static pages created. To see them, go to Pages from the WordPress dashboard.
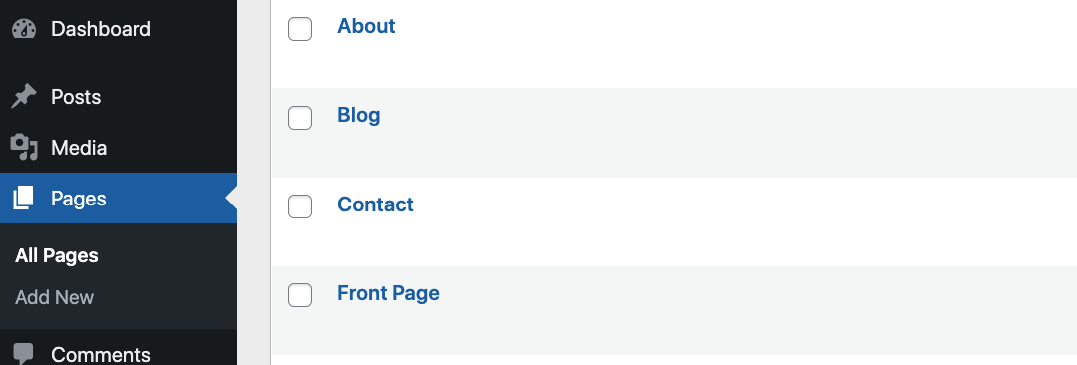
Go through the pages you see there one by one and adjust them accordingly.
The process of working with either of these pages is the same as when you worked on the homepage.
Also, if any of the following pages are missing from the list, create them by hand:
- About page – a page that talks about what the site is and who it's meant for. Here's an example of such a page on our site.
- Contact page – this is where you can add your contact form (created via Contact Form 7, remember?) plus any other contact info that you want to display.
- Privacy Policy – a page that's required by law in many countries. WordPress already gives you a handy template for that page. Fill it out with your info. Consult with a professional if needed.
Creating a new page is simple; click on the Add New button in the Pages section of the WordPress dashboard.
This is just the tip of the iceberg when it comes to pages. Different websites will need different pages. If you're not sure what pages to create, your competition is always a good source of inspiration. See the pages they have on their sites and think if replicating them on your site makes sense.
Adding site navigation
Now that you have a handful of pages created, it's time to make sure that your website menus link to those pages and every page can be found easily.
Go to Appearance → Menus (from the WordPress dashboard) to begin.
Your theme already came with some example menus, but you should still check if nothing is missing there.
First, see what menus are available in the main drop-down section next to “Select a menu to edit.” It's best to start your work with any menus that are already on your site instead of creating new ones.
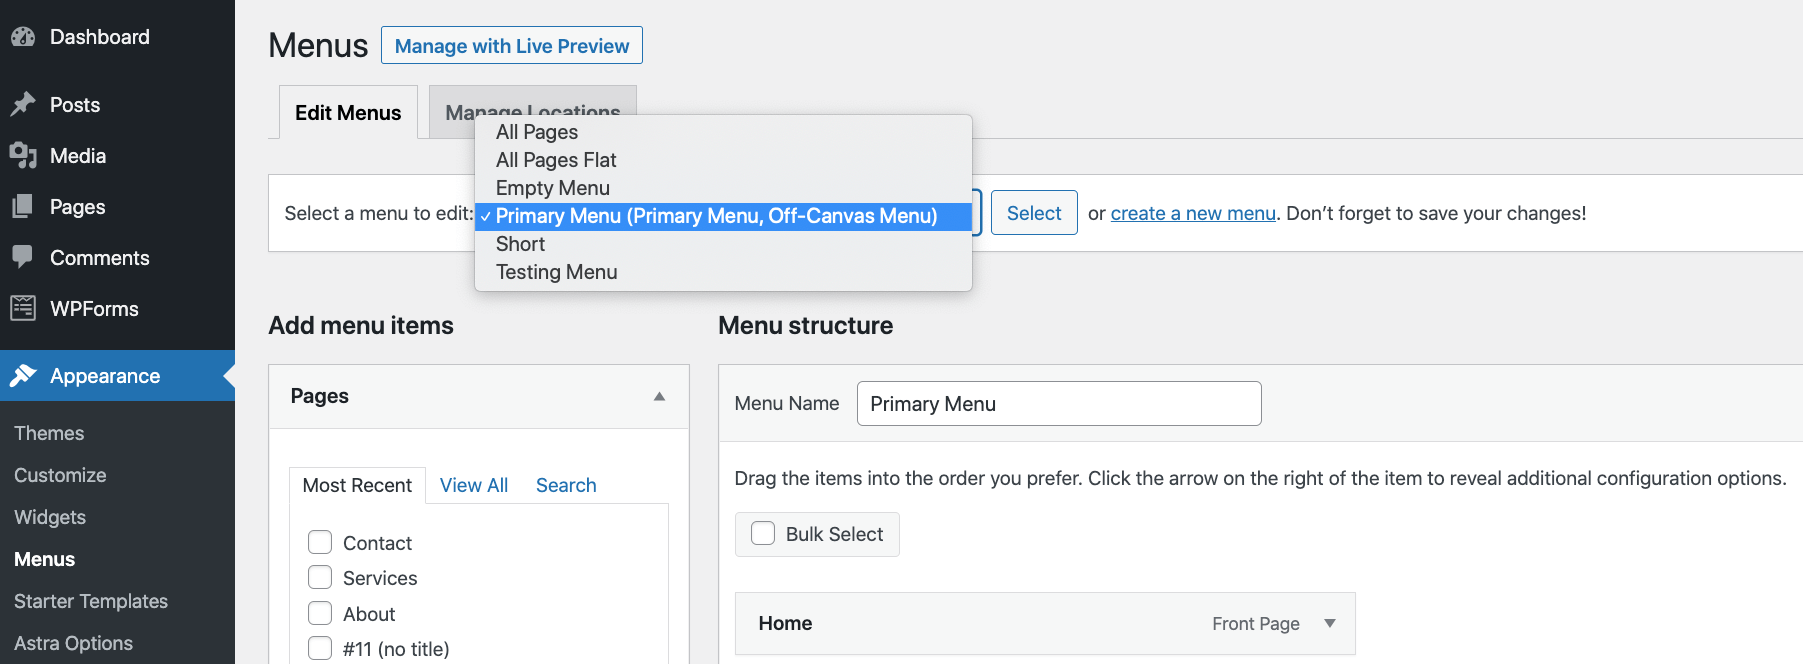
Once you've selected a menu, see if all your pages are already included in that menu.
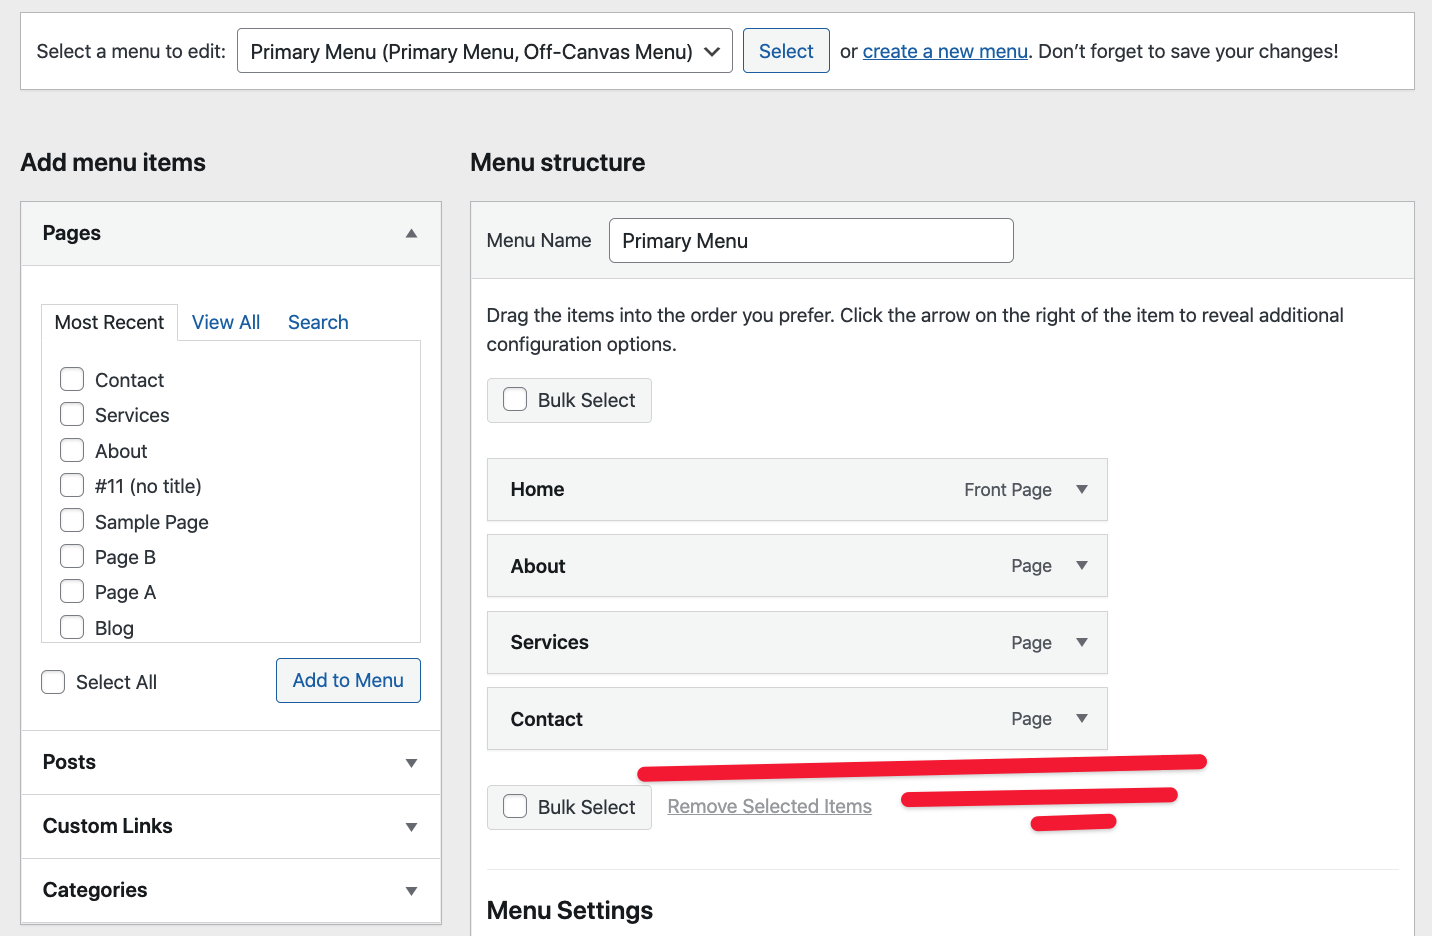
If not, pick your pages from the sidebar on the left and click on Add to Menu.
Of course, you can also choose to delete items from the menu. To do that, click on an item and then on Remove.
You can drag and drop pages within the menu to realign them.
Optionally, you can also change the display location of the menu – via the boxes next to “Display location.”
Click on the Save Menu button at the bottom to save all your changes and make the menu visible publicly. Also, make sure to always test your menus once you're done working with them – see if all the links work correctly.

Start a blog
The term “blogging” has evolved quite a bit over the years, and these days, its meaning is a lot broader than a couple of years ago.
Blogs are no longer small personal projects where people write about what they had for breakfast or about their favorite book. Nowadays, blogs are serious business tools – and I do mean serious!
So, what is a blog exactly?
These days, a blog is simply the part of your website where you share content/articles on topics that are of interest in your niche.
If you're, say, a barber, those topics could be, “how to style your hair in the morning in less than 5 minutes,” or “how to trim your beard by yourself.” These are quite obscure examples, but, actually, the more specialized the better!
By publishing advice that your audience wants to read about, you're convincing people to keep coming back to you. And, as a byproduct, they will use your services or buy your products every once in a while. In other words, the trust you've built through content can then be monetized via your products or services.
How to start blogging on WordPress
This one is simple!
WordPress actually started as a purpose-built blogging engine. Quite frankly, WordPress was born to do blogging!
This means that you don't even have to install any additional tools on your WordPress site before you can start blogging on it.
Simply go to Posts → Add New and start writing your first blog post.
This interface should look familiar…it's basically the same interface you used when working on your pages (and homepage).
As you're writing your post, you can add images to it, links to other websites, links to social media, and loads of other things. When you're done, click on the main Publish button up top.
👉 If you want to learn more on how to blog on WordPress, read this in-depth guide of ours.
(Optional) Add an ecommerce store module
I feel like I've said it a couple of times in this post already, but the great thing about WordPress is that it can serve any type of website purpose or business goal. This also means that you can use WordPress as the engine that runs your ecommerce store.
WordPress can handle all of the core functionality of your ecommerce store, your product listings, the shopping cart, customer orders, payment processing, and basic fulfillment management.
All this is done by a free plugin called WooCommerce.
Installing WooCommerce works just like installing any other WordPress plugin – simply go to Plugins → Add New and enter “WooCommerce” into the search box. Click on Install and Activate to get WooCommerce going.
WooCommerce will invite you to go through a quick onboarding sequence, where you'll handle the key settings and store details (such as taxes, shipping zones, etc.).
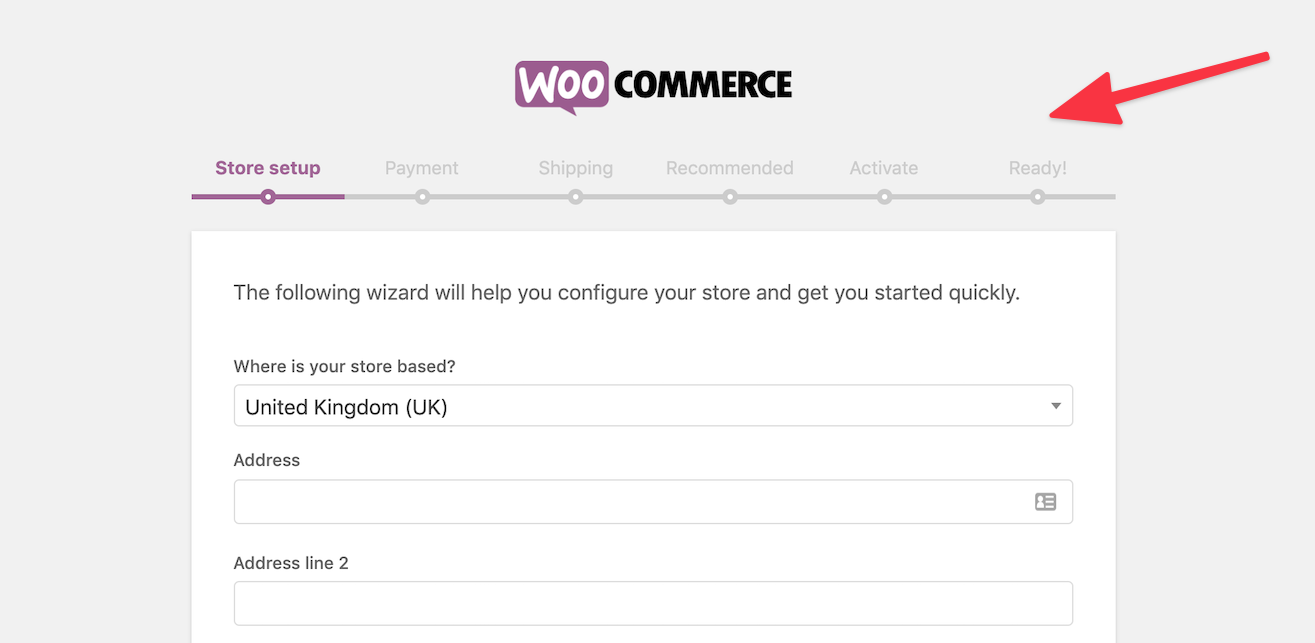 With that done, you can start adding your products and building your shop page to accept your first customers.
The topic of working with WooCommerce deserves its own resource, and we really can't explain everything in just a couple of paragraphs here.
👉 If you want to get more in-depth info on how to start an online store on WordPress and WooCommerce, read this separate guide. It's not only a technical walk-through, but also info on how to decide what to sell and how to position your store correctly in your niche. A highly recommended read for anyone interested in starting their ecommerce journey!
Get the word out
We've covered a lot of ground in this step-by-step guide! We took on everything from learning the basics of WordPress to picking a domain name and hosting, setting up your site, picking a design and customizing it, adding new functionality via plugins, and much more.
At this stage, your WordPress website should be fully functional and ready to welcome your first visitors. The only question that remains is, how do you actually get people to find your site?
Right, this seems like an important puzzle piece that's missing. But don't sweat it! Just like learning how to build a WordPress website involves a process, learning how to promote it involves a process as well.
Here are some good resources to start with:
- 10 actionable tips to increase your online store's traffic quickly
- ecommerce marketing – your in-depth guide to doing it right
- 50 ecommerce marketing tips for outranking competitors
- best advertising strategies for online shops
Have any questions on how to build a WordPress website? Ask away in the comments below!


Comments 0 Responses