
BigCommerce is a wonderful place to get started with your online business, considering the options for unlimited products and bandwidth, along with the sleek storefronts. However, the natural next step for expanding is to migrate your Bigcommerce shop to Shopify. Most online solid shops go with Shopify, and it’s primarily because of the platform’s robust feature set and built-in scalability.
The coolest thing about migrating your site from BigCommerce to Shopify is that it should take less than an hour, and you don’t lose any of the valuable information like product details, images and orders.
With that said, let’s take a look at an in-depth, step by step tutorial on how to migrate your shop from BigCommerce to Shopify.
Step 1: Make a Shopify Account and Store
It may feel natural to get started in the BigCommerce dashboard, but you actually need to create a Shopify account first. Go to the Shopify homepage, and click on the Get Started button. This reveals a popup page where you can type in your email address, desired password and store name. This puts you on a 14-day free trial, so click the Create Your Store button after that.

Step 2: Tell Shopify About Yourself
Shopify offers two options for you: An online store or a retail store (pop up shop). We’re covering a migration in this tutorial, so you would select the Online Store box and click on the Next button.

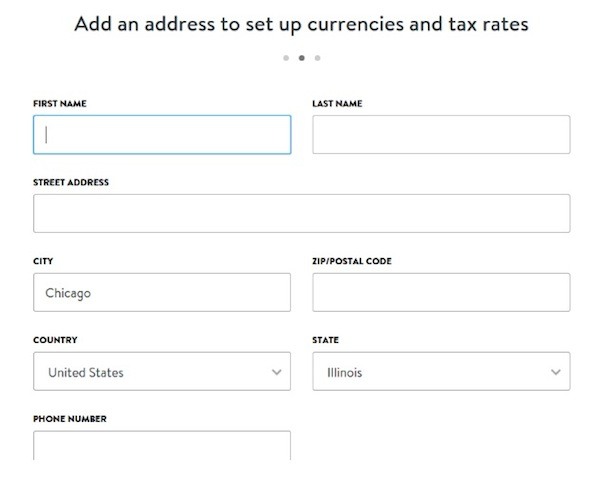
On the next page, fill in your address information to setup your tax rates and currencies. This page requires your name, address and phone number. Once complete, click on the Next button to proceed.
Step 3: Specify What Your Store is Like for the Migration
Shopify wants to learn as much about you as they can. This way, they can assist with the migration and even send you tips as to how you should handle the new platform. This new page asks for you to tell them if you are already selling on another platform, which is what you’re doing.
The Bigcommerce platform is an option, but you can select the Other option at the bottom of the drop down menu. Mark how much money you plan on making per year, and click on the Enter My Store button.

Step 4: Select a Payment Plan from Shopify
Since it’s not the greatest idea to migrate your entire shop with a trial account, I recommend selecting a Shopify plan to complete the process. In the dashboard, choose the Select a Plan button to see all of the solutions available.
If you just want to test this migration out, go with the Starter Plan. You also have a few other plans including the Basic, Professional and Unlimited options. Click here for pricing details and information about what you receive with each plan.

After you decide on your plan, you can go to the next page to fill in all of your payment details. After typing in your credit card information, and how often you would like Shopify to bill you, click on the Confirm Changes button in the bottom right hand corner.

Step 5: Choose a Theme So Your Site Looks Cool
Although it’s not possible to migrate the exact design of your Bigcommerce store, Shopify offers various themes that you can browse through to keep your branding intact. Go the the Shopify dashboard homepage, and click on the button that reads Select a Theme. This is located under the Customize the Look of Your Website area.

Keep in mind that you can choose a theme after the migration, but it’s often easier to visualize how the migration worked if you have an actual layout for the website. That said, if you do decide to implement a theme, scroll through the Shopify Store, and consider opening up the entire store to see every option available to you. Some of them are provided for free, while others require a fee.

Step 6: Install the Migration App Called Cart2Cart
Most Bigcommerce customers use the Cart2Cart app, which can be found in the Shopify App Store. Click here to find Cart2Cart, and click on the Get button to add it to your shop.
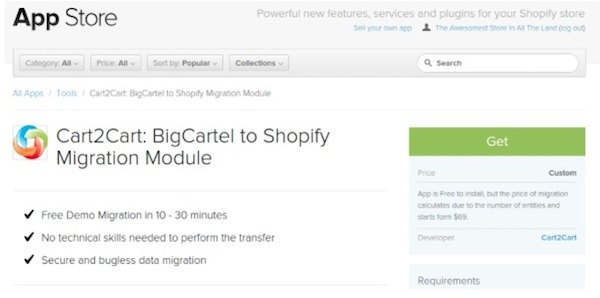
The Cart2Cart app costs at least $69 for a migration, yet it’s definitely worth it, considering the handy tool transfers over everything below.
- Your product details and images.
- The categories in your Bigcommerce shop.
- Customer data and shiping information.
- All orders, manufacturers and order products.
After pressing the Get button, the system brings you back to the Shopify dashboard, where you can click on the Install Cart2Cart: Shopify Migration Module button. This is completely free at this point, but they ask you for payment details once you want to run the migration.

Click on the New Cart2Cart User tab, and fill in your full name, email and desired password. Remember that this is a completely different Cart2Cart account, so it has no relation to your Shopify login information.

Step 7: Configure the Source and Target Carts
The Source Cart Setup is where you specify where all your data is coming from. In this case, it’s Bigcommerce, so go through the drop down menu to choose that. You must also paste in the main URL (domain name) of your Bigcommerce site.

The Bigcommerce migration also requires you to retrieve the API Path and API Token from your Bigcommerce account. Follow the steps in the screenshot below once you login to your Bigcommerce store.

Once you find the API Path and Token, paste them into the fields required, and click on the Proceed to the Next Step button.
The Target Cart Setup is fairly simple, since all you need to paste in is the URL of your new Shopify store. After that, click on the Proceed to the Next Step button.

Step 8: Begin Your Migration
Once you are ready to make the move from Bigcommerce to Shopify, click on the Start Migration button.

Step 9: Choose the Entities You Would Like to Migrate
You should get transferred to a Cart2Cart page, where you can select the entities you want to move over, such as products, categories, customers and orders. Click the Proceed to Next Step button to move past this step. All the additional options on the page can be skipped; however some stores may like the idea of preserving order IDs, so make that decision at your own discretion.

Step 10: Assign Currencies for the Migration
Since Bigcommerce and Shopify have varying currency settings, the transfer program wants to ensure that you are moving all of your prices over in the same currency. You might just have to select the Default Currency, but you may also have to scroll through the list to see which of the currencies work for your country. Push the Proceed to Next Step button to move on.

Step 11: Managing Your Order Status Mapping and Migrating
Each order that comes through your Bigcommerce store is assigned a tag for you to better manage them. For example, one order may be tagged as Pending, while another may be tagged as Shipped.
Shopify wants to ensure that the migration keeps these nice and organized. However, Shopify has different names for these status tags. Therefore, you must walk through all of the order statuses to specify which of the Target Statuses you would like to convert them to. Some of them are the same, like Pending and Pending, but others will require a little thought.

After that, click on the Proceed to Next Step button and run the Demo Migration if needed. Skip the migration insurance and go to the Confirm Migration tab.
Once you walk through this step, all of the details we talked about above will have been transferred to your new Shopify store.
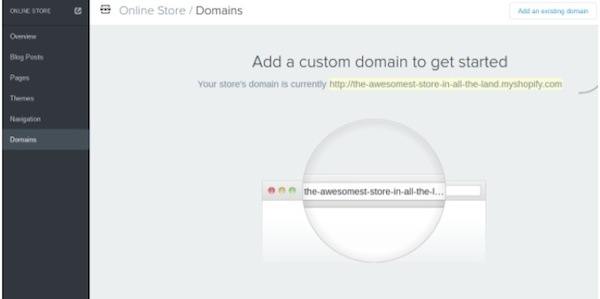
Step 12: Managing Your Domain Name
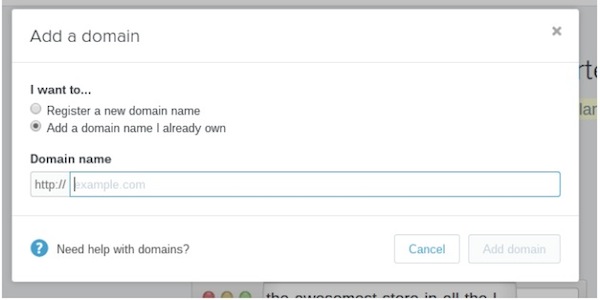
There’s a good chance you want your old domain name on the new Shopify site. For this, navigate to the Online Store tab in the Shopify dashboard. Select the Domains option, and click on the Add an Existing Domain button in the upper right hand corner.
This process is pretty simple, considering Shopify walks you through the necessary steps. Follow along with the Shopify guide and just make sure you paste in the desired domain when they ask.
You may run into some problems with your hosting account or domain provider. In this case, learn how to modify your DNS settings to ensure everything is working properly.
Step 13: Redirecting Your Links
The final area that store owners struggle with while performing a migration is the old links. You have valuable old links to your products and pages, and they probably have built up some SEO power for you. What happens if someone navigates to one of those old links?

You certainly don’t want them seeing an error page, so you need a redirect in order to send users to the corresponding page or post on your Shopify store.
Luckily, the Shopify App Store provides a $39 solution called Traffic Control – Bulk Redirects. It lets you redirect your links manually or upload a list of the links for a bulk redirect. Simply install the app and walk through the steps to make sure your links are set and you won’t waste any SEO link juice.
Btw, did you read my full Shopify review?

Over to You…
Are you ready to migrate your shop from Bigcommerce to Shopify? Drop us a line in the comments section below if you have any questions about the whole process.


Hello – I’m going on 24 hours of import, it currently says “Reading File” is this normal?
Hey Katie,
Did you manage to solve this issue?
We have managed to start our Shopify store, we decided we did not want the previous images for most items and changing product details and currently moving our customers over with csv using the Shopify template. The next dilemma is- is there a similar way to migrate orders over without an app and if not, can you choose to only import orders with cart2cart without using it for products and customers? We also have been using sweetooth rewards (recently they changed names to smile.io) and we want to be sure that once we install the app with Shopify and switch our domain over when ready to go live that it will update and keep existing rewards credits for the e-mail addresses provided for/by individual customers – is that linked to domain name? Example – currently on the Shopify domain, install smile.io and it wants me to create a new account – but once I bring the domain over to Shopify, install it again (I deleted it) then I should be able to log in and keep it connected the way it already is, right?
Thanks for this very helpful blog post.
We want to migrate the data from BigCommerce to Shopify, but we want to migrate it and then make adjustments to the new site before going live. Can we migrate to the test site and keep the BigCommerce site live until we’re ready to go live? How do we do that?
Thanks,
Stuart
Hello, you can import your products into your Shopify store and change the domain name only when you are ready. Untill then your Shopify Store will be on a sub domain like yourname.shopify.com
Should I wait to do the 301 redirects until I’m ready to switch my Shopify store live?
Hey Jessica, yes you should definitely wait.
I’ve a shop on Bigcommerce and thinking about to transfer to Shopify but I’m worried about loosing customer and seo…
Hi Elena,
If done right migrating from BigCommerce to Shopify should not affect SEO.
–
Bogdan – Editor at staging.ecommerce-platforms.com