
There’s one main reason to change languages on Shopify: your customers speak a different language than what’s offered by default. That default language is English, so you may find that your shoppers mainly speak German, French, or Chinese, making it essential to translate.
Merchants also encounter the need to change languages on Shopify when they expand into other markets. This warrants one of two approaches:
- You could create multiple regional sites (like one under .de and another as a regular .com domain name). But for the new market, it makes sense to implement the language that’s most common for customers in that region or country.
- You can offer multiple languages on one ecommerce store, where the customer chooses their desired language, or the web browser automatically detects which language should be used based on the user’s location.
Luckily, switching to another language is easy on Shopify. However, there are multiple areas you must address, like translating your theme content, along with the checkout module.
In this guide, we explain everything you need to know about how to change languages on Shopify. Keep reading to learn all about it!
Method 1: Add One (Or Several) New Languages Using Shopify’s Built-in Features
The goal of this method is to keep your current online store, but add options for multiple languages. This way, the browser can work its magic to select the right language for each end user. As a fallback, your site lists a dropdown menu for the user to select the language they want to see, across the entire online shop.
It’s a beneficial method when trying to minimize the number of sites you create in other markets. Merchants are able to maintain one website for all regions, while still having the opportunity to reach new customers.
Here’s how to add new languages to your Shopify store (using the built-in translation features):
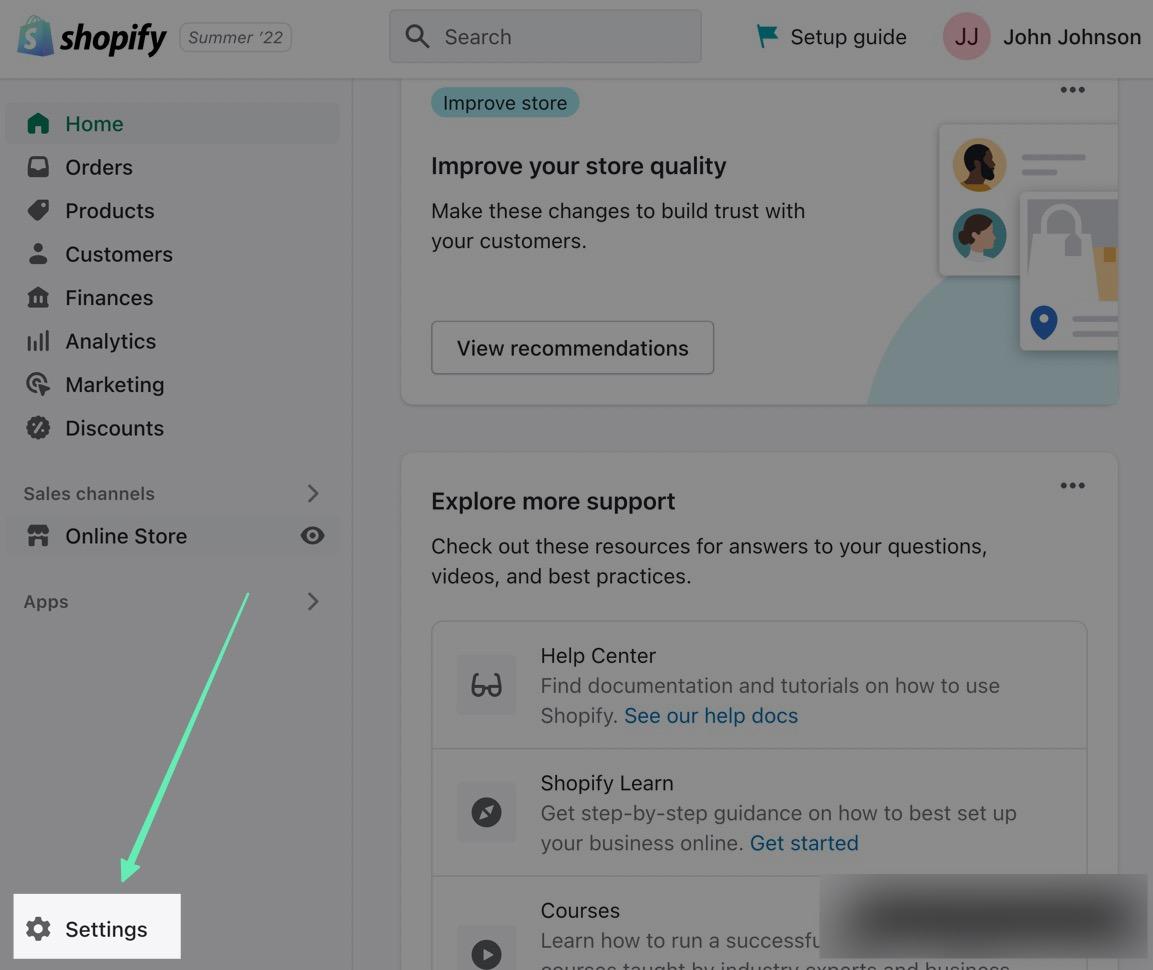
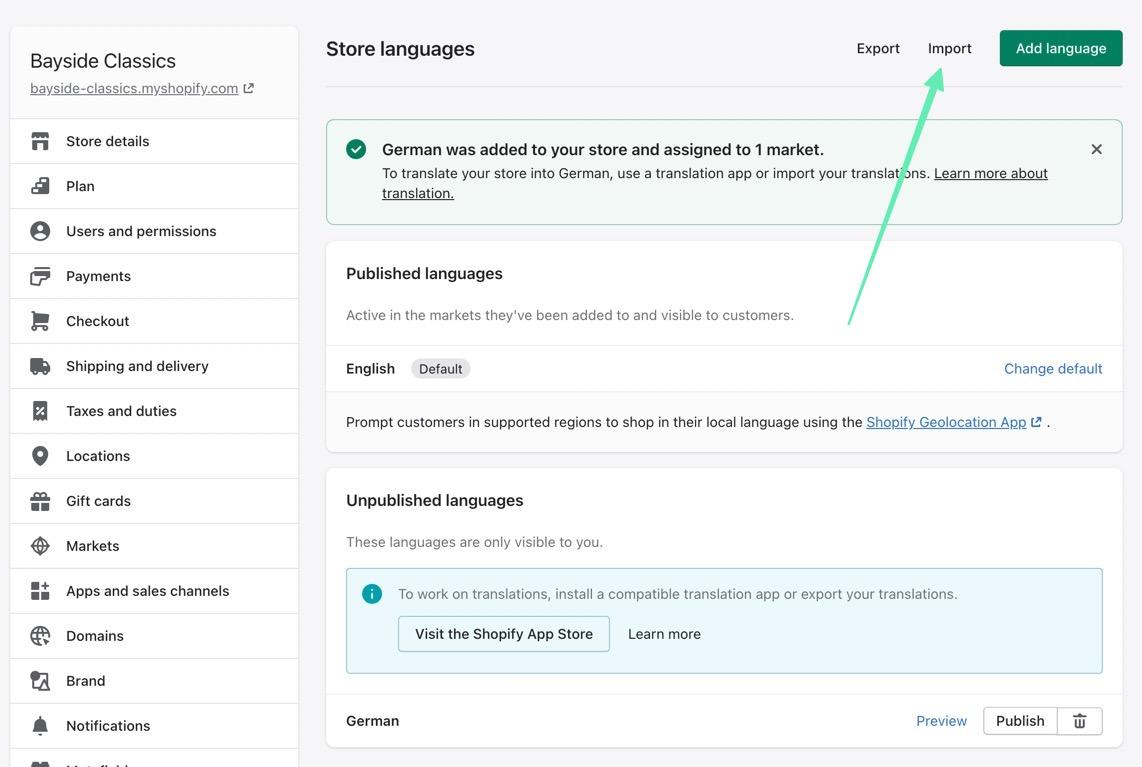
Step 1: Go to the Language Settings in Shopify
Log into your Shopify account to open the backend dashboard. On the left side menu, look to the very bottom to locate the Settings button. Click on Settings.
This brings you to the Settings panel, which features a long list of settings tabs, for things like domains, metafields, locations, and notifications.
You’re looking for the Languages tab, which is situated near the bottom of the list. Scroll until you find it, then click on Locations.
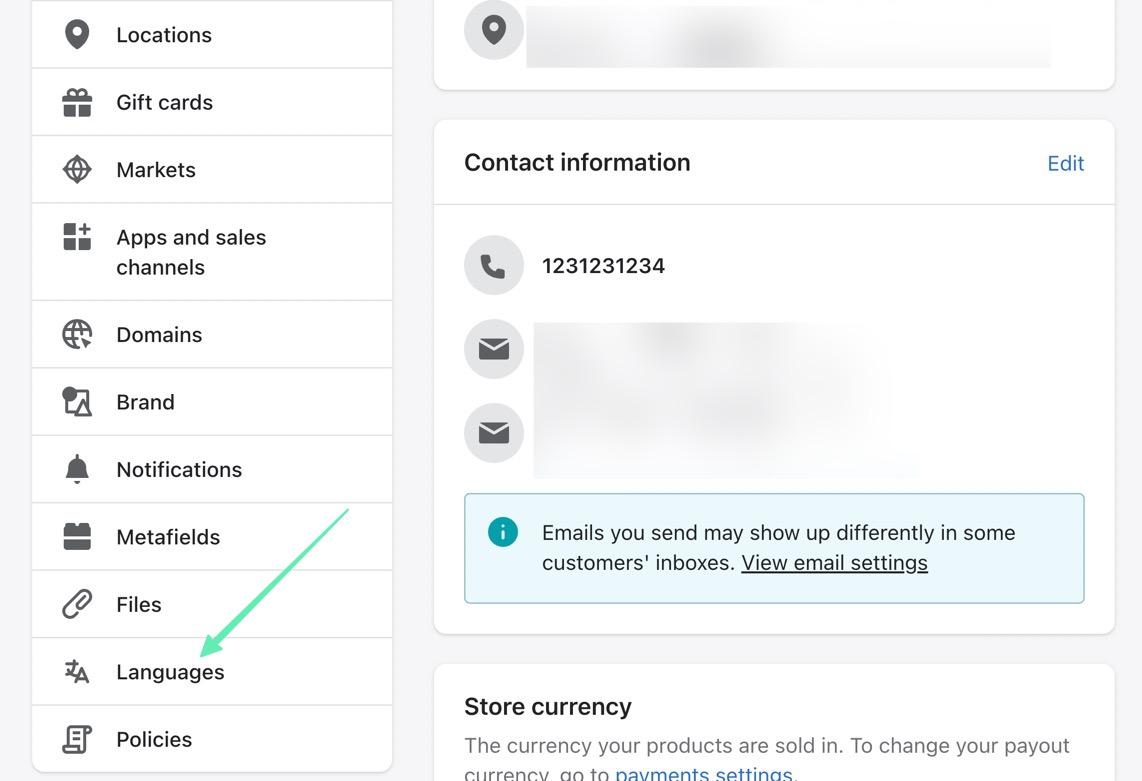
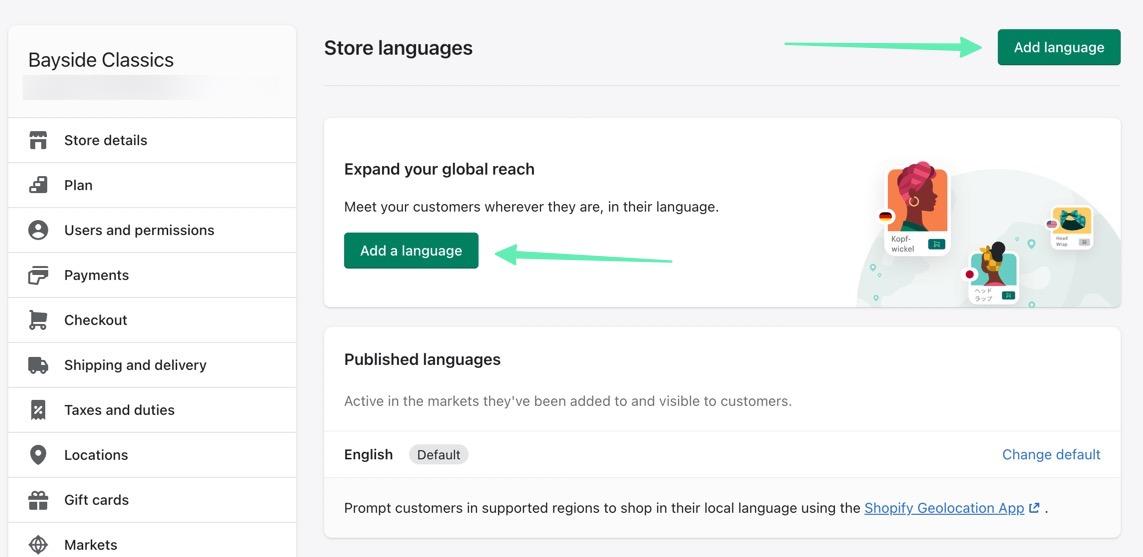
As a result, you’re sent to the Store Languages page, allowing you to move onto the next step for adding languages to your store.
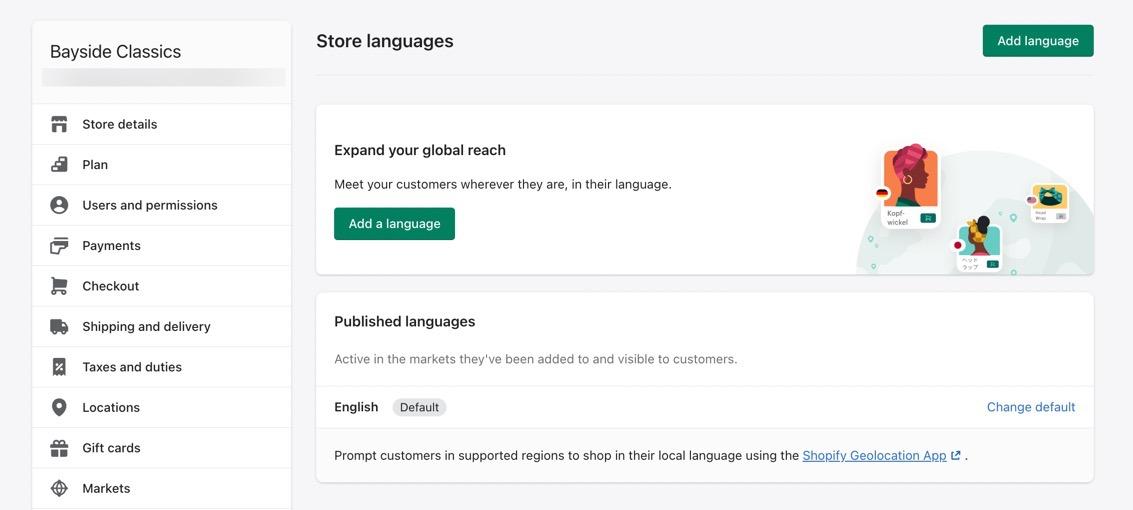
Step 2: Add a Language
Click the Add A Language button.
Note: You’ll notice that the current language is English. While walking through this process, English remains as one of the languages for customers to choose. However, you can delete English (for a site that only needs one language that’s not English) or you can keep it there for customers to pick the language that makes the most sense.
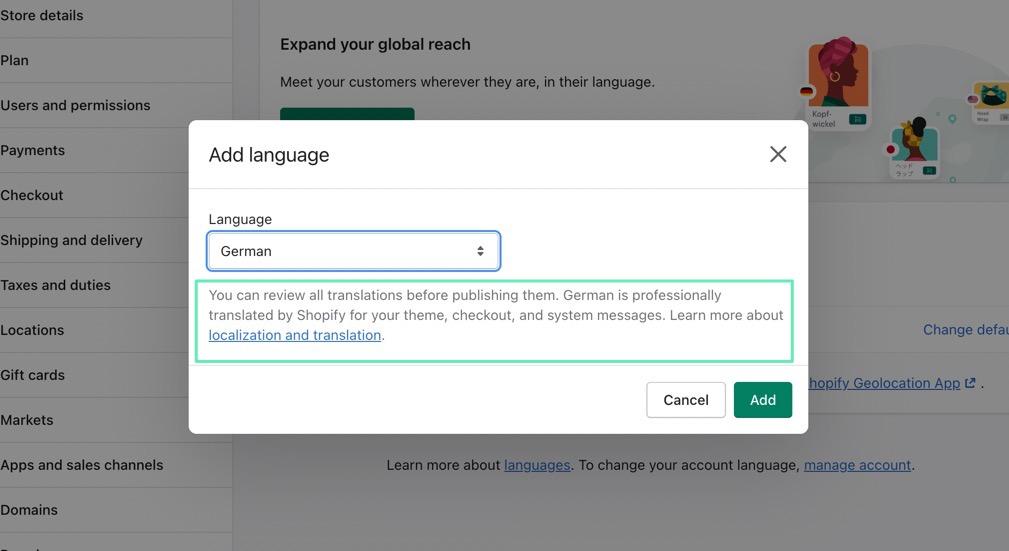
A popup appears for you to sift through the languages available on Shopify. Click the dropdown menu. Navigate to one of the languages you’d like to add. Select the language.
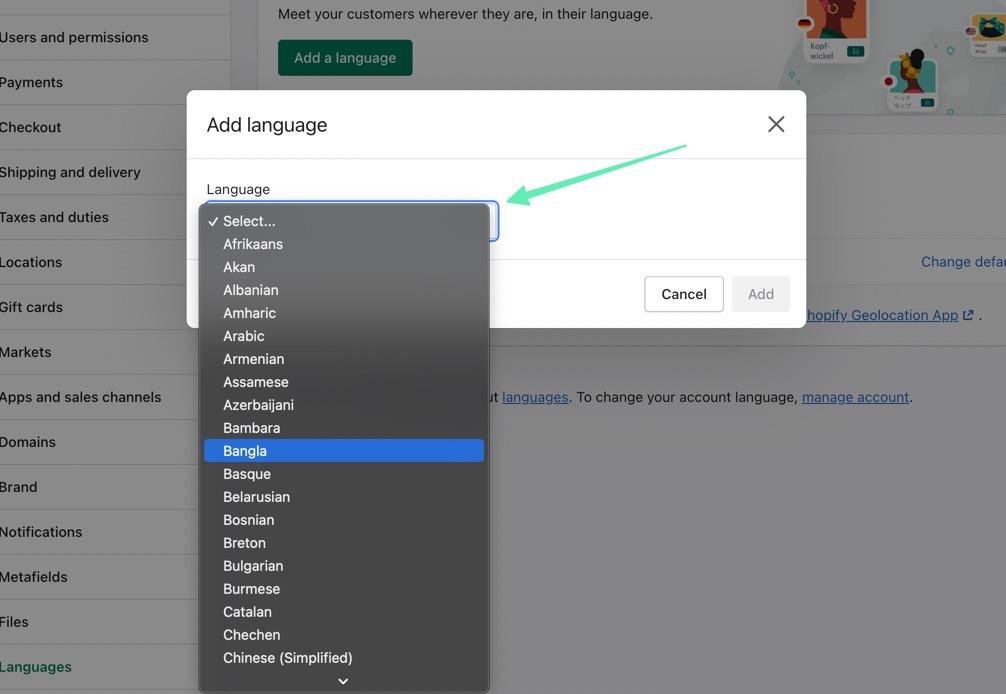
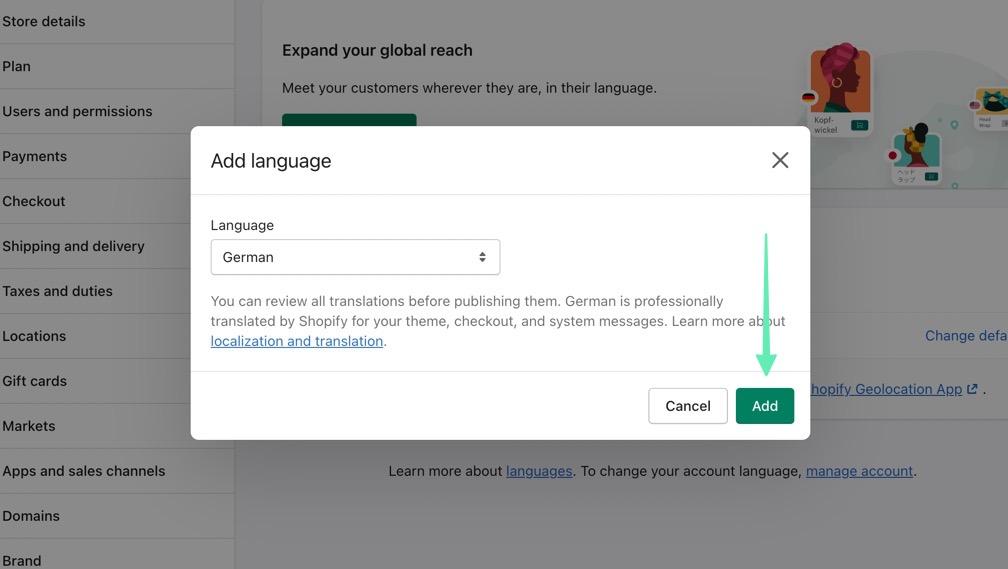
One thing to keep in mind is that some languages are professionally translated to provide a more accurate transition from English. For example, Shopify had already professionally translated much of the content you’d find on standard Shopify themes, giving you a much stronger option for switching to another language.
However, some languages are not professionally translated. That means Shopify uses automated translation tools (similar to Google Translate) to reach a fairly accurate translation of what’s on your website. You may find this helpful, but you often must upload your own content translations to receive the best result. The automated translations also come in handy as a starting point when creating your own importable translations.
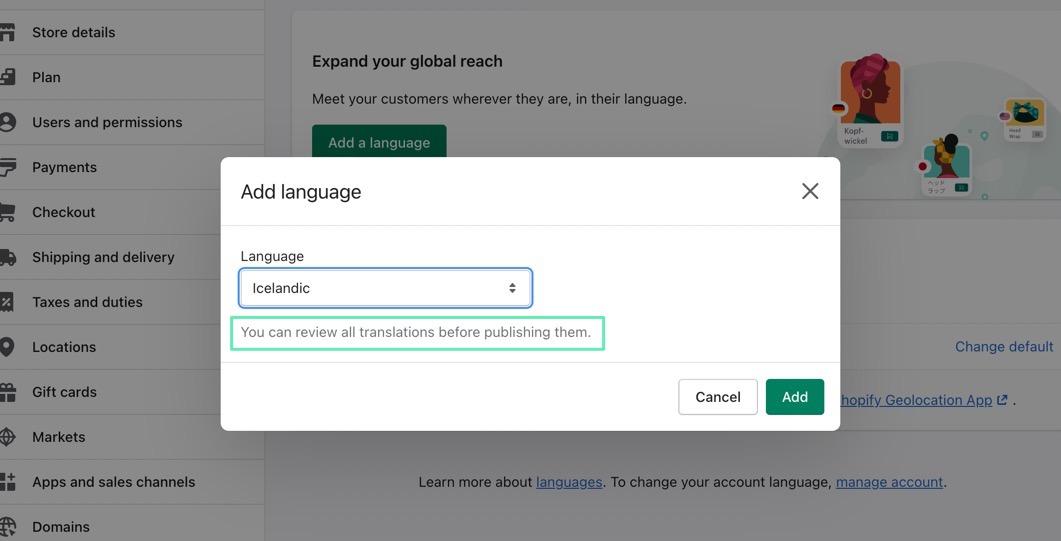
Once you decide on a language, click on the Add button.
Step 3: Import Any Necessary Translations for Content (Optional)
Some Shopify themes may not support complete translations. You also may find that the desired language isn’t professionally translated by Shopify, leaving you with a somewhat incorrect language translation that you must fix manually. Luckily, Shopify provides several solutions for translation issues.
One of them is to import a CSV of your own content translations. This may sound frustrating (that you must complete all the translations yourself) but it’s much faster to go this route instead of scanning through your entire website to make edits for each block of text. The import takes your translations (we recommend hiring someone for this) and automatically updates the entire site for you.
Simply click on the Import button on the Store Languages page to complete that process. It will then ask you to upload a CSV file with all translations inside that file.
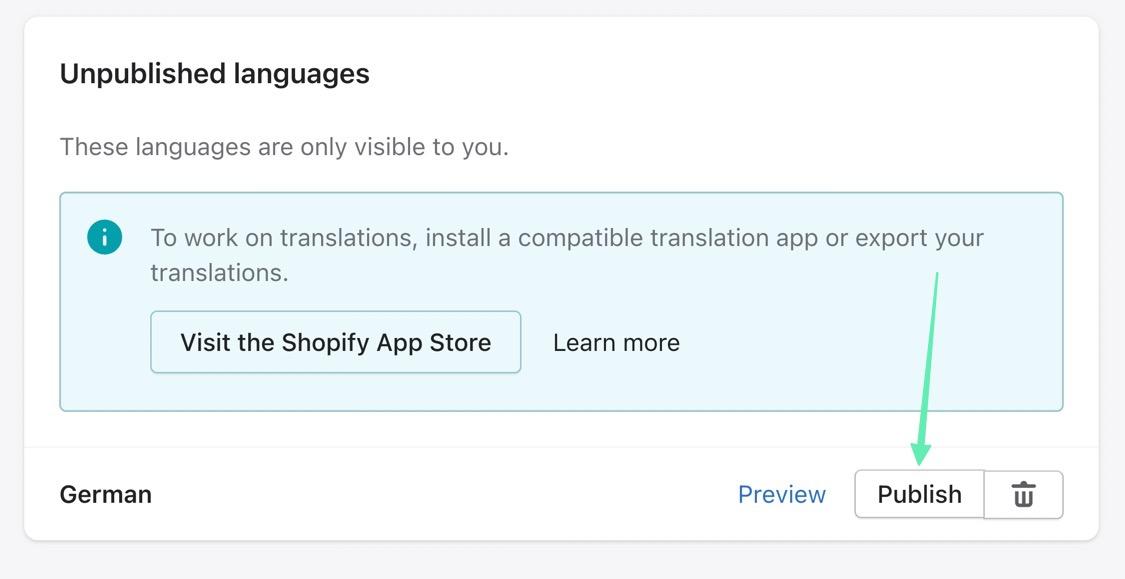
Step 4: Publish the Previously Installed Languages
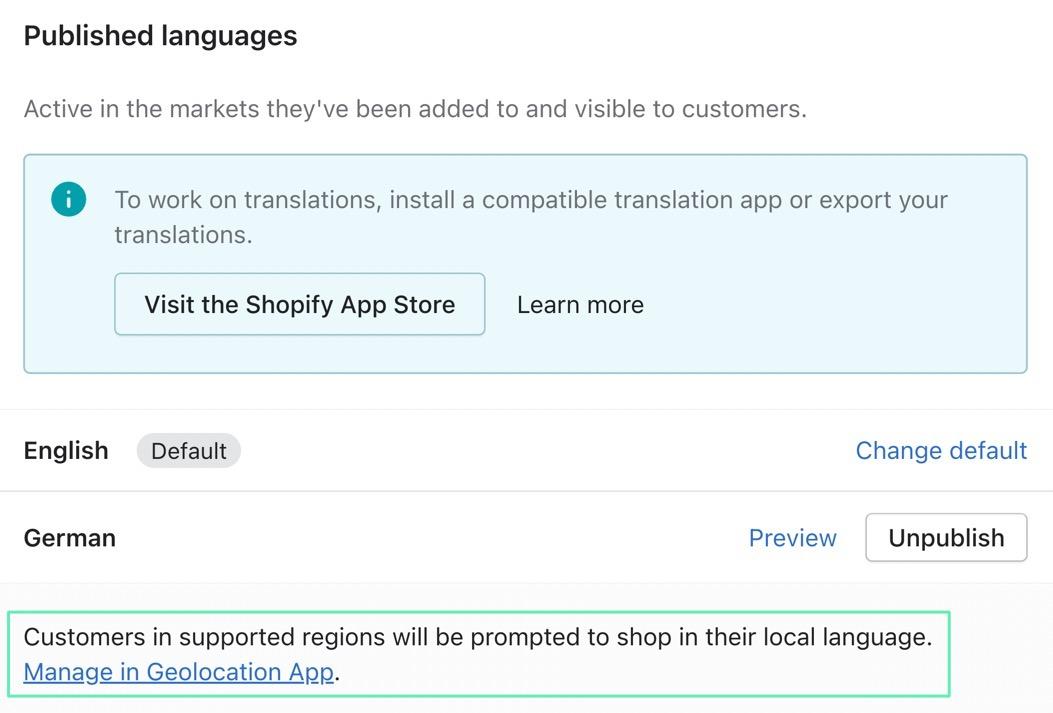
Just because you added a new language doesn’t mean it has been published to your ecommerce store. On the Store Languages page in Shopify, scroll to the bottom of the page to look at the Unpublished Languages header. Here, you should see the most recent language added to the store.
You must click on the Publish button for it to actually take effect on the store.
Note: Consider using the Preview button to get an idea of how the automated and professional translations work with your Shopify theme. Some themes don’t work all that well with the basic translations; for those situations, we recommend turning to a translation app or uploading your own translations.
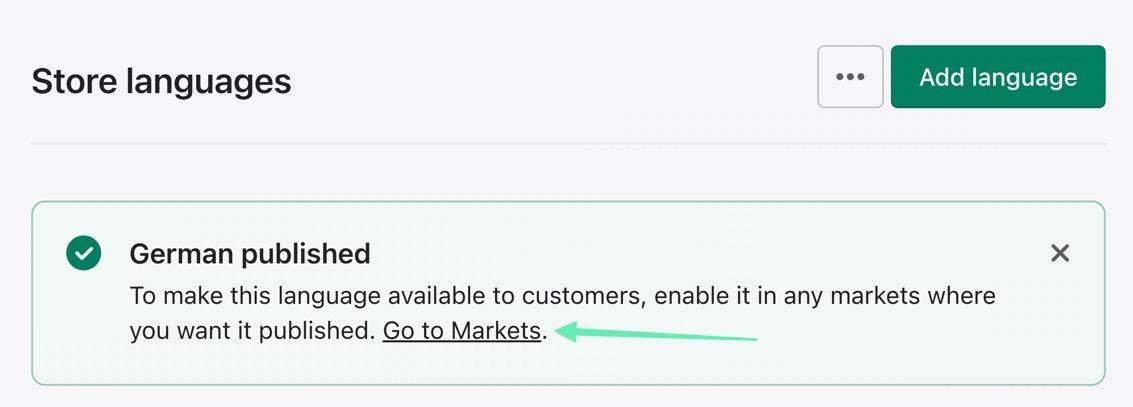
After clicking the Publish button, you should see the new language listed as “Published” alongside the default English language.
Step 5: Add a New Market for the Language
Shopify uses “markets” to offer alternative languages and currencies to shoppers living in countries you may not usually serve. Sellers can add new markets to achieve stronger personalization for regions.
To make it so that your new language is given as an option for certain markets, you must actually add a new market to attach that language to.
On the Store Languages page, click on the Go To Markets link. This should appear inside the confirmation that the new language has been published.
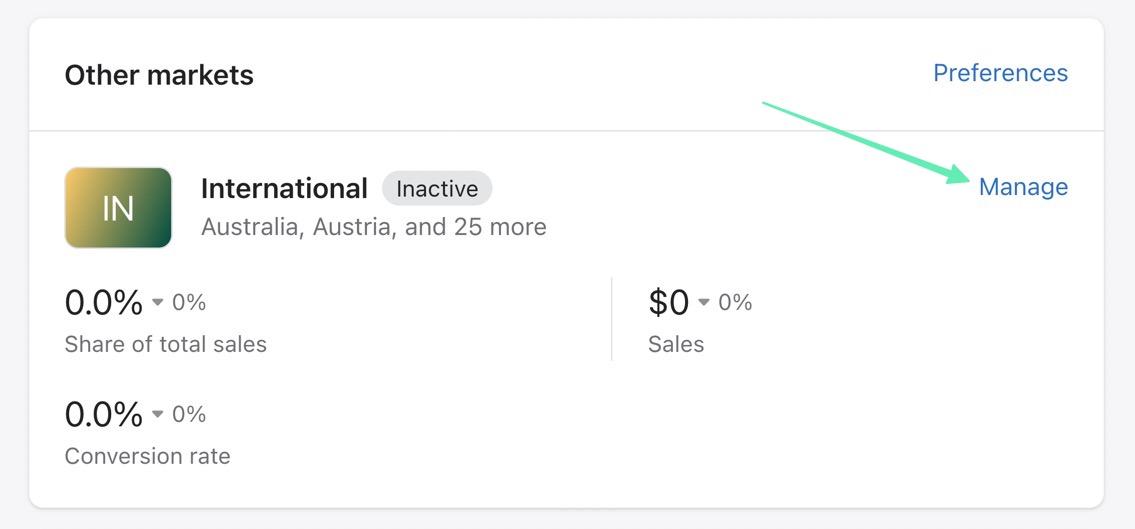
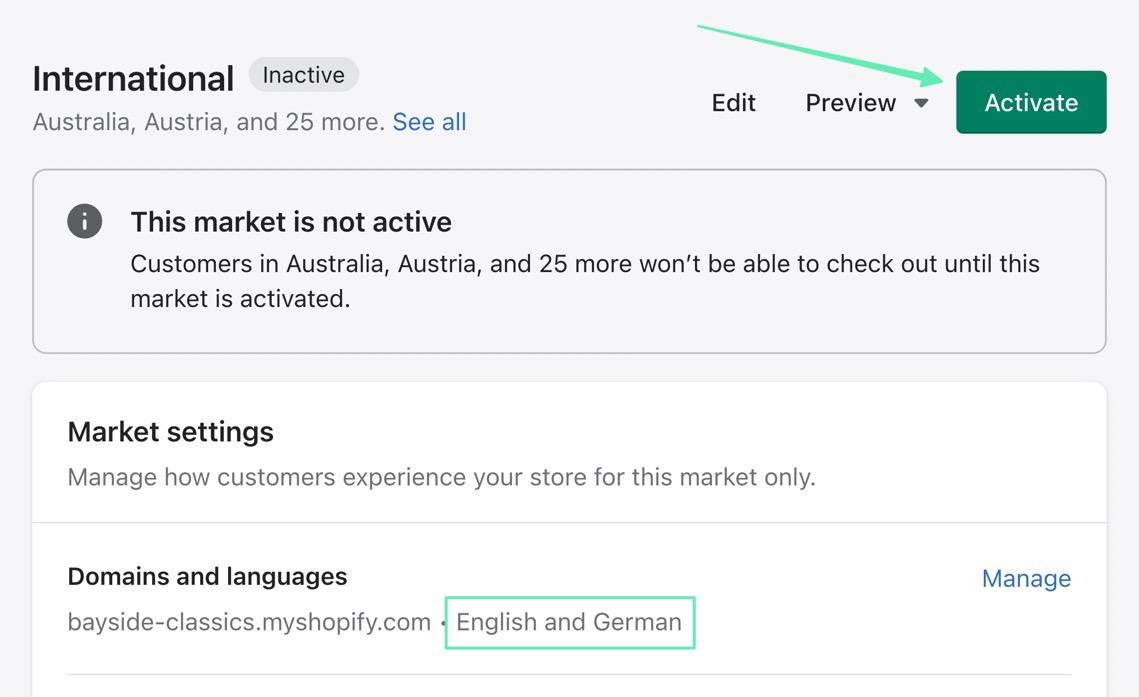
You’re able to add and remove individual markets from this page, but the easiest solution it to pick the International market (which includes over 25 markets such as Australia, Austria, and Germany).
Note: Click on the More link to see the list of languages included with each market. And make sure your language has a market assigned to it. Otherwise, the language won’t appear as an option when people from that country come to your website.
Select the Manage link under the International section.
The next page tells you that the market is not active. To check to see if the desired language is included in the International Market, click the See All link.
Otherwise, click on Activate to turn on the International Market.
Step 6: Add a Language Selector
At this point, some browsers will automatically select the right language for a user based on their IP address country. However, it’s also wise to provide selectors on the frontend, where the users themselves can pick which languages they want to view on your Shopify site.
To add some selectors, look for and click on the Manage In Geolocation App link, listed at the bottom of the Published Languages page.
You can also access the Geolocation tool under the Apps section in the Shopify dashboard. Within this app, choose to Show Recommendations; this activates a popup window for new users to always pick their desired market. You can also mark the checkbox to Show Selectors, which inserts a dropdown selector inside your footer.
Note: This Geolocation area also offers a Customize tab for editing the overall design of the selectors. You can change everything from colors to text.
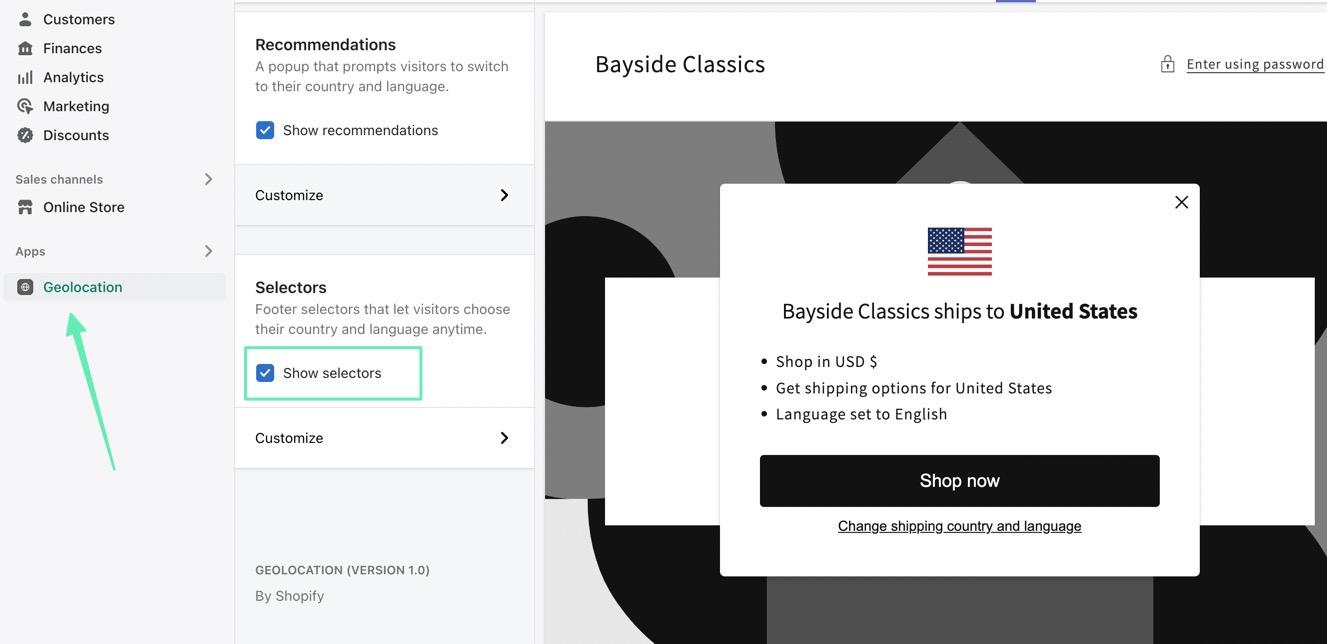
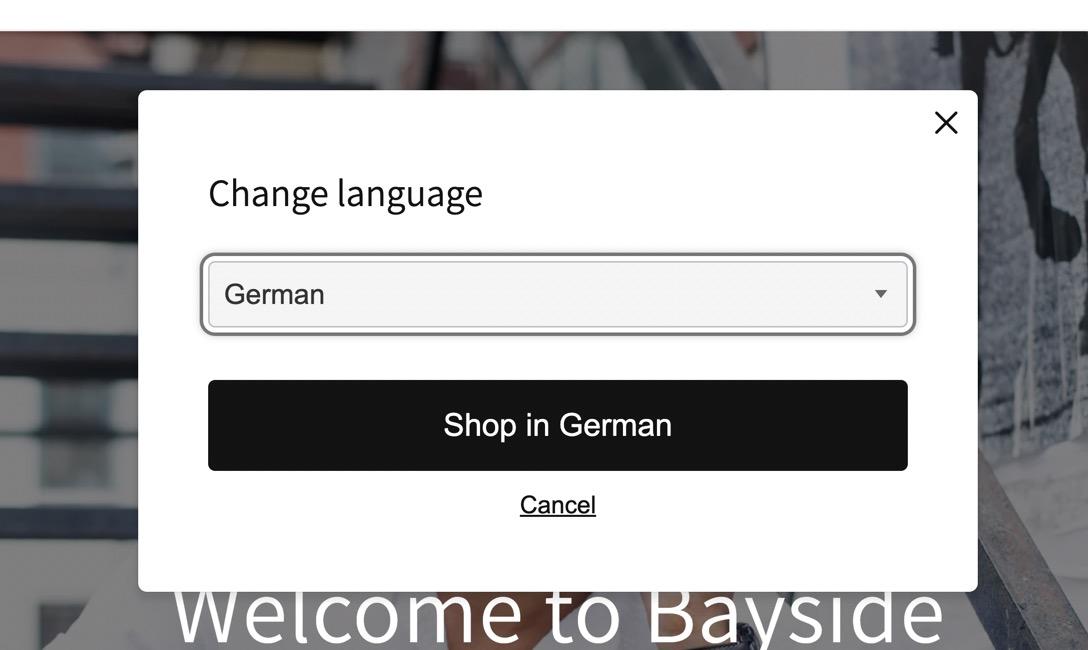
Now, on the frontend of your store, everyone who comes to your ecommerce site sees a popup window with the following elements:
- A statement on which current language is selected by default
- A button to continue with the default language
- A link to Change Language to any of the other languages you’ve activated on your theme
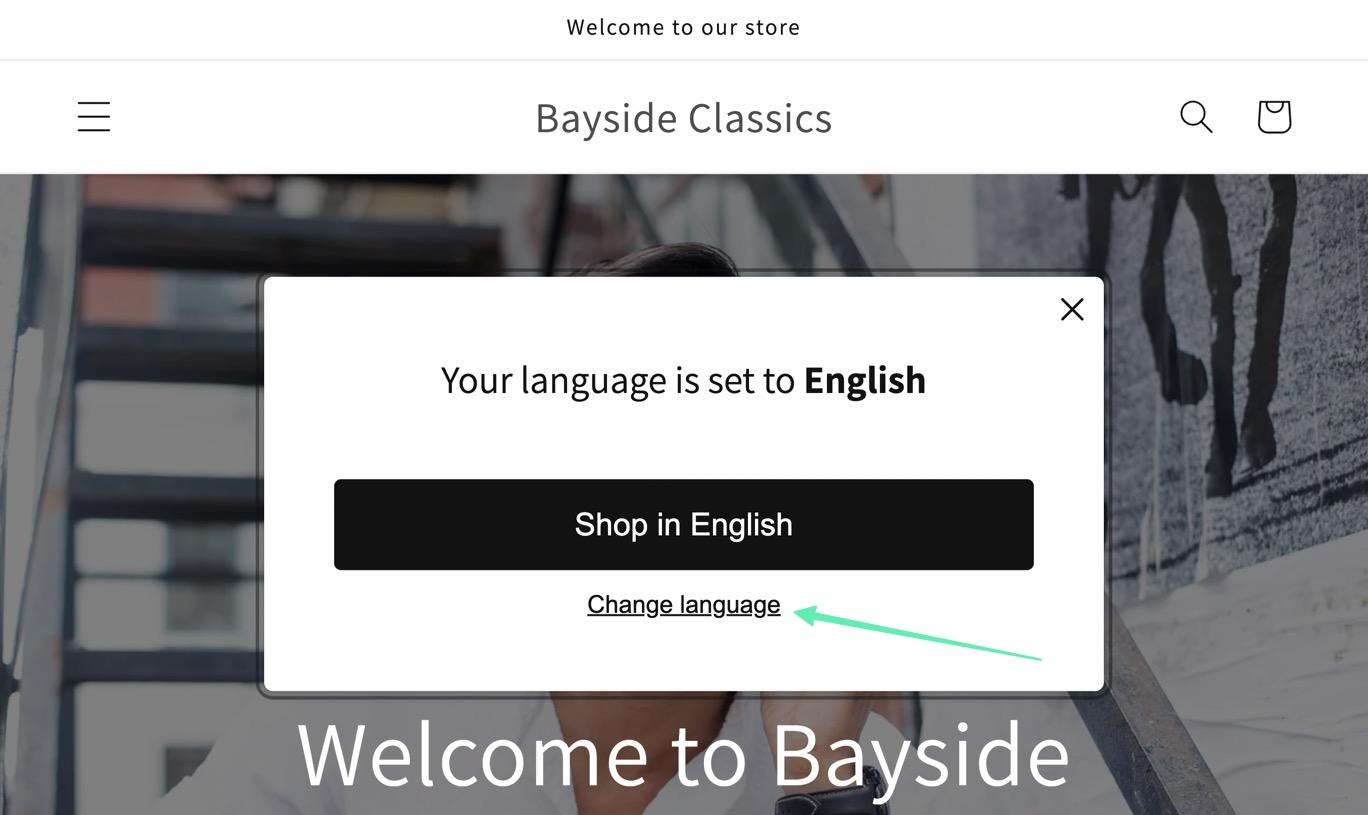
When changing the language, the user gets a dropdown menu to swap out one language for another. Then, they can click on the Shop In (Language) button to proceed.
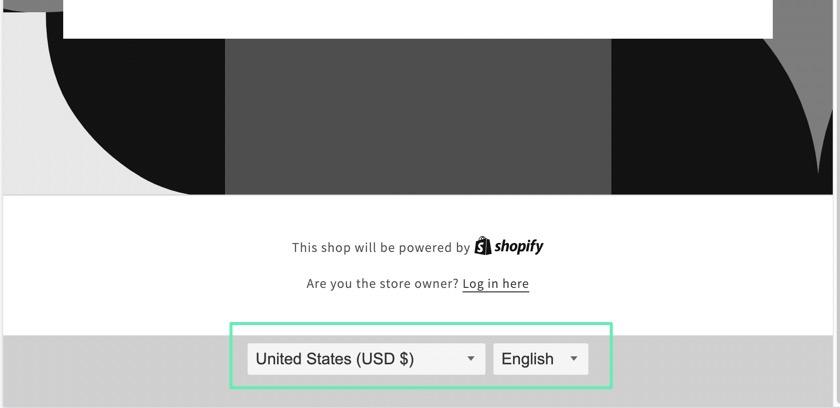
The footer selector is a little less intrusive, and it acts as a global language changer anywhere on your site. Once active, users can find it in the bottom footer. It functions similar to the popup but provides a currency changer (if active on your site, and a quick dropdown menu for configuring the right language.
Step 7: View the Translation Results on Shopify
Whether the Shopify language translation occurred due to the web browser’s automated detection features, or because the user selected a different language, the theme then switches as much of the content as it can to the new language.
This is where it’s essential to test the language translations, since some Shopify themes aren’t as supportive of translations as others. And you may find that the languages without professional translations produce less reliable results.
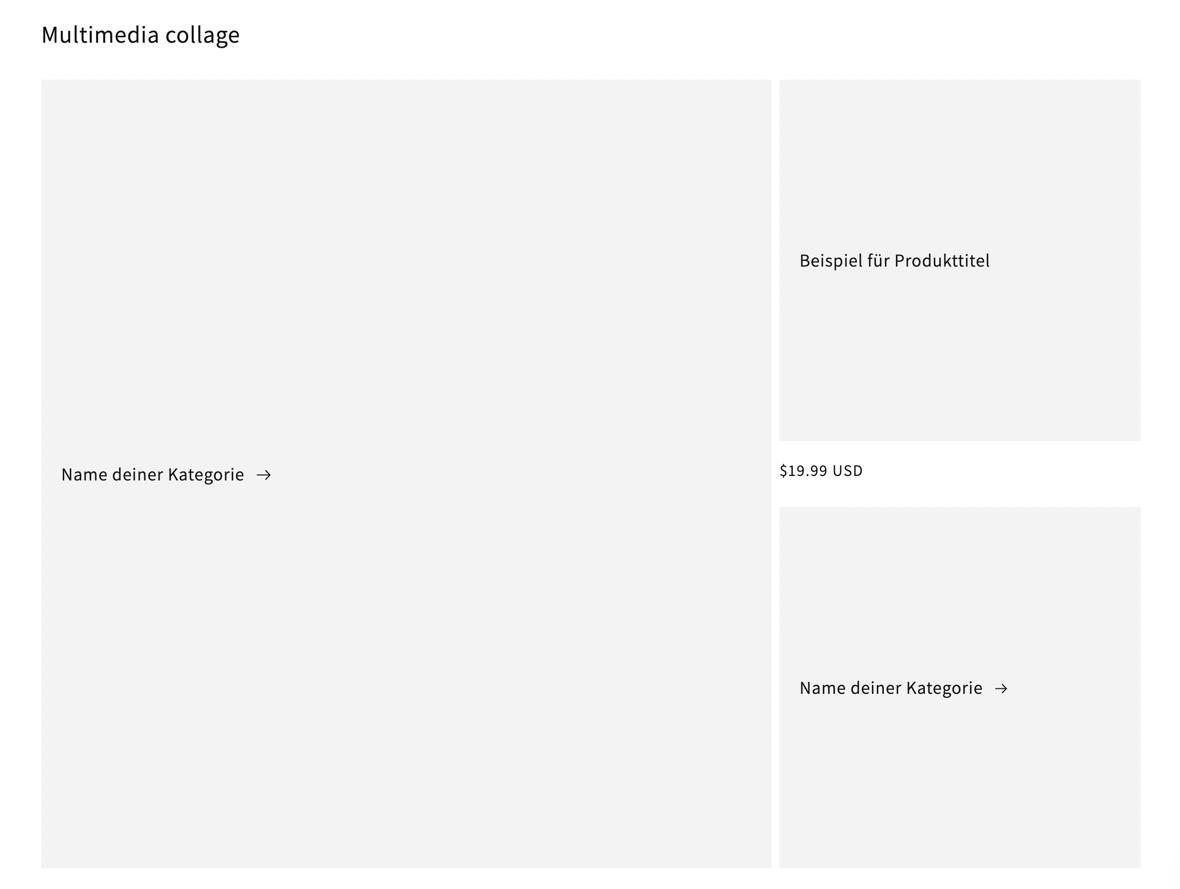
Here’s a banner collage on the homepage of our testing store to show you that the German language translation worked successfully.
It’s important to review every page of your website, including your blog, product pages, About information, and Contact page.
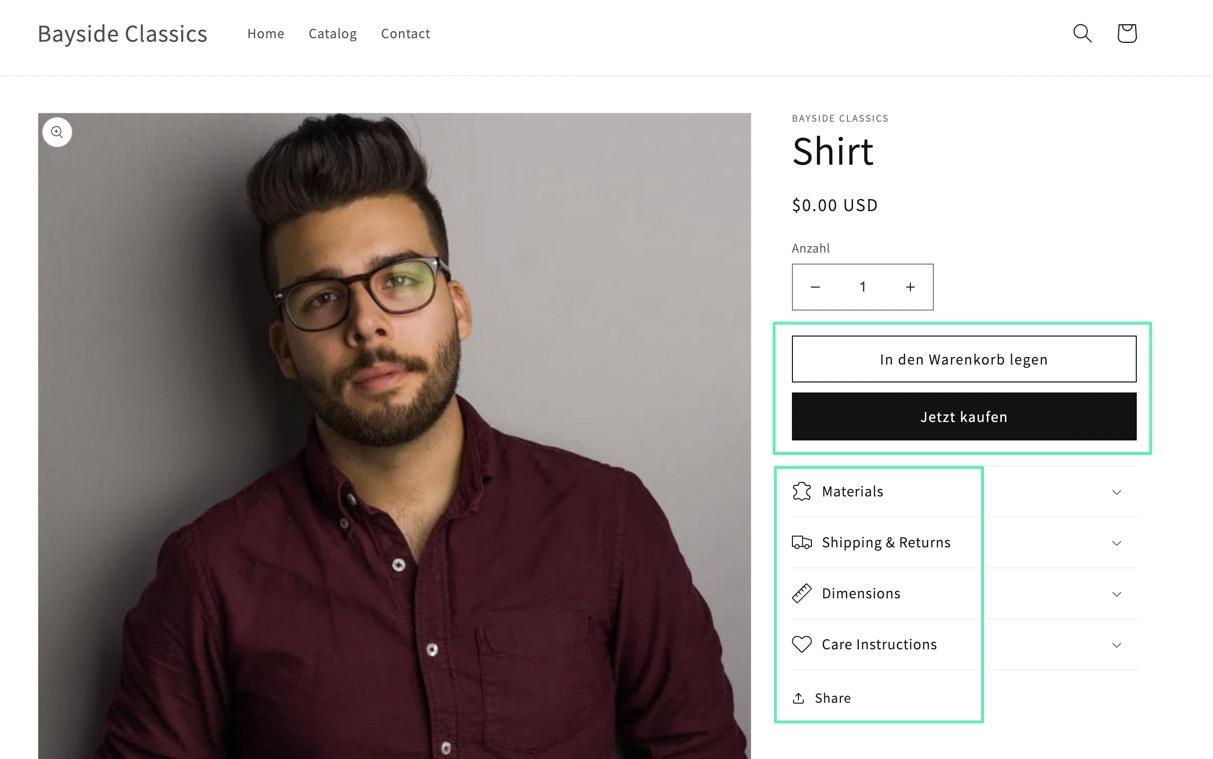
Take our product page, for example. Much of the content—particularly on the buttons—was translated. Yet, we’re still seeing English for the product information dropdown menus.
If you find some areas that went untranslated, this is when you must consider uploading your own translation files to the theme, or opting for another method, like with a translation app (see below).
Method 2: Use a Shopify Translation App
Learning how to change languages on Shopify requires some patience and research, considering you often must upload your own translations and, sometimes, the theme doesn’t play nicely with your language choices.
If that’s the case, you’re typically better off turning to a Shopify translation app.
Notable Shopify translator apps include:
- Transcy (AI Language Translation)
- Langify
- LangShop
- Bablic Translation
Consider testing out all those translation apps to see which ones offer the best results for your store. There are also some apps that provide human translations rather than the automated translations provided by the apps recommended above.
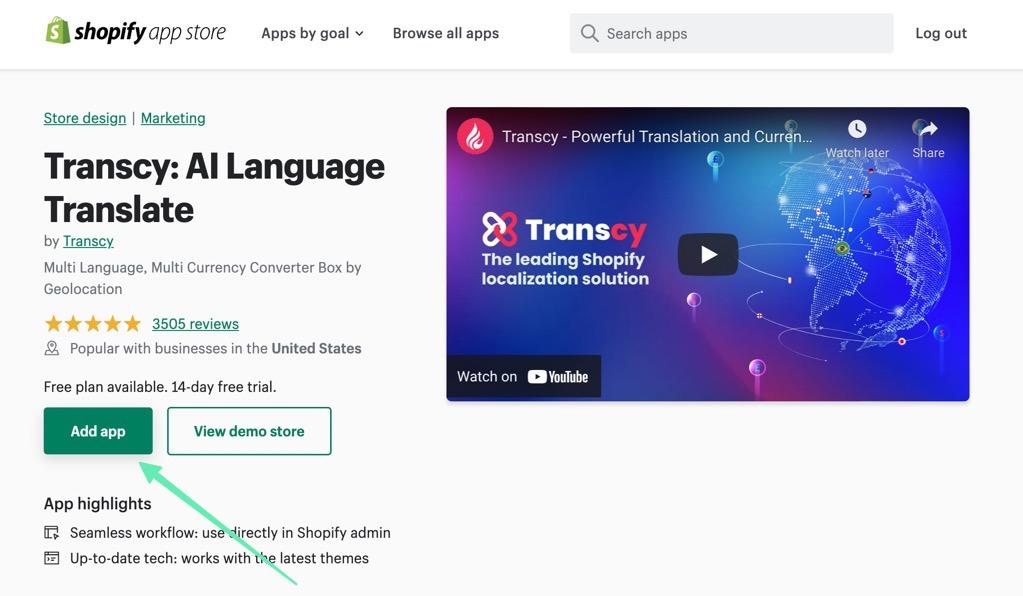
For this tutorial, we’ll use Transcy because it has a free plan, and the artificial intelligence translations work rather well.
Step 1: Install and Set Up the Transcy App
Install the Transcy: AI Language Translate app from the Shopify App Store.
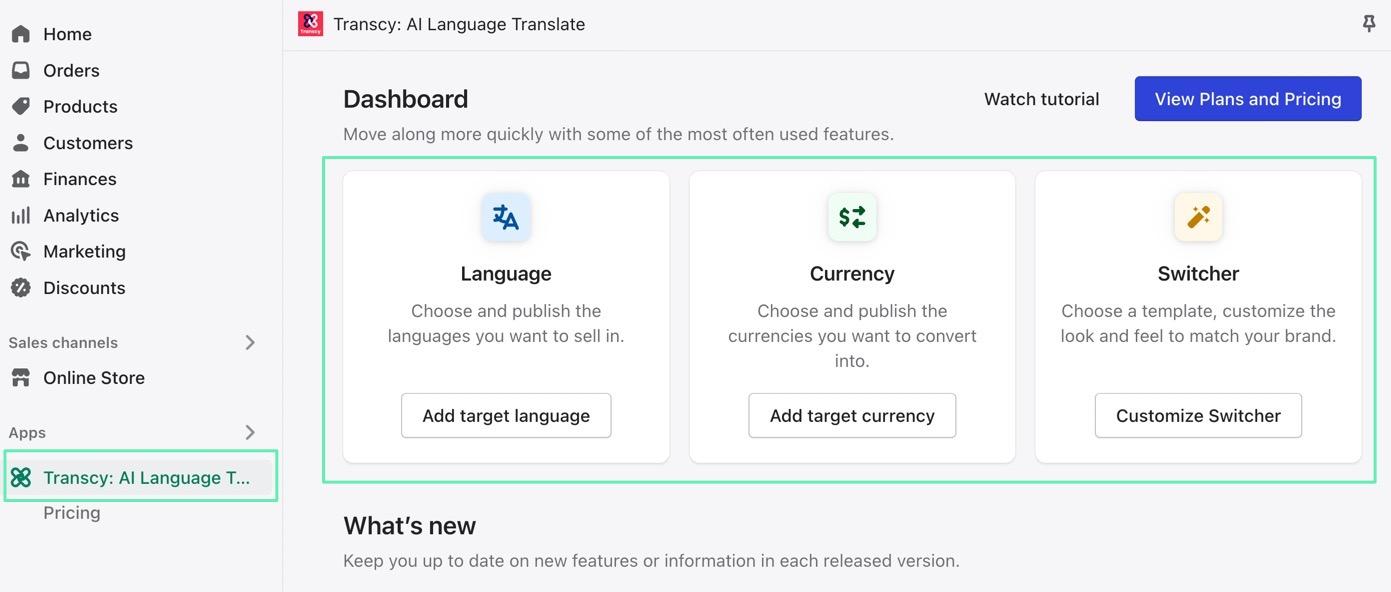
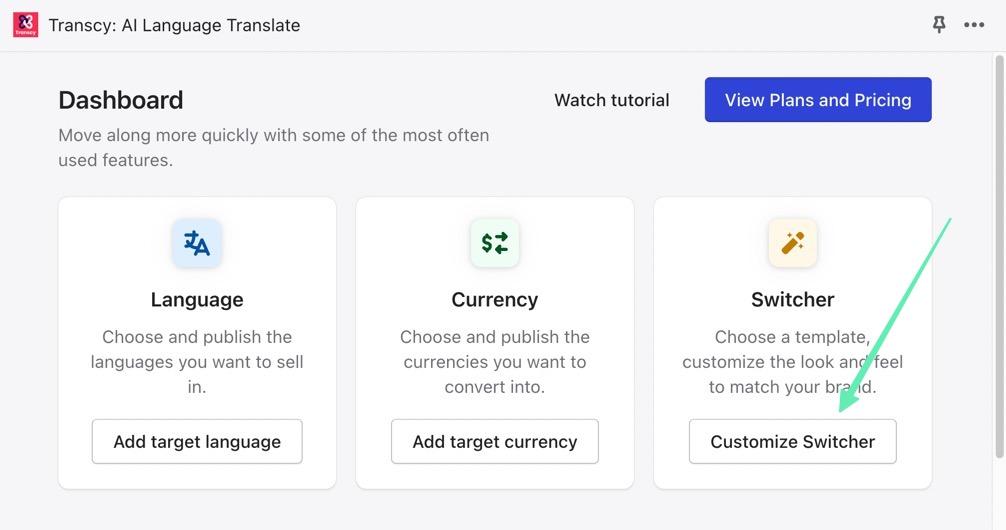
Walk through the steps needed to connect the app to your Shopify store. When finished, you’ll see a Transcy tab listed underneath the Apps section, and you’ll be brought to the Transcy dashboard, which shows options to:
- Add Target Language
- Add Target Currency
- Customize Switcher
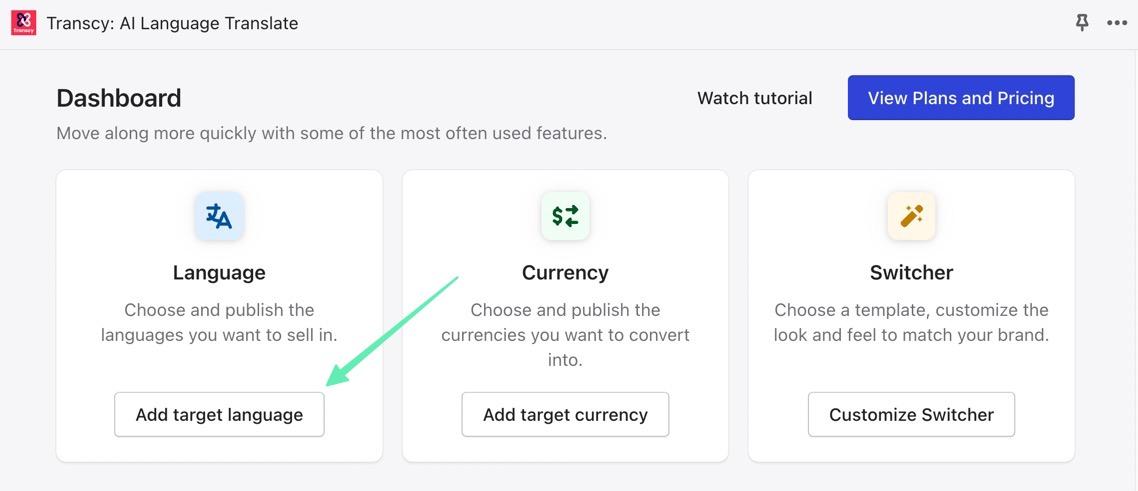
Step 2: Add a Target Language
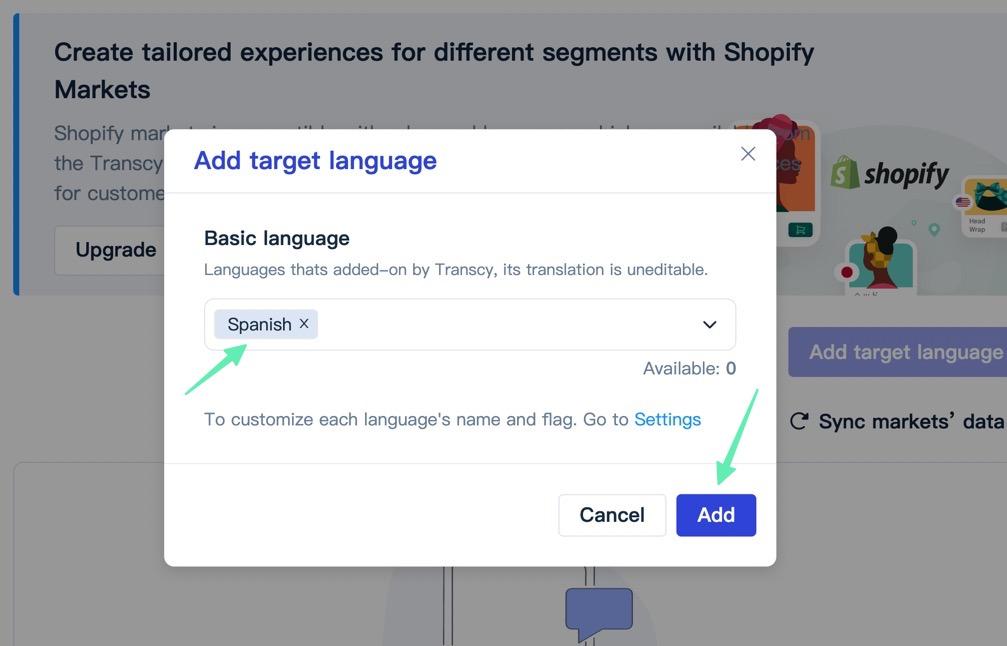
To start, click on the Add Target Language button on the Transcy dashboard in Shopify.
This brings you to a new window: The Transcy Dashboard. Here, click on the Add Target Language button.
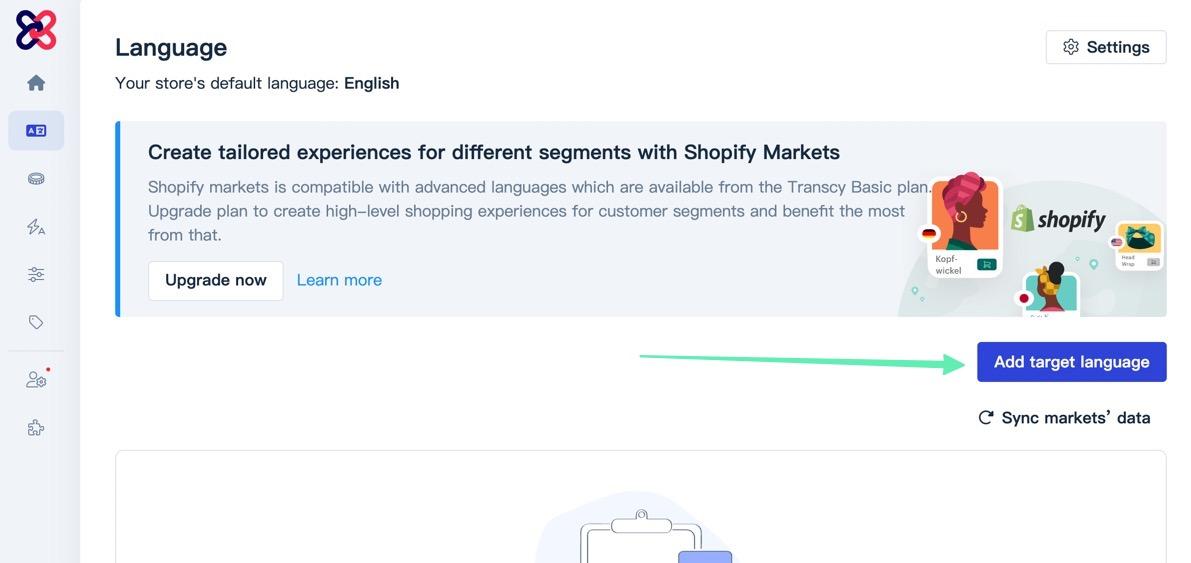
Select a language from the dropdown menu; there are hundreds available.
Click on Add once you have the language(s) you want.
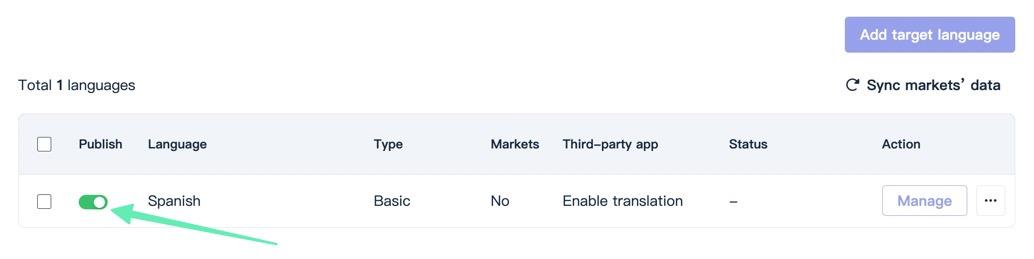
You should now see that particular language inside the list of target languages on Transcy. Flip the Publish switch so that it’s green and active.
Step 3: Add a Language Switcher
Go back to the Shopify dashboard. Click the Customize Switcher button.
This page allows you to customize every aspect of the language switcher, with settings for choosing dropdowns or popups, along with template saving and customization tools.
However, you must first complete a few steps to make the translator active with the switcher.
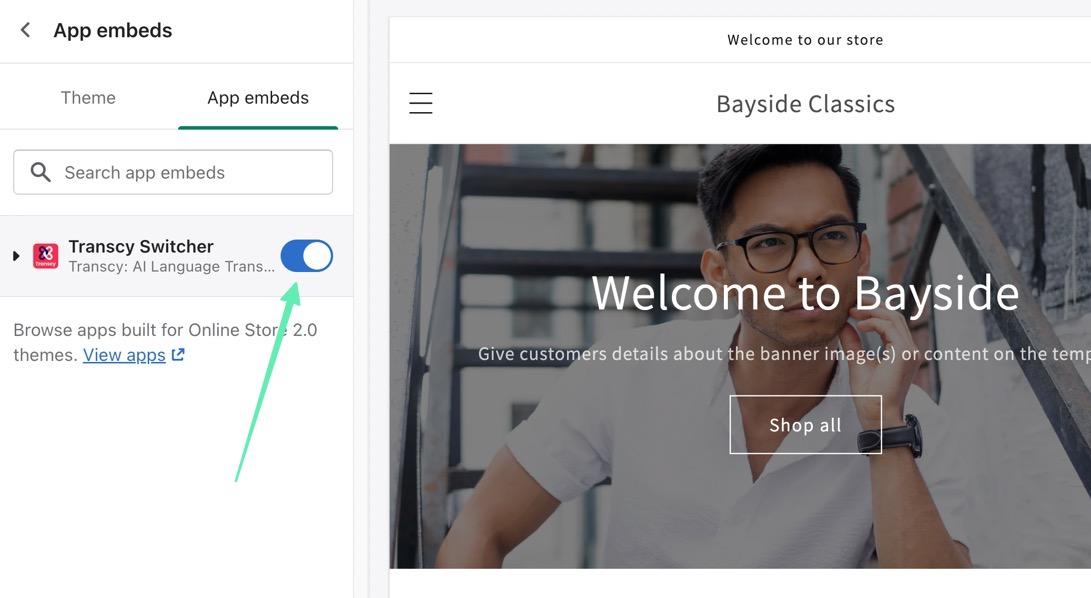
Click on the Go-To icon (the small arrow next to where it says, “Activate Transcy Switcher on Storefront”).
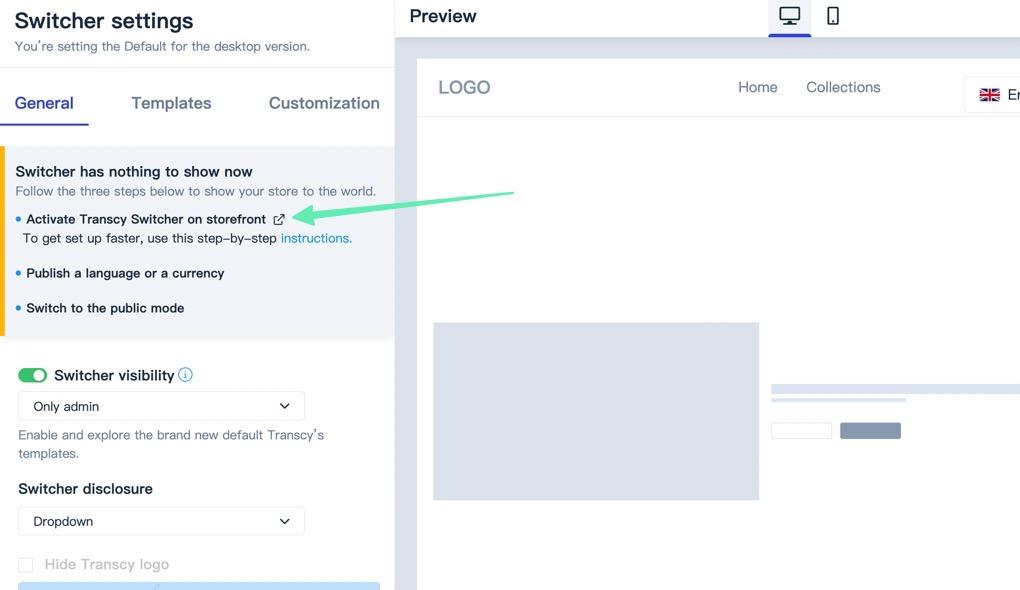
This sends you to the App Embeds section of Shopify. Essentially, the Transcy Switcher is a separate app embed that you must activate. To do so, flip the switch to On for Transcy Switcher.
Note: Be sure to click the Save button when you’re done turning on the Transcy Switcher App Embed.
Back in the Transcy dashboard—inside the Switcher Settings—find the Switcher Visibility header. Make sure it’s turned on, then change the setting from Admin to Public so that everyone can see the switcher.
Once again, click Save.

Step 4: Test the Switcher and Language Translations
With a language added, and the switcher activated, you can now go to the frontend of your ecommerce store to test out the translation functionality. You’ll see a dropdown menu in the header or a popup window, depending on which one you decided on.
The user can pick a language (and currency if you added multiple currencies), and click Apply to run the translations.
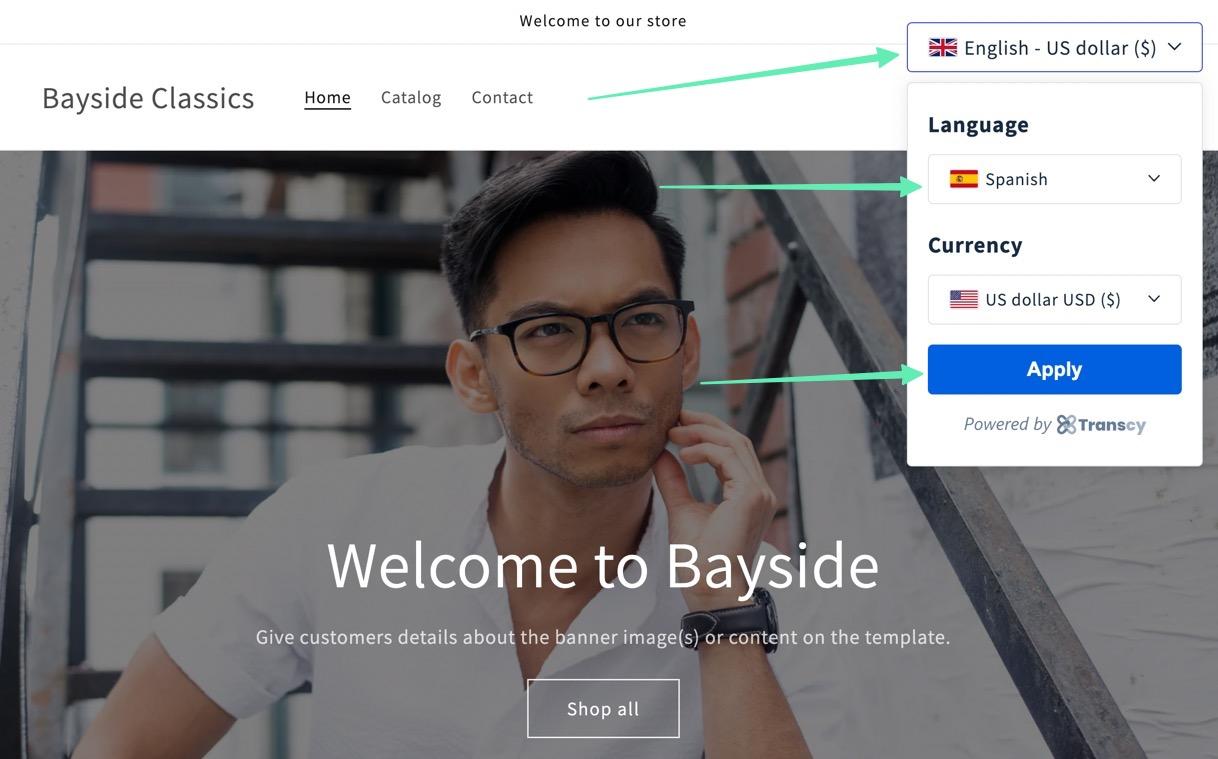
As a result, the entire online store gets translated to the new language. We’ve found that translation apps like Transcy are more accurate, and give you greater control over the translations, than what’s offered by default in Shopify.

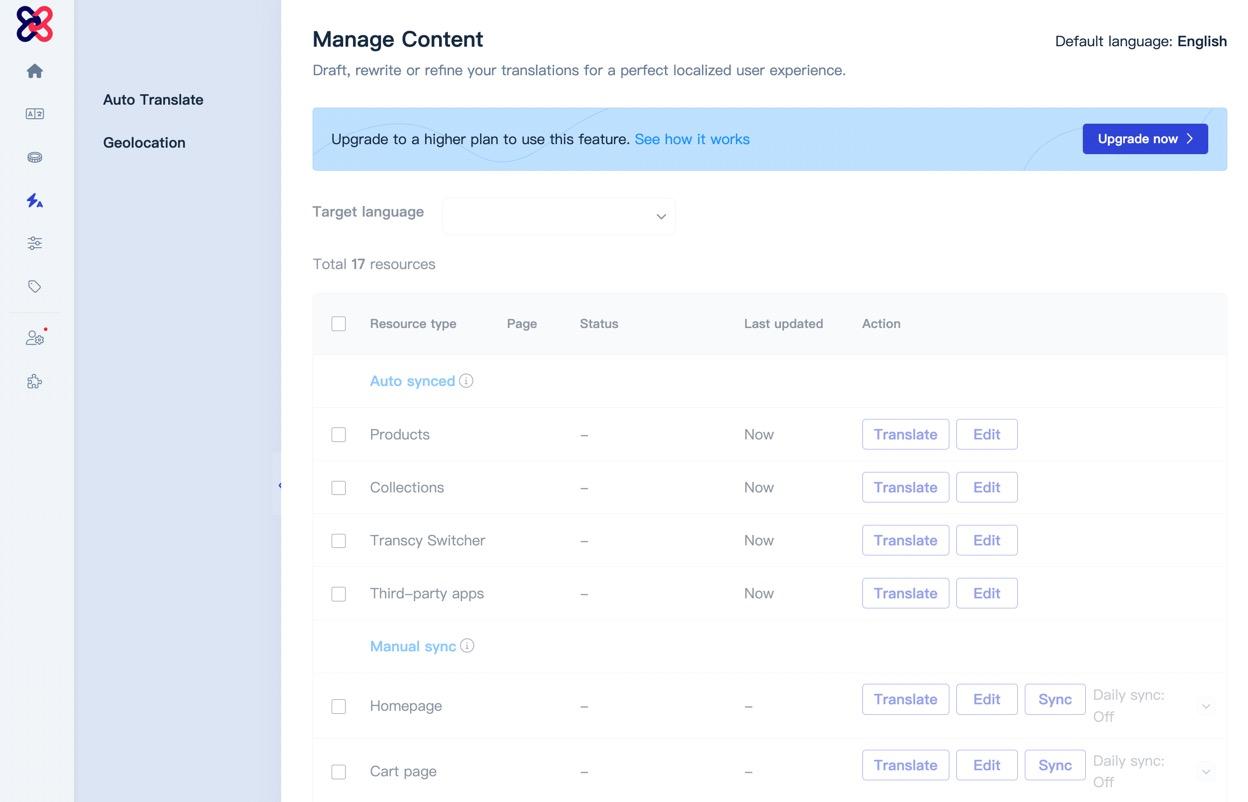
Tip: Consider Upgrading
Although Transcy has excellent translation tools right out of the box, it comes with auto-translating as well, along with geolocation and specific content translating tools. This way, every new bit of content you add to the store gets translated, without you having to run the translation again. These features come with the Basic plan from Transcy, requiring a paid upgrade.
Our Conclusion
Learning how to change languages on Shopify helps merchants who want to expand into other markets. It’s also a useful tool so that all Shopify users know that they can open a shop with the most powerful ecommerce platform on the market, without having to worry about language troubles.
In this article, we explored several methods for adding new languages to your store, activating language pickers, and using a Shopify translator app for more advanced translations.
If you need any clarification about how to change languages on Shopify, share your thoughts in the comments section below. Have you ever attempted to change languages in Shopify? If so, do you have any additional suggestions for those doing it for the first time?


Comments 0 Responses