
The world of blogging requires dedication, a desire to create excellent content, and the right tools. It all starts with a powerful blogging platform. You can choose from hundreds of blogging systems (like Blogger, WordPress, and Tumblr), but none of them stack up to the tried-and-true WordPress content management system (CMS). It's filled with features for generating beautiful articles, publishing videos, or whatever type of content you desire. Use this guide to learn how to start a WordPress blog from scratch and also turn it into a hub where people want to go.
In this step-by-step tutorial, we'll cover what's required to start a WordPress blog, along with details on hosting, making a new blog post, and tips on how to enhance your marketing and search engine optimization (SEO) efforts. Before that, we suggest you think about a niche topic you'd like to cover on your blog, as it's rather difficult to tap into the blogging world unless you have a strong focus.
With that said, keep reading to learn how to start a WordPress blog.
What's Required to Start a WordPress Blog?
Not a single blog is the same, but most of them need a few simple startup elements to make a professional-looking blog and to ensure that all your posts end up published and accessible online.
You should start with these pieces to set a solid foundation for your blog:
- A web host for putting your site files on a server. Shared servers work well for smaller blogs, but you may have to think about more powerful hosting if you plan on growing.
- Your own domain name, or the internet name and URL address for your blog. This is how people find you online. An example of a domain name is staging.ecommerce-platforms.com. You can sometimes get a free domain name from your host.
- The most recent version of WordPress, the content management system we're using to design your blog and make blog posts.
- A WordPress theme made for blogging. Themes vary in pricing (many are free) but they're necessary for designing your site and making it look pretty. Essentially, you don't have to be an advanced web designer if you use a theme.
After those primary elements, most other items are optional. However, we'll cover additional tools to boost your chances of getting seen online, like with SEO WordPress plugins and contact forms.
Keep reading to learn all about how to start a WordPress blog and link it to the various other tools and services to make the blog a success.
Choose Your Hosting and Domain Name
The first two steps for making a WordPress blog involve giving it a name for the internet and finding a place to store your site files. The first part – naming your blog – requires you to select a name and check if a domain name is available for that choice.
Acquiring a domain name goes hand-in-hand with choosing a hosting provider, seeing as how most reputable hosting companies have the tools to buy a domain name when you sign up for hosting.
Therefore, it's best to complete both of these tasks in one step. Although many hosting companies (like SiteGround, WP Engine, or GoDaddy) provide quality servers and customer support, we mainly recommend SiteGround for those just getting started with blogging. The reason we like SiteGround is that it's affordable and secure, and you can upgrade your plan as it grows, instead of being stuck on a server that only works for smaller blogs.
In short, you want a hosting provider that allows you to scale up your operation. You may never need to expand your server requirements to accommodate thousands of visitors, but it's nice to know that you have that option. Overall, SiteGround works well for small, mid-sized, and large blogs, seeing as how the pricing is flexible and you can choose from all types of hosting.
To get started, go to the SiteGround website.
The homepage features the most popular hosting plans, ranging from regular shared web hosting to scaleable cloud hosting.
For a blog, especially those that don't plan to rapidly scale, the Web Hosting and WordPress Hosting plans make the most sense. We typically recommend the WordPress Hosting plan since it offers a managed hosting experience where you can automatically install WordPress, and essential plugins, without putting in much work on your end.
Regardless, we recommend comparing each plan and choosing the one that fits your situation the best.

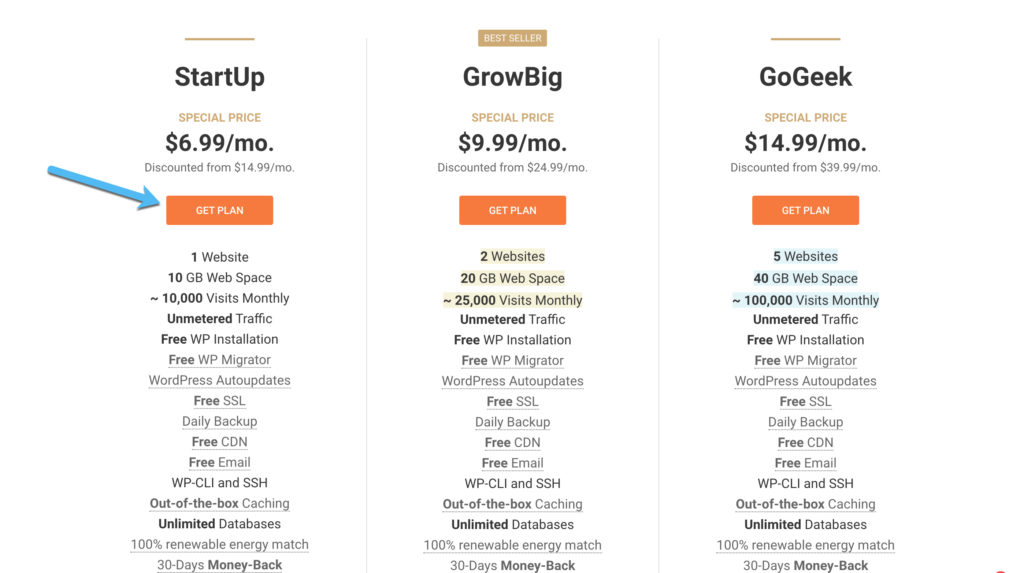
Each style of hosting plan includes several specific pricing packages. These plans vary based on the number of websites supported, webspace, and monthly visits for your site.
Go ahead and select the one that makes sense for you. We typically recommend opting for the StartUp or GrowBig plans, seeing as how there's no reason to spend extra money if you don't need it. You can always upgrade to a higher plan if you need more support for increased traffic.
Next up, SiteGround brings you to a page to register a new domain name or transfer over one you currently own.
Either way, SiteGround walks you through the process.
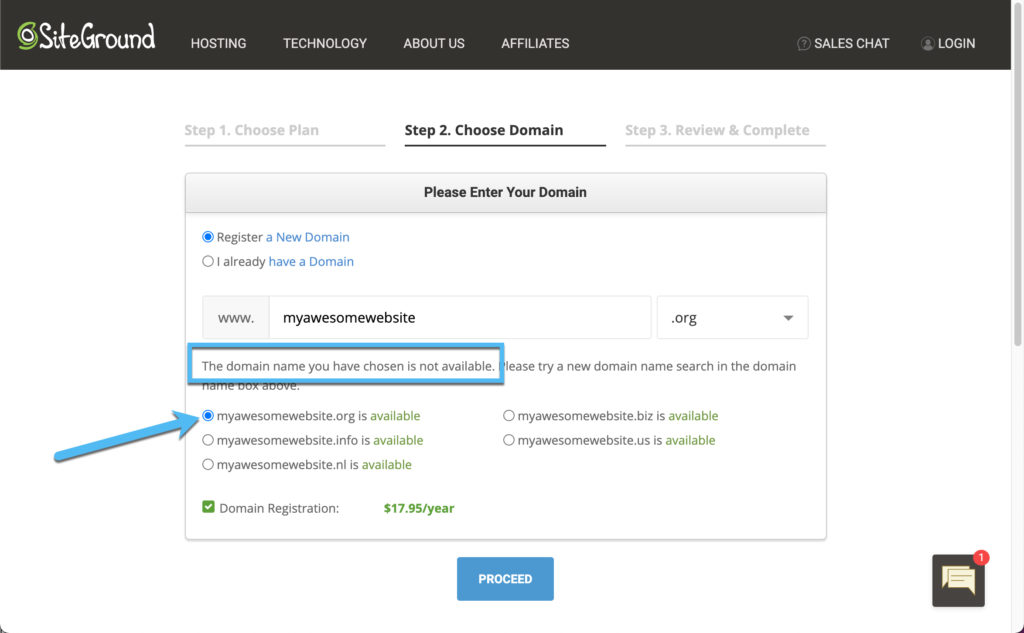
For this example, we'll select that we want to register a new domain. Type in a domain name idea in the field below that. Click on the Proceed button to check if the domain is available.

The following page indicates if the domain is available or not. If it's not available, type in a new variation of the domain name or select one of the recommendations (this usually takes the same name but adds a different domain extension, like .org or .biz).
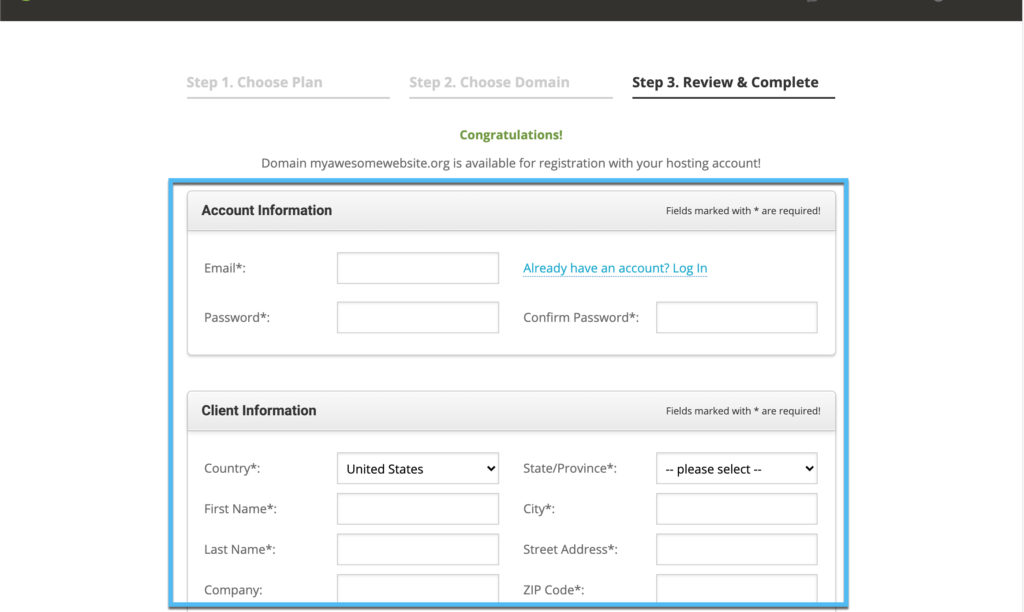
After finding a domain name, walk through the Review and Complete page by filling in fields for your Email and Password. These allow you to get logged into your hosting dashboard. Continue with other contact information such as your name, address, and company.
Scroll down to type in your payment information.

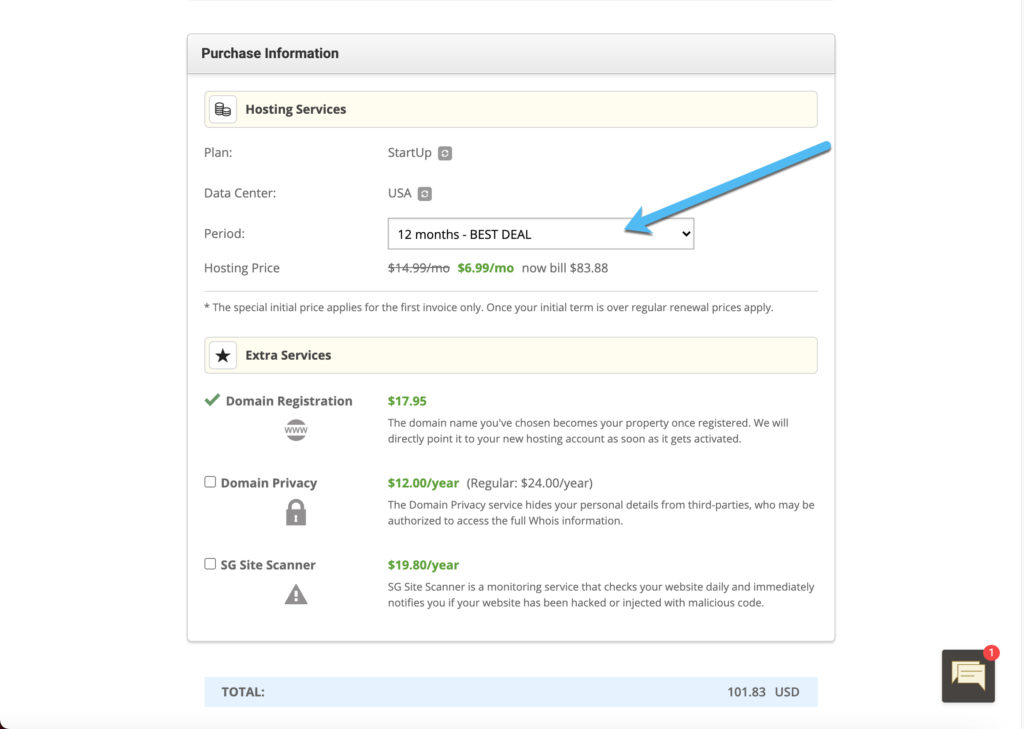
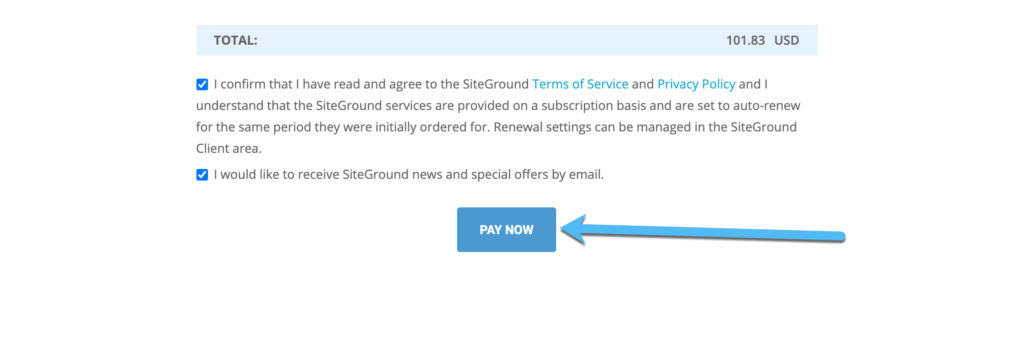
Continue below the payment information to get an understanding of how much you're paying and which options are available for changing your deal. As with most hosting companies, SiteGround has a dropdown to change your hosting period. Typically, a longer contract period means a lower monthly rate, so you can save on your first year and into the future.
You can also opt for extra tools and services like domain registration, domain privacy, and a site scanning feature.
Finally, click on the Pay Now button to process your transaction and activate your hosting account. Moving forward, the goal is to install now and activate a WordPress website on this hosting server. SiteGround, or any host for that matter, stores and manages your blog's files on a server, allowing it to be seen online.
Launch Your WordPress Blog on the Host
Most reputable web hosts offer one-click installation buttons for WordPress and several other content management systems (CMS). SiteGround is no different, as it provides a quick WordPress button if you go to WordPress > Install and Manage.
After that, select the WordPress option or consider having them install WooCommerce as well if you plan on selling products from your blog.

The rest of the process gets outlined by SiteGround, so walk through those steps of specifying your domain, choosing your login information for WordPress, and ensuring the entire installation takes place. After that, you should see a login form for the WordPress wp-admin dashboard or you'll get sent directly to the WordPress dashboard.
Simply log into your WordPress dashboard using the username and password you created during the WordPress installation process. It's not the same login information that you used for the hosting account.

Now you have an active WordPress site stored on the SiteGround servers or whatever hosting company you went with. In the following steps, we'll explain how to make your site look pretty with a WordPress theme made for blogging, while also explaining how to add blog posts and other important content items.

Get a Blogging WordPress Theme
WordPress by itself looks rather minimalistic. It functions primarily as a framework for you to build on. Most new WordPress installations automatically include a default WordPress theme so your site at least looks presentable. So technically, you can already post blog articles and manage things like your menu.
However, you typically want to complete a little research to locate the perfect WordPress theme for your blog. That way, you have control over what the blog looks like and can choose the branding, colors, fonts, and formats instead of settling for the first theme given to you.
There are several ways to search for WordPress themes. For premium themes (those that usually provide direct customer support and advanced features) go to places like ThemeForest and MojoMarketplace. You can also complete a search online for premium theme sellers to find hundreds of reputable developers like aThemes, Elegant Themes, and ThemeIsle.
On the other hand, WordPress provides a direct link to the free WordPress Theme Library.
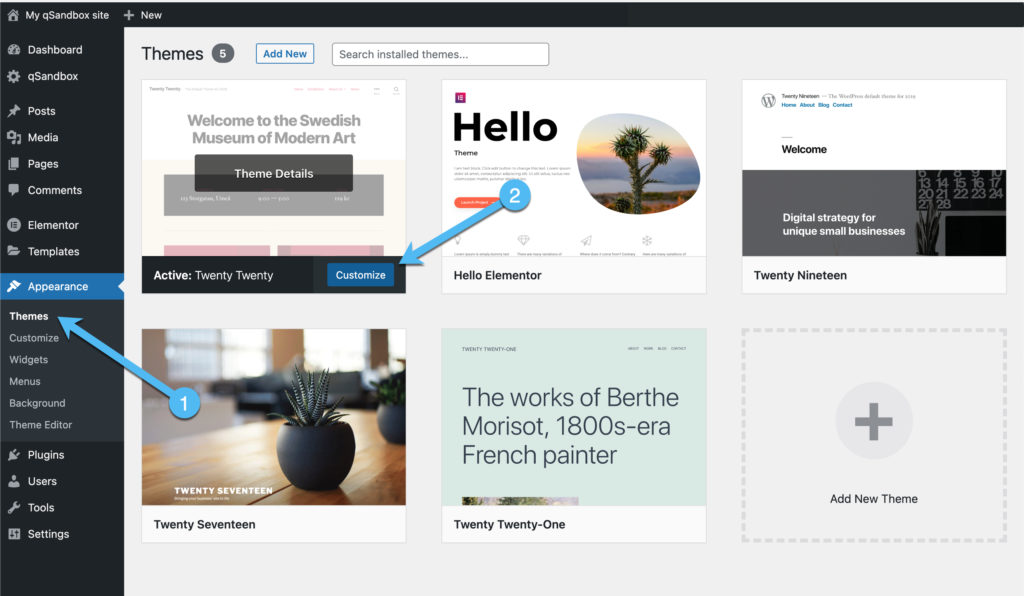
Go to Appearance > Themes in the WordPress dashboard.

As you can see, the Twenty Twenty theme is already installed for your new site. You can stick with this for the simplest route or consider searching for other WordPress themes to get added functionality.

Click on the Add New button to browse the entire list of free WordPress themes available to you.

You can filter the library to only look at the Featured, Popular, or Latest themes.
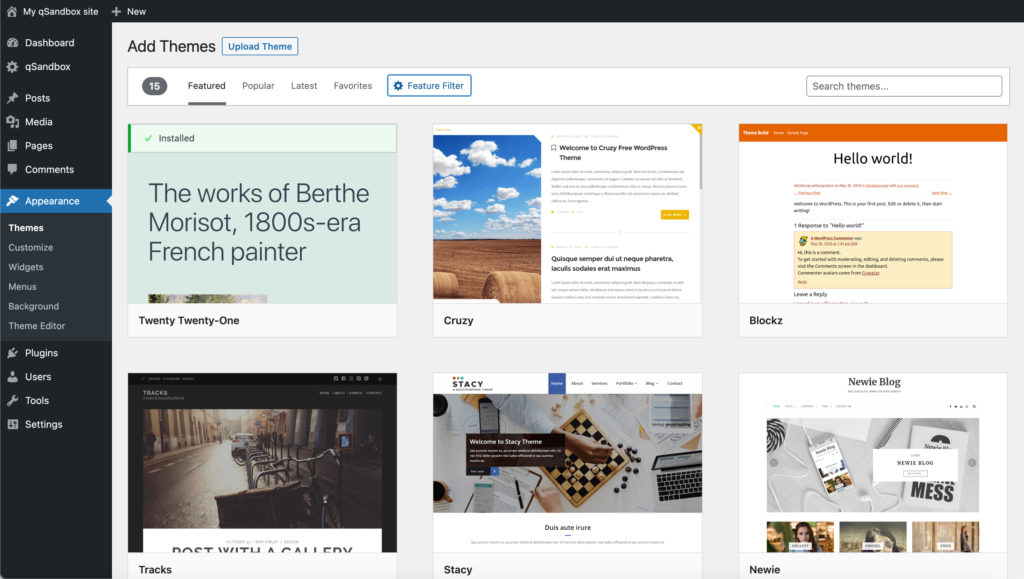
It's also possible to click on the Feature Filter to narrow the search down to those themes with specific features, like those with a blog or for ecommerce.

Some of the more high-quality blogging themes include Hello Elementor and Astra, seeing as how they're both lightweight and great for designing multiple styles of websites. In addition, they both offer additional templates and demo content for the ultimate design process.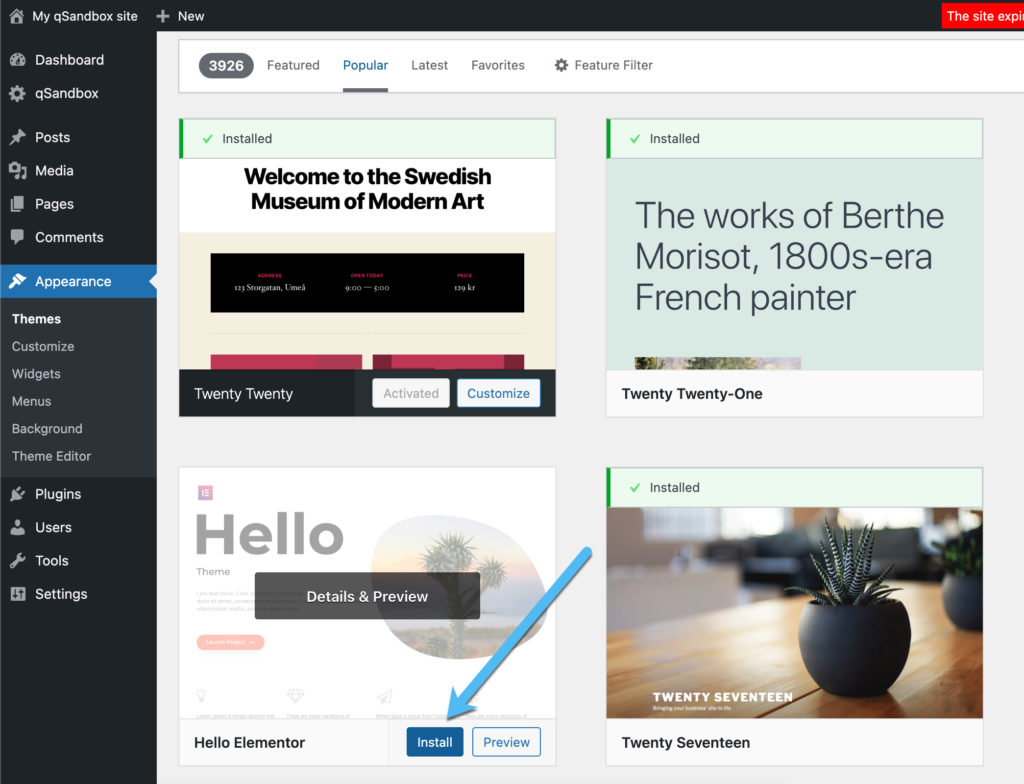
The great part about themes is you can install and uninstall as many as you want. It only takes a few moments to activate and test a theme, so it's not a bad idea to go through that process to see if it actually works well for your own blog.
For this example, we'll install the Hello Elementor theme. With many WordPress themes, you must also install demo content or a page builder to then add page templates. The demo content and page building options vary from theme to theme.
For Hello Elementor, you need to install the Elementor page builder to have access to the page templates.

Once activated, go to Pages > Add New in WordPress.

Here you can create a homepage or blog post feed, or whatever page you want, including Contact pages and About information.
Select the Edit With Elementor button to activate the page builder and start your design with page templates.

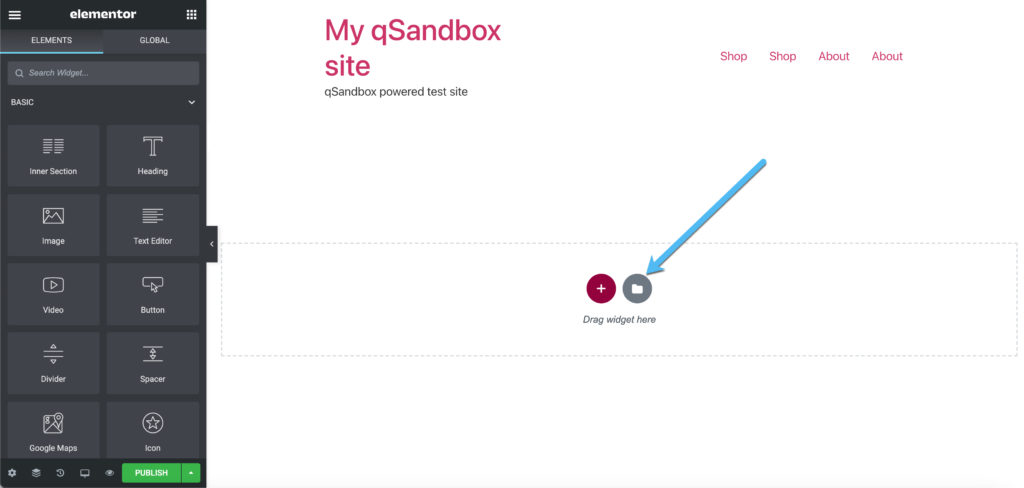
The Elementor page builder appears on the next page.
Select the File Folder icon, which holds all page templates and blocks.
Many Elementor page templates require a premium subscription, but you can browse through the selection to locate free ones.
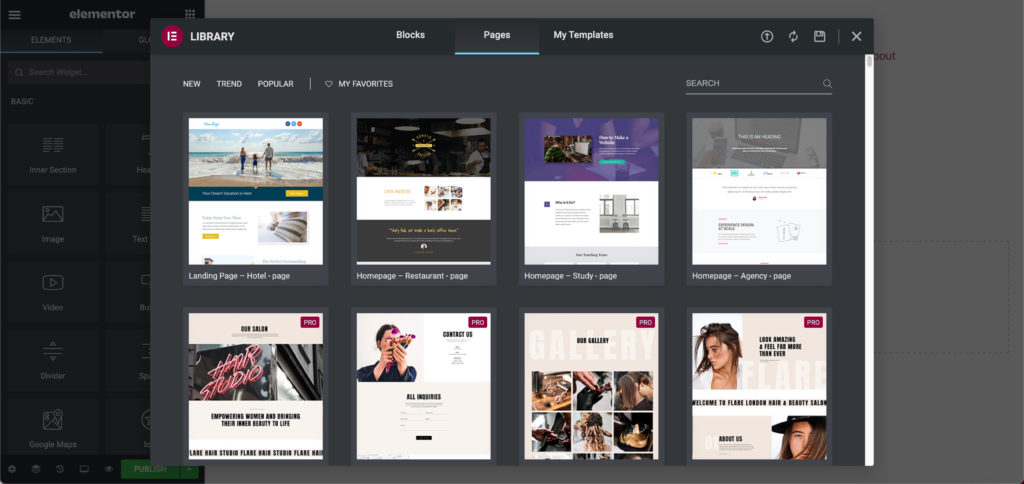
You can also search for a keyword (like “blog”) to find more specific designs. In this case, we found a blog-oriented template that's free to use.

Again, each theme has its own method for installing templates and demo content. So you may find that your chosen theme has a different process.
For Hello Elementor, you must connect to the Template Library in the cloud.
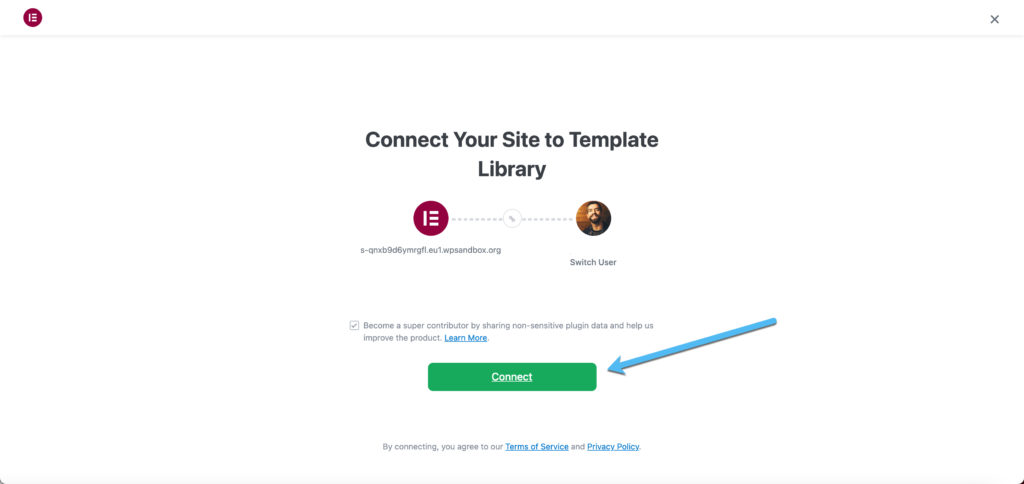
After that, it allows you to click the Insert button to see the template on your website.

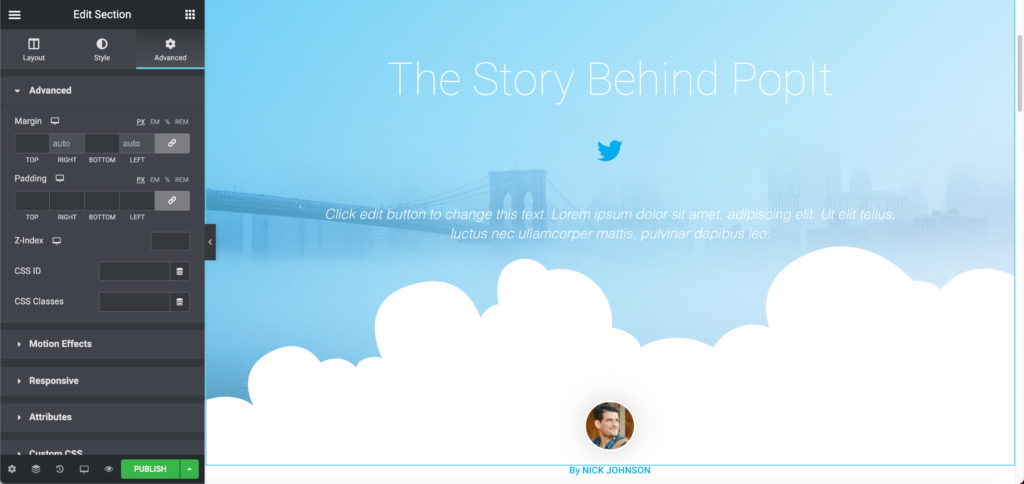
The page builder reveals the complete design, which offers drag-and-drop elements and options to click on the content blocks to edit the demo data and add your own content.
Seeing as how blogs are usually better off when you go the simple route, we also recommend looking into the default WordPress themes that often come out with new WordPress releases.
These get named after the year and a musician, so you can see the most recent ones at the top of the WordPress Theme Library search.
As you can see, there's Twenty Twenty, Twenty Nineteen, Twenty Twenty-One, and Twenty Seventeen within view during our search.

For this example we'll install and activate the Twenty Twenty theme, seeing as how it already has a decent homepage with a nice blog feed, without the need for any demo content.
Depending on the theme, you often have to go to Settings > Reading to indicate what page you want to show up as your homepage.
Many blogs go for the Latest Posts on the homepage, since blog content is the primary offering. However, you also have the option to create a Static Page where you have full design control, as opposed to a simple list of your blog posts. Many themes provide demo content for a static homepage.

We went with the Twenty Twenty theme and decided to show the latest posts on the homepage. We now see the blog on the frontend ready to go for designing the website and writing up some blog posts.

Customize the Theme
Theme customization comes down to the type of theme you chose and where those customization settings are located. For instance, any theme you use with a page builder will have many of the editing features on its frontend editor.
Having said that, there are a few customization settings that are almost always located inside the WordPress Customizer.
To edit those primary settings, click on Appearance in the WordPress dashboard. Locate your installed theme and click on the Customize button.
This reveals the WordPress Customizer, a standardized way of editing many parts of your WordPress theme. Having said that, each theme still has its own unique design elements inside the WordPress Customizer.
To begin, click the Site Identity button. You can also click on the visual editing elements, like choosing the logo or tagline areas to edit them right from there.
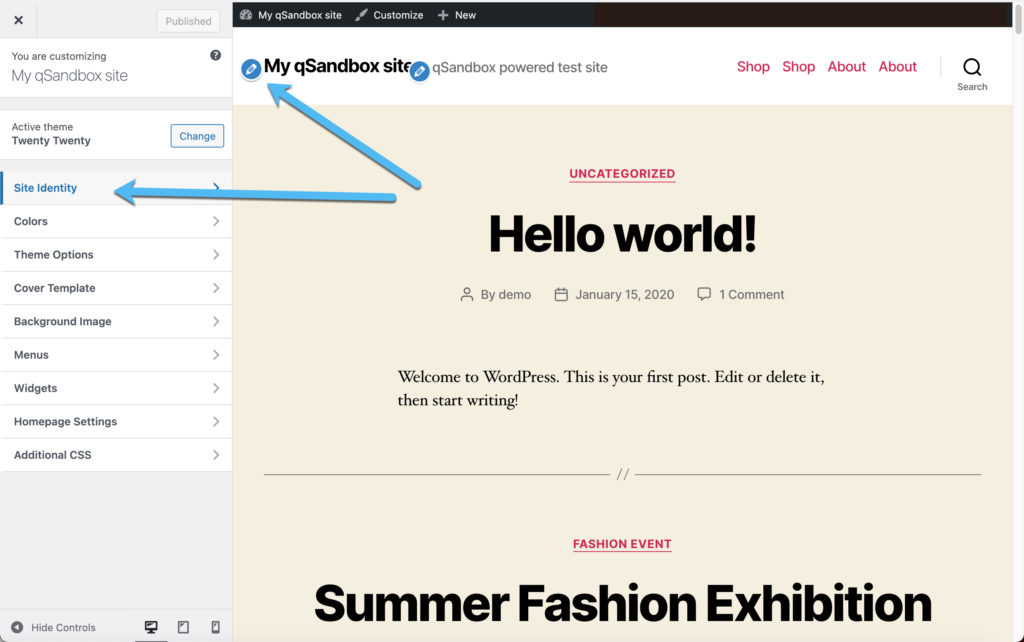
You can upload a new logo in the Site Identity module. It also has fields for adjusting the Site Title and Tagline or removing them altogether.
![]()
We recommend going through every tab in the Customizer to ensure you design the WordPress blog exactly the way you want.
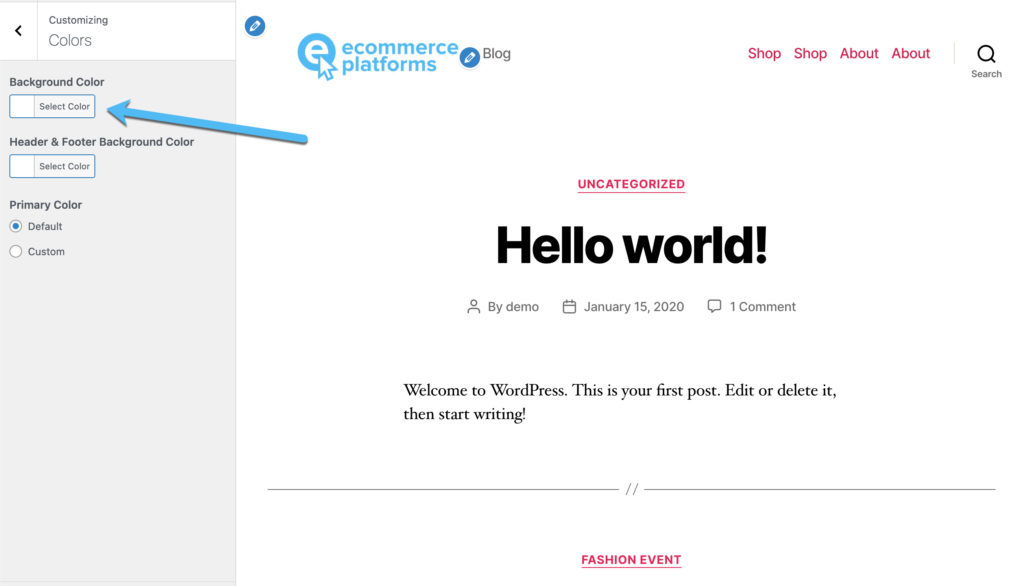
One essential tab to look at is the Colors tab.
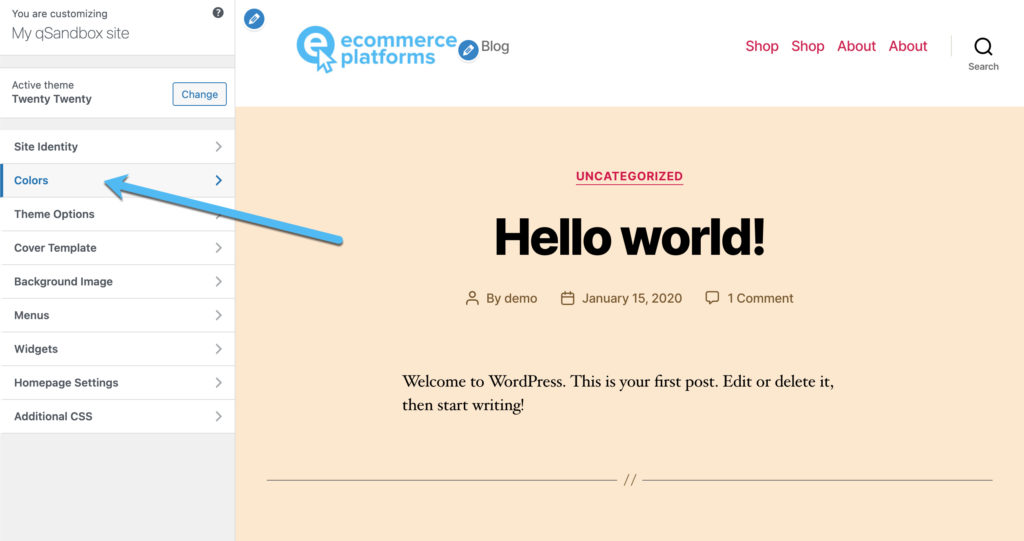
In that tab, modify the Background and Header and Footer Background Colors to your preferences. As you can see, I removed the beige background and made it a more modern white color. These changes seem small but they're essential parts of learning how to start a WordPress blog and establish your brand.
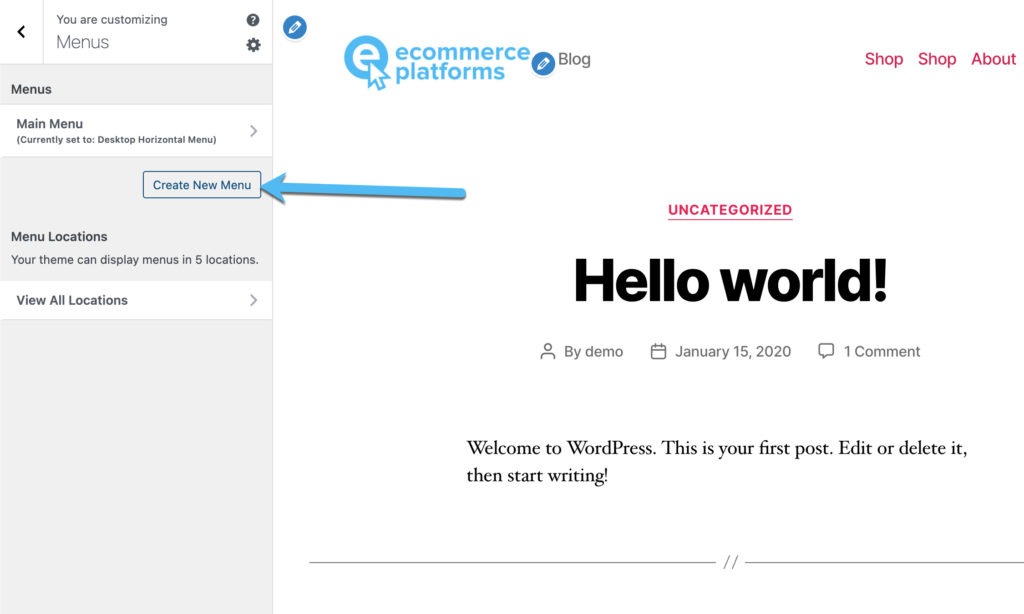
It's also a great idea to click on the Menus tab. This lets you edit the current menu if you already have one.
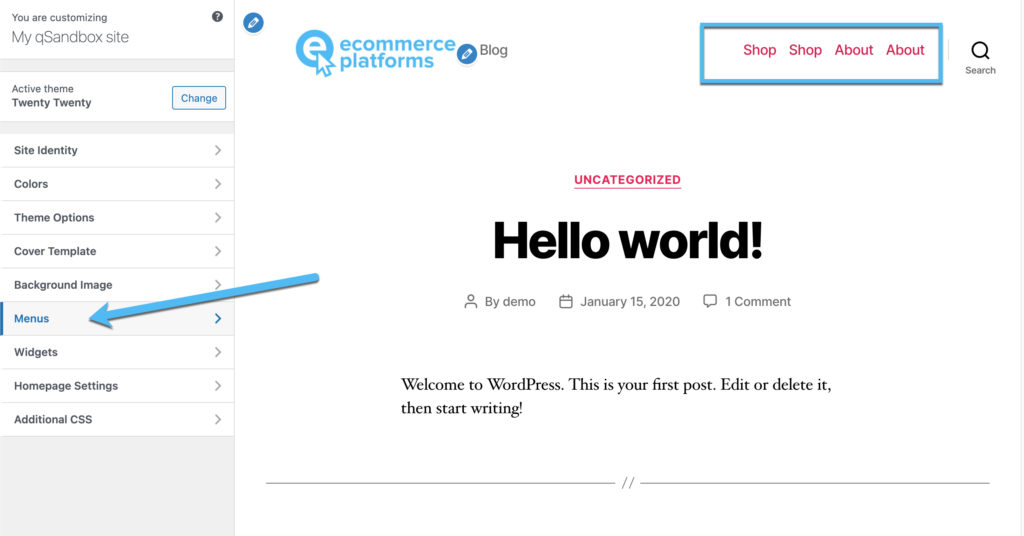
Click on the Create New Menu button to proceed.
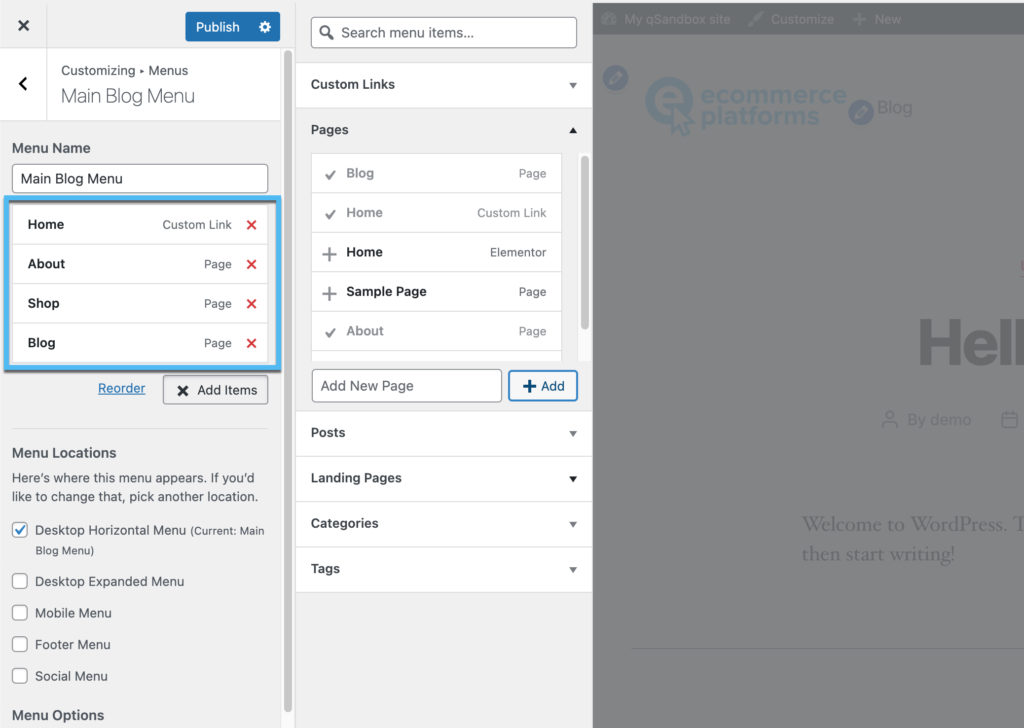
Fill in the Menu Name, and specify where you want that menu to appear. You may have several locations to place a menu on your theme, but the desktop or main menu area is for the primary menu that gets shown on all pages at the top of your website.

Moving onward, be sure to click the Add Items button. This shows a selection of ways to add pages or links to your menu. For instance, you can add previously created pages or posts to the menu or make your own links.

Each one you add appears underneath the menu you just created. Feel free to remove or add as many items as you want, but don't go overboard as a cluttered menu pulls away from your content.
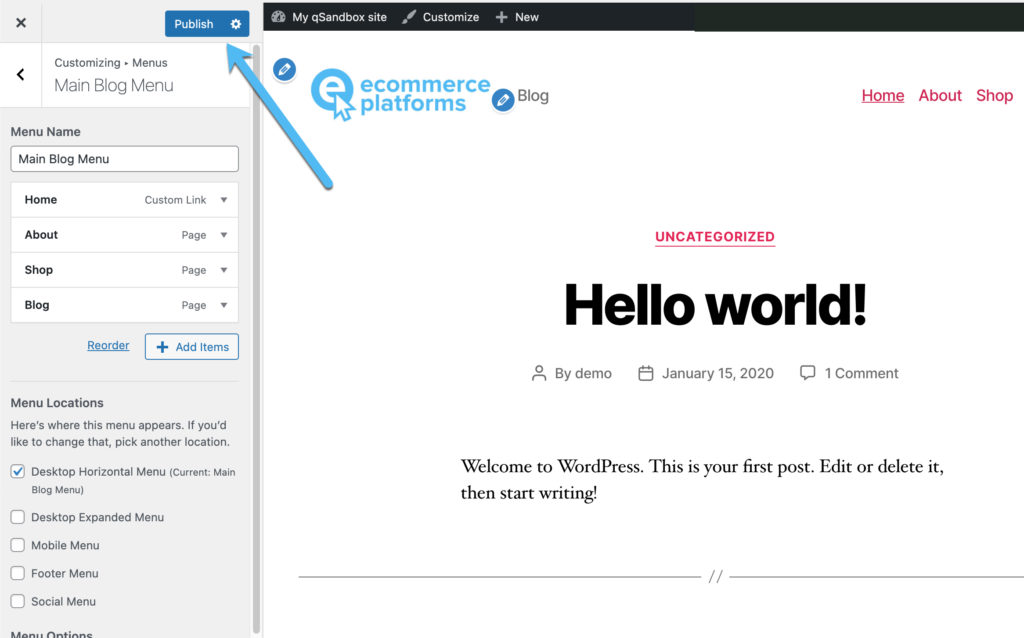
You can now see the completed menu in the screenshot below. We have four buttons, one to the Homepage, another to an About page, and a third to the Shop (if you plan on having a Shop). We also have a link to the blog to help people get around a little easier.

Remember that every change you make in the WordPress Customizer needs to be Published to take effect on your website's design.
How to Start a WordPress Blog Post
Learning how to start a WordPress blog is nothing without writing and publishing a few blog posts. That's the heart of your publication, so it's important to understand the easiest way to go about making articles.
In the WordPress dashboard, go to Posts > Add New. You can also edit a previously created blog post by clicking on one of the items on the post list. However, a new website probably doesn't have any posts, unless they were imported with the demo content.

This brings up the WordPress Gutenberg page builder. It's also possible you have another page builder installed on the website. If that's the case, feel free to create and edit your blog posts in that.
However, the Gutenberg editor does a wonderful job of organizing your post and providing quick article-building tools.
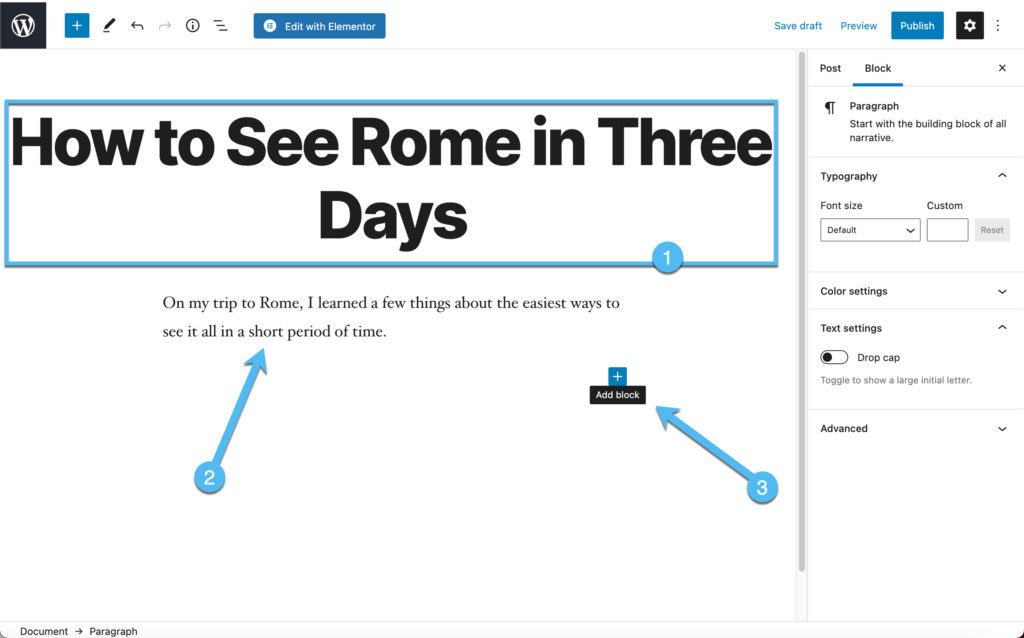
Begin by setting a title for your post. Then go into the content editor to include elements like paragraphs and images.
Click on the Add Block button to see the wide range of content blocks available. For instance, you can insert videos, columns, and lists, all from that quick button.
Search for the block of your choice and click on it to activate the block within the editor.
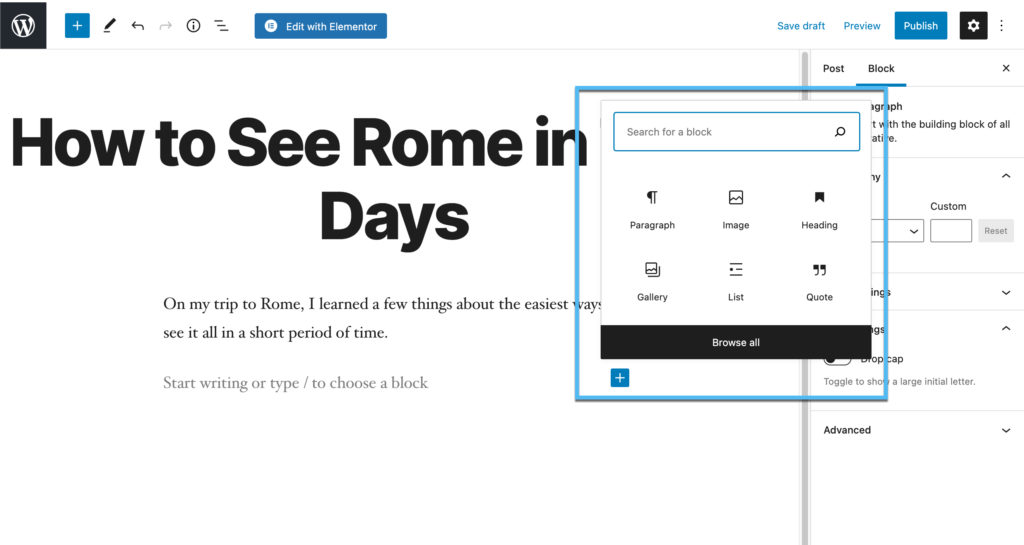
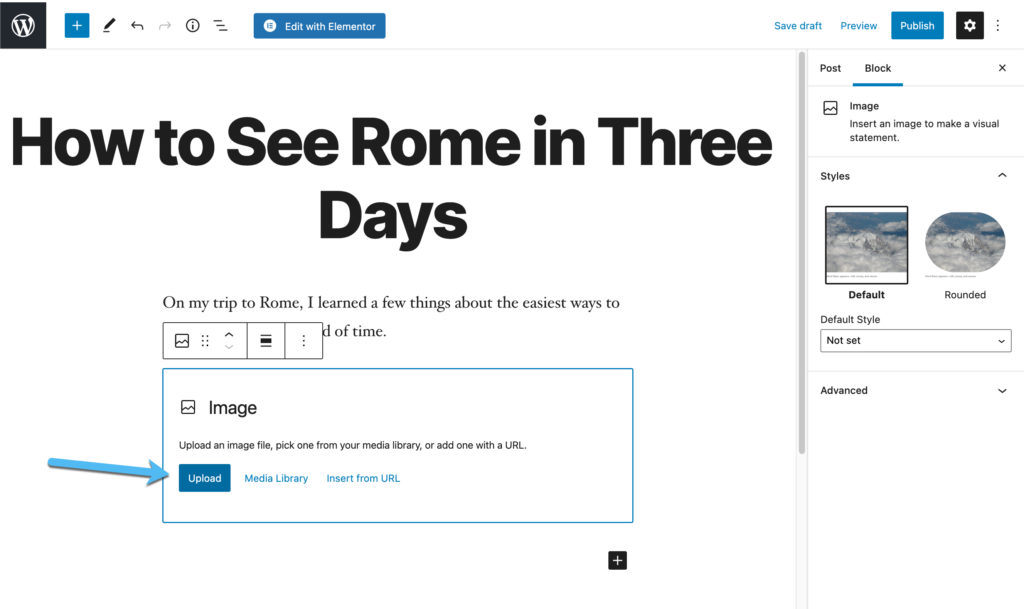
For this instance, we'll add an Image block. You can either upload an image from your computer or select the Media Library to use a photo you've already uploaded to the site.
As you can see, uploading an image has now placed a relevant photo inside the blog post.
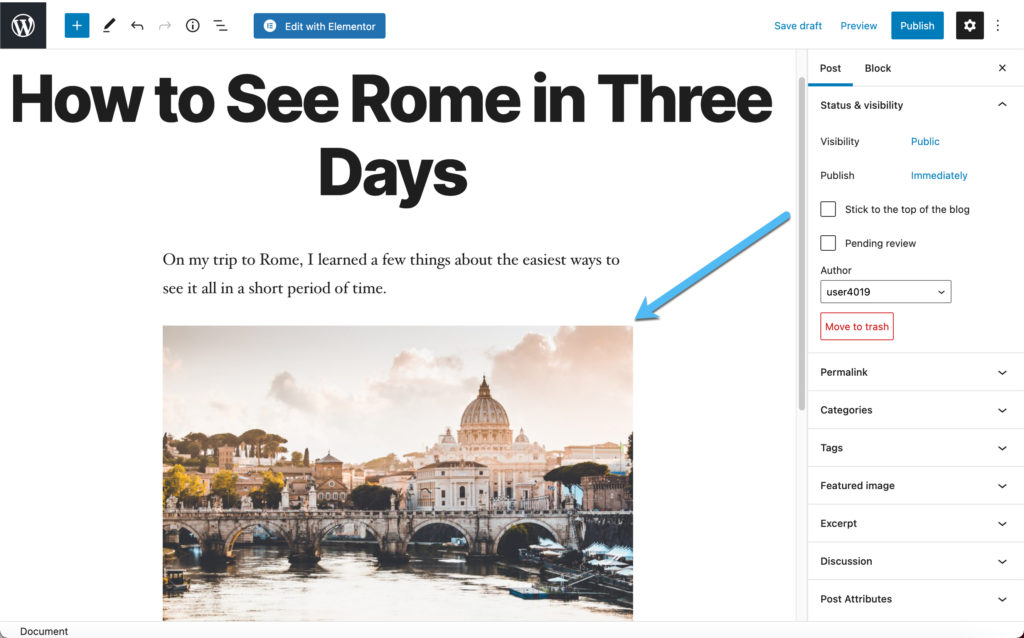
WordPress also provides several Block and Post Settings on the right-hand side. One way to quickly optimize your post is to add a relevant and keyword-optimized Alt Text for all images in your article.

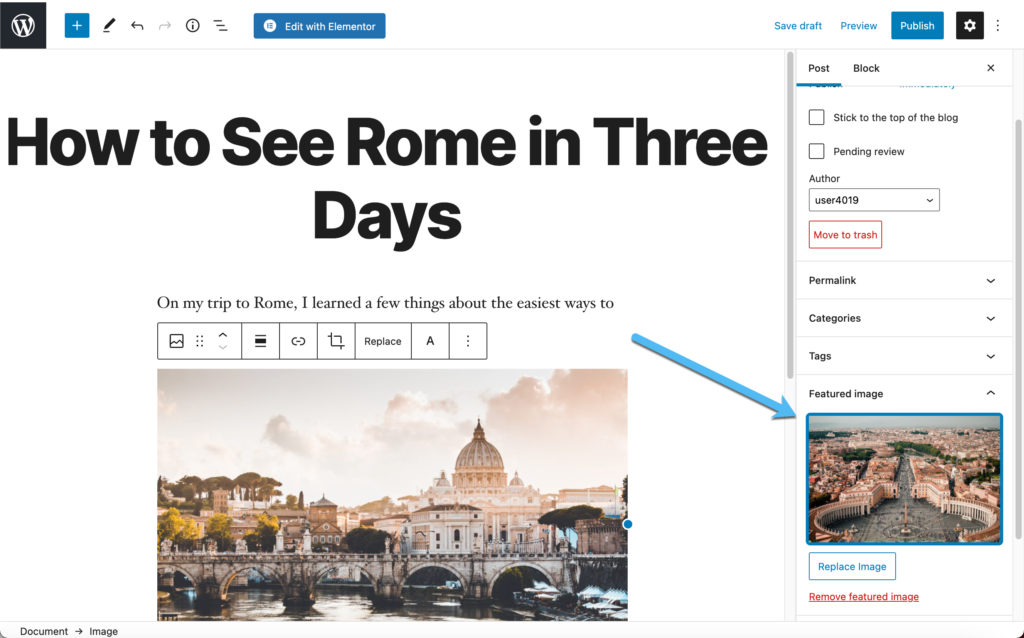
Go to the Post tab to specify categories, set tags, and more.

In particular, we recommend uploading a featured image, as this is the image that appears in blog feeds (like your potential homepage), widgets, and galleries. It's important to remember that the first image you insert into the post content has nothing to do with the featured image. That can be a little confusing for those just learning how to start a WordPress blog.

The Featured Image is shown as a thumbnail in your post editor.
Click on the Publish button after you're done with your article to see it on the frontend and for every visitor to read your content.
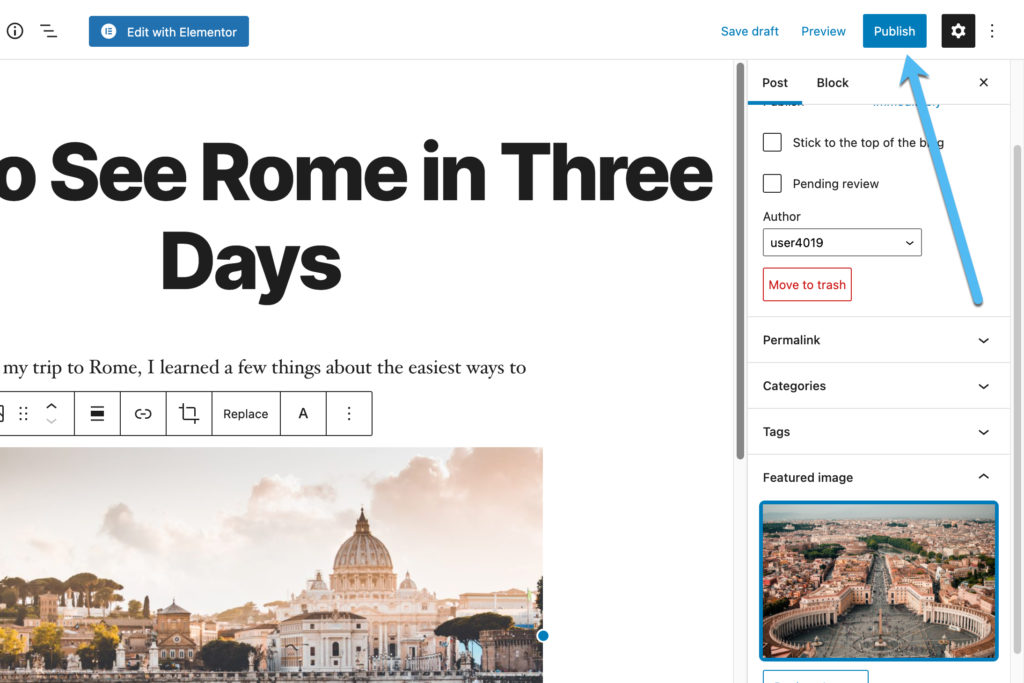
Make sure you preview the entire post on the frontend to ensure everything looks formatted and you didn't miss any typos or grammatical errors.

Finally, you can go to your Blog page, or the Homepage, depending on where you have your blog posts showing up after publication.
This places the most recent blog post at the top of the feed, with past articles pushed one spot lower to make room for the new one.

Additional Tips on How to Start a WordPress Blog
Although making a WordPress blog only takes a few minutes or hours (depending on how much you customize) the content creation and customization process doesn't have to end there.
WordPress is filled with features to get started now with extra pages (like FAQs and contact pages), email sign-up forms, and more. Therefore, we recommend considering the following tips and best practices that primarily relate to building your followership and organic traffic as time passes:
- Make a contact form so people can reach out to you. Design a simple page in WordPress and add a free contact form, like with the Site Kit by Google plugin. Don't list your contact information. Forms minimize spam since bots can't strip your contact information from the page.
- Configure some sort of tracking tool to expand upon the statistics provided by WordPress. The WordPress stats may work for some blogs, but you gain more insight about your visitors if you consider Google Analytics. Some themes have fields for linking to Google Analytics. Or consider installing the Site Kit by Google plugin.
- Optimize your WordPress blog for SEO. Read our SEO technical guide and utilize tools for metadata on pages and posts, alt tags on images, and optimization plugins like Yoast SEO, Rank Math SEO, and free plugins for caching like W3 Total Cache (to speed up your site).
- Consider a WordPress.com blog instead. WordPress.org is the self-hosted version of WordPress, whereas WordPress.com offers a hosted solution. It's often easier for beginners since the entire hosting process is managed and in the same place as your blog. However, the monthly pricing gets a little high for the added convenience.
- Start building your email list with a form tool from MailChimp, MailPoet, or the built-in WordPress email marketing feature. Email marketing is the best way to grow your blog, and it's often free for smaller blogs.
- Think about how to monetize your blog by using affiliate marketing, an online store, or advertising.
- Sign up for the many online WordPress resources to read about the best ways to make money online, optimize your blog posts, and reach out to new readers. staging.ecommerce-platforms.com is a great resource from the ecommerce side of things. You can also search for many WordPress-specific forums and blogs, including ThemeIsle, CodeInWP, Elegant Themes, WPBeginner, and WPExplorer.
Our Conclusion on How to Start a WordPress Blog
From finding the right hosting company to publishing your first blog post, the WordPress blogging journey makes for an excellent learning experience and the opportunity to make a name for yourself online. Some people only want to blog online as a hobby, but it's also possible to make money online if you focus on a niche topic like travel for middle-aged women or cooking on a budget.
We wish you the best of luck on that blogging journey. Be sure to let us know in the comments if you have any questions on how to start a WordPress blog.


Comments 0 Responses